• Welcome to ClassicBroncos! - You are currently viewing the forums as a GUEST. To take advantage of all the site features, please take a moment to register. It's fast, simple and absolutely free. So please join our community today!
    If you have problems registering or can't log into your account, please contact Admin.

problem SOLVED!! Explorer 4g install......Viperwolf?...Bowsher??

Crush

Contributor
Bronco Guru
Joined
May 30, 2007
Messages
3,463
Loc.
Greenbottom, WV
Can someone tell me exactly what stock wires can be removed and not needed and the what wires go where. I ve read the article in the tech section and going by it incan unplug the end of the wiring harness and wire in the 4g. But then my brain is asking me how the rest of the truck gets power after that?!?!? So confused.

Oh, its a 77 bronco and 2001 expy 4g. I am also using the expy wiring harness for the starter/batt/alt

Thanks
 
Last edited:

Broncobowsher

Total hack
Joined
Jun 4, 2002
Messages
35,048
I know, but I don't know stock wiring colors enough to give a good answer.
The regulator has 3 function wires on it. The alternator has 2. The charge wire I consider a given. With the higher output of the 4G you need a bypass to avoid passing all that current through the stock wiring, which really has a hard time handling stock output alternators.

Back to the regulator you are trying to delete.
The F wire goes to the old alternator, no longer needed.
The I wire is the ignition. It turns the alternator on. This is switched power. The 4G needs this.
Then there is a battery wire. Also sometimes called a "sense" wire. This is a feed directly to the battery. The idea of this is the regulator can sense the voltage at the battery, without any voltage losses through the rest of the electrical system. They knew the stock wiring was not that good when they designed it so they built in a fix. The 4G has this sense wire as well. Many times it is simply hooked up to the alternator output. This does work, but isn't the best. It limits the alternator output to the set point, but can allow the battery/system voltage to run lower due to the voltage drop in the charge wire. Ideally the sense wire should go as close to the battery as possible and not connected to anything that will place a load in it. If you do just connect it to the alternator output just make sure the charge wire is heavy enough to avoid a voltage drop under load

So those are the 3 wires that are attached to the regulator. One is deleted. The other two go to the alternator. At least one of them (the turn on wire) does anyway. I prefer the sense wire to head to the alternator.

Now the extra oddball wire(s) you may encounter. Ground wires are simple enough, just put them to a ground on the engine/alternator. If you have a wire connected to the "S" on the alternator, and you have an electric choke, things will now get interesting. The stator is only making power when the engine is running, not if the key is on but actually running. It is a raw tap from inside the alternator. It heats the choke circuit on the carb. This way the choke is only warming up and opening while the engine is running and not just opening up when the key is on. If you have EFI, or manual choke, this isn't a problem. If you happen to still be running the electric choke, now we need to be creative. The stock Ford/Motorcraft/Autolite carb like 9V for the heater. Aftermarket carbs can be either 9V or 12V. The dirty way around this it to wire into the ignition circuit. Really bad way is the positive on the coil. Bad thing is this puts extra load on the ballast resistor wire and drops ignition voltage. Goodbye power and economy. Better would be to tap off the ignition switched wire just ran to the alternator. That gets you 12V when the key is on, but regardless if the engine is running or not. Oil pressure safety switch for an electric fuel pump can be added, now it is only hot with the key on and with oil pressure. Still 12V. If you want the stock 9V or so for the stock carb, a generic ignition ballast resistor can be added inline. Now you have the stock choke voltage (or pretty close to it) that only applies when the engine is running with oil pressure. All that because they no longer needed the stator post on EFI engines that the 4G came off of.
 

Viperwolf1

Contributor
electron whisperer
Joined
Aug 23, 2007
Messages
24,335
The 4G can deliver more current than the old 10g charge wire can safely handle. You need to run a new charge wire directly to the battery or battery side of the starter solenoid. Use 6g or larger wire.

The old 1G regulator can go away. It should have had 3 wires going to the connector, a yellow, a green-red and an orange. The yellow came straight from the battery side of the starter solenoid. The green-red comes from the ignition sw. and is a switched 12V wire (handy to have for underhood accessories). The orange went to the alternator. There may also be a black wire going to the regulator mounting screw. That also went to the old alternator.

You should have a 10g black wire on the battery side of the starter solenoid. There is actually a fusible link on that end of it, probably 6" long. This wire provides all the power inside. The other end of this 10g wire is the old alternator charge wire. You can attach this end to the battery side of the starter solenoid also. If you do you need to add a fusible link to it.
 
OP
OP
Crush

Crush

Contributor
Bronco Guru
Joined
May 30, 2007
Messages
3,463
Loc.
Greenbottom, WV
So when running the 4g and a pgm starter i can eliminate the old voltage regulator and wires completely. Right? Then the only wire i need out of the original harness is the black wire with the fusible link in it and the s an interminal wires from the solenoid relay. But ind definately do need a mega fuse in the wire from the alt to the solenoid relay. I Think i got it now. Maybe? Lol
 

Viperwolf1

Contributor
electron whisperer
Joined
Aug 23, 2007
Messages
24,335
So when running the 4g and a pgm starter i can eliminate the old voltage regulator and wires completely. Right? Then the only wire i need out of the original harness is the black wire with the fusible link in it and the s an interminal wires from the solenoid relay. But ind definately do need a mega fuse in the wire from the alt to the solenoid relay. I Think i got it now. Maybe? Lol

You do need a switched 12V wire to turn the 4G on. I wouldn't say you need the megafuse but it's nice to have if you ever drop a wrench across the top of the alternator.
 
OP
OP
Crush

Crush

Contributor
Bronco Guru
Joined
May 30, 2007
Messages
3,463
Loc.
Greenbottom, WV
Thanks viper and bowsher. Just to be clear. From the bronco harness I need to hook back up the...
black power supply wire with the fuseable link
Yellow wire on the battery side of the solenoid relay
Read and black push on wires of the solenoid relay
I can delete the orange wire from the old regulator to the alt and the black 10g wire from the harness to the alt

Correct?
 
OP
OP
Crush

Crush

Contributor
Bronco Guru
Joined
May 30, 2007
Messages
3,463
Loc.
Greenbottom, WV
Also. My old solenoid relay isnt marked so indont know which post is a which. The red and black push on wires for the small posts. What do they do and which one goes on i and s

Thanks again
 

Broncobowsher

Total hack
Joined
Jun 4, 2002
Messages
35,048
As I pointed out I don't know factory color codes.

But the solenoid is pretty simple. A test light can help a lot there.
The "I" post is for the ignition. It is a secondary output of the solenoid that gives a voltage boost to the ignition system while starting the engine.
The "S" post is the signal from the ignition switch to start. It is the power into the solenoid for it to function.
There is a third that you need to know about. The mounting bracket is the ground. It must be attached to the body to be grounded for the solenoid to work. If it isn't bolted down making a good ground, it isn't going to work.

The "I" post will have some power to it whenever the key is in run. It may be full 12V if the points are open or closer to 9V if the points are closed (or the electronic version of points). This may or may not have voltage present with the key turned to start. But that doesn't matter, once hooked up to the correct post on the solenoid it will be powered by the solenoid to keep the voltage up during the start. So that should be enough to get those two wires hooked up. This is universal regardless of what color the wires are.

Now I saw a comment about a PMG starter. This takes a little extra special wiring. There is a solenoid built into this starter with a little wire for it. The most common and easiest (and incorrect) way of hooking this up is to jump it to the big power wire. This will cause the starter to hang up a little bit. Once the engine starts and the key is released from the start position the starter is still spinning. Being a PMG it acts like a generator as it spins down. With the solenoid attached to the to the input power of the starter that is now an output from the starter acting as a generator it will keep the solenoid pulled in until the starter slows enough to stop making electricity.

The correct way (Ford did it this way in the early years of the PMG starter) is to move the big heavy battery cable from the switched post of the solenoid to the battery side. That is battery power to the solenoid 100% of the time. But you take that little jumper wire and route that back up to the solenoid on the fender. Attach this to the old starter feed post that is now empty. At this point the fender solenoid that once had control over the starter now has control over the starter mounted solenoid. But you also keep the ignition feed during start (that "I" wire on the solenoid). This same setup was also the aftermarket fix for the older GM starters that suffered from solenoids that would not pull in strong enough for the starter to work right. This is how GM owners used a Ford part to fix there starters. So it may feel a little redundant but it is a good way of doing it.

The "S" will only have voltage present while the key is turned to start.
 
OP
OP
Crush

Crush

Contributor
Bronco Guru
Joined
May 30, 2007
Messages
3,463
Loc.
Greenbottom, WV
Thanks bowsher. That clears up some confusion i had. Already had the starter down. Im using the wiring harness off the explorer. Just so i had the factory wires to the pmg starter. It was meshing both the 4g and pmg with the bronco harness where inwas having problems. But i think i got it now
 
OP
OP
Crush

Crush

Contributor
Bronco Guru
Joined
May 30, 2007
Messages
3,463
Loc.
Greenbottom, WV
Viper. That alt charge wire on the other end of the inside power feed wire. Can i just eliminate it or does it have to connected to the batt side of the solenoid?
 

mattt

Bronco Guru
Joined
Sep 23, 2006
Messages
3,810
Here is how I wired mine with a PMG starter, 4G Exp Alternator & factory cables. I eliminated the factory Bronco starter solenoid and switched to a solenoid out of a later truck, Explorer, whatever, that was factory EFI. I did that for 2 reasons....1, it is a cleaner and more compact for where I wanted to move it. 2, there is some disagreement out there if the newer type solenoid has diode?? protection for the EEC, preventing voltage spikes from reaching the EEC. I went with the idea that the newer solenoid does offer protection to the EEC, otherwise why did Ford change the solenoid on later year vehicles? I dunno....

Now, back to the wiring.....With moving the solenoid up next to the battery, mounted on the inner fender apron, I chose to shorten the factory Bronco harness, and only use what is necessary. My Bronco is a 69, not sure if other years are the same colors. If I remember correctly from 2011, I only used 4 wires from the Bronco harness, 2 heavier gauge power wires black & black w/ yellow stripe, green w/ red stripe, and red w/ blue stripe. The original brown wire that went to the other factory solenoid post was left in the loom and capped off.

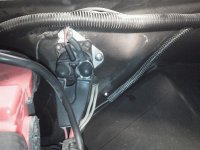
1) The 2 heavier gauge wires(black & black w/ yellow stripe) are what powers everything inside the cab. You really only need to use one of them, but if you leave the other dangling, it will be live power just hanging there. If I understand correctly, those two wires are the "loop" that made the factory Ampmeter work. They looped thru the "loop" on the back side of the Ampmeter, which sensed how much the system was charging. These 2 can be seen in the pic, attached to the right side solenoid post at 12 o clock, after dropping out of the main loom. Both of them now have a fusible link downstream of the solenoid post.

2) Green with red stripe is the Alternator "excite" power, which turns the Alt on once running. I can't remember where it went initially, but mine is now connected to the same color wire on the factory Explorer alternator plug. The factory Explorer alternator plug has one more wire in it that is yellow w/ white stripe. The Explorer serp tech article mentions where to wire that into, and I think it's to battery voltage. I soldered mine up with the large charge wire where I connected factory fusible links from an Explorer. Green w/ red stripe wire can be seen in the pic dropping out of the main loom before the solenoid and running down the apron/inner fender seam where it joins all the other wires going to the engine, starter, & alternator. The heavy gauge Alt. charge wire(s) fusible link can be seen attaching to the right side solenoid post at 5 o clock.

3) The last of the 4 is the solenoid power wire which is red w/ blue stripe. That is key power to activate the solenoid which engages the starter. It's going to the single post on the solenoid at 11 o clock.

As you might recognize, I also used factory battery cables from a truck, not an Explorer, that are all pre-wired for PMG starter. That is what the other black rubber connector end cabling is coming off the bottom of the solenoid. That power harness, the ground cable harness with 3 ground points(engine, body & frame), and the Alternator wiring pass across the inner fender where it meets the battery tray on their way to the starter, engine, and alternator. The body ground can be seen attached to the upper mounting screw for the solenoid, where I tied in a few other important grounds by soldering all of them together.

I'm sure there are other ways to wire it all up, but take your time and once you know which wire is what, it's pretty easy. I was not sure at first, but the more I studied & understood it all, it became easy and made logical sense.
 

Attachments

  • 4g-soln.JPG
    4g-soln.JPG
    102.4 KB · Views: 86
OP
OP
Crush

Crush

Contributor
Bronco Guru
Joined
May 30, 2007
Messages
3,463
Loc.
Greenbottom, WV
Mattt. Thanks a bunch. That confirms alot of my suspicions. I too have a new type solenoid and that was for some of the same reasons you chose to. I am, however, staying carbed and duraspark for now but it still cleans up the area. I used the explorer wiring cause that is what i had. When i used the truck stuff on my buddies it was much easier for some reason. Lol.
 

mattt

Bronco Guru
Joined
Sep 23, 2006
Messages
3,810
What is different in the Explorer battery & starter cables vs. a truck? I'll have to take a look next time I see one. Good luck with the project.
 
OP
OP
Crush

Crush

Contributor
Bronco Guru
Joined
May 30, 2007
Messages
3,463
Loc.
Greenbottom, WV
Truck has that y thing at the solenoid relay. Explorer has a wire from the batt to the starter. Wire from the batt to the power distribution box. The. A bunch of crapin between there and the solenoid i think. But anyway. Then there is a wire from the alt to the solenoid and the ground wire from the batt. All that is taped up in one harness Plus there are three smaller wires in a branch of the harness. Two of them go from the alt to about where my solenoid goes and one runs from the same solenoid place to the starter. I believe that the power wire from the batt and the alt wire use to hook up to a breaker/fuze/or distribution block and then something went to the solenoid from there. But the harness i have had all the wires i needed in the right place so I used it. Im going to have to put new ends on the wires going to the solenoid to be able to fit the posts but it seems to be working out pretty good. I Will draw anpic later and post when i can get to a pc
 
Top