• Welcome to ClassicBroncos! - You are currently viewing the forums as a GUEST. To take advantage of all the site features, please take a moment to register. It's fast, simple and absolutely free. So please join our community today!
    If you have problems registering or can't log into your account, please contact Admin.

Project: 76, Orange Special Decor

OP
OP
gnsteam

gnsteam

Contributor
Bronco Guru
Joined
Jan 29, 2010
Messages
3,522
Loc.
Lincoln NE
Thank you Pat. Glad to see your out enjoying your rig. Your build has been an inspiration to me.

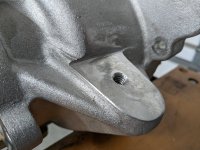
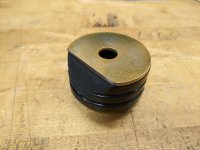
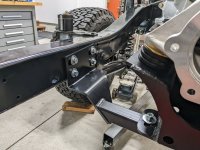
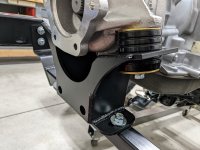
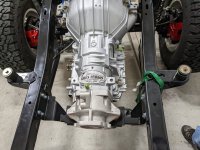
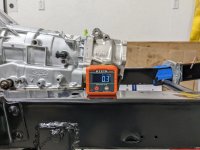
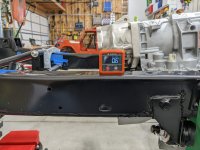
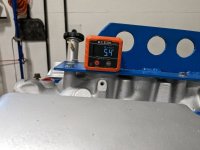
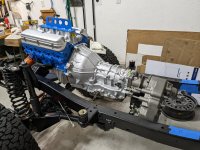
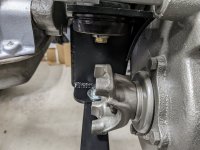
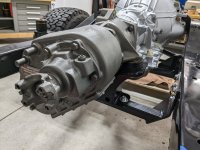
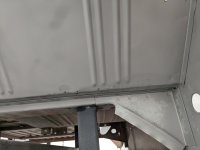
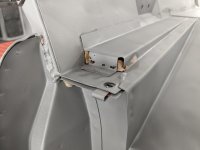
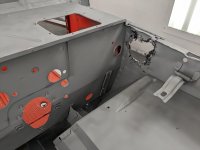
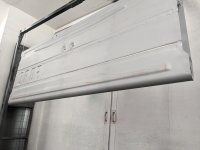
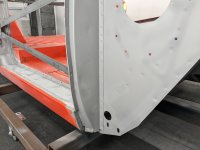
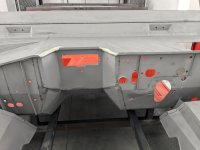
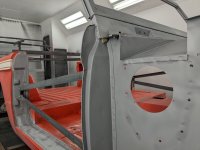
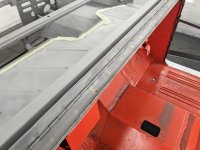
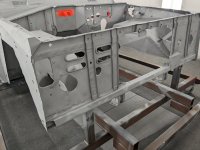
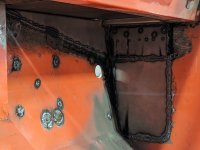
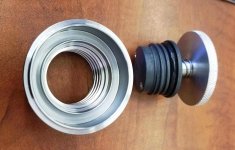
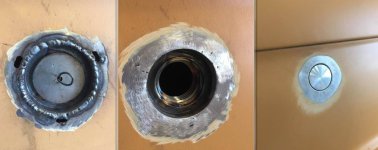
This afternoon, I mocked up the Tom's Off Road, AOD crossmember. The first thing you need to do. Is remove some of the aluminum around the mounting point on the AA, 4R70W to Dana 20 adaptor. The surfaces are machined leaving a large radius around the mounts bolt hole. however the radius does not clear the large bushing washer. So you need to remove the material back to the housing. And remove a portion of the washer to get it to lien up with the mounts bolt hole. You also have to clearance one side of the large poly bushing to clear the AA housing. See pictures below. Once this is accomplished, it's a matter of attaching the AA housing onto the end of the transmission, and bolting the crossmember assembly to the frame. Add the bushing washers and bolts and it all fit together nicely.
 

Attachments

  • PXL_20221123_182610972.jpg
    PXL_20221123_182610972.jpg
    253 KB · Views: 47
  • PXL_20221123_182616521.jpg
    PXL_20221123_182616521.jpg
    188.6 KB · Views: 41
  • PXL_20221123_182620079.jpg
    PXL_20221123_182620079.jpg
    180.4 KB · Views: 40
  • PXL_20221124_014255511.jpg
    PXL_20221124_014255511.jpg
    151.6 KB · Views: 37
  • PXL_20221123_202613654.jpg
    PXL_20221123_202613654.jpg
    193 KB · Views: 42
  • PXL_20221123_202624340.jpg
    PXL_20221123_202624340.jpg
    199.4 KB · Views: 43
  • PXL_20221123_202642684.jpg
    PXL_20221123_202642684.jpg
    174.7 KB · Views: 43
  • PXL_20221123_202648399.jpg
    PXL_20221123_202648399.jpg
    225 KB · Views: 50
OP
OP
gnsteam

gnsteam

Contributor
Bronco Guru
Joined
Jan 29, 2010
Messages
3,522
Loc.
Lincoln NE
After bolting the transmission crossmember in and bolting down everything tight. I set my digital level in a few places around on the engine and frame. I'm no expert but it looks like thing are pretty plumb considering. Opinions appreciated.
 

Attachments

  • PXL_20221123_203224989.jpg
    PXL_20221123_203224989.jpg
    149.6 KB · Views: 28
  • PXL_20221123_203156165.jpg
    PXL_20221123_203156165.jpg
    173.1 KB · Views: 25
  • PXL_20221123_203119126.jpg
    PXL_20221123_203119126.jpg
    120.8 KB · Views: 23
  • PXL_20221123_203006128.jpg
    PXL_20221123_203006128.jpg
    136.6 KB · Views: 22
  • PXL_20221123_202944752.jpg
    PXL_20221123_202944752.jpg
    186.7 KB · Views: 22
  • PXL_20221123_202859706.jpg
    PXL_20221123_202859706.jpg
    155.5 KB · Views: 23
  • PXL_20221123_202813849.jpg
    PXL_20221123_202813849.jpg
    134.8 KB · Views: 29
OP
OP
gnsteam

gnsteam

Contributor
Bronco Guru
Joined
Jan 29, 2010
Messages
3,522
Loc.
Lincoln NE
Hi Dave, yes we need to get together again, it's been awhile. Is your 68 nearing completion?
 
OP
OP
gnsteam

gnsteam

Contributor
Bronco Guru
Joined
Jan 29, 2010
Messages
3,522
Loc.
Lincoln NE
Yesterday's progress, was installing the transfer case. The install went very well with only one hiccup. I had to hook up the engine hoist one more time to remove the transmission support. So you can get to the lower two, tailshaft housing to transfer case bolts.

You will notice in the pictures, that there is little room to spare (adout a half inch) between the front output yoke and the cross member. Probably the last of the Bronco progress for a while. A laundry room remodel is next on the wife's list of upgrades around here. And it has to be done before we host Christmas.
 

Attachments

  • PXL_20221127_230901578.jpg
    PXL_20221127_230901578.jpg
    243.7 KB · Views: 33
  • PXL_20221127_230831619.jpg
    PXL_20221127_230831619.jpg
    181.4 KB · Views: 31
  • PXL_20221127_230824335.jpg
    PXL_20221127_230824335.jpg
    187.1 KB · Views: 24
  • PXL_20221127_230847369.jpg
    PXL_20221127_230847369.jpg
    198 KB · Views: 24
  • PXL_20221127_230854090.jpg
    PXL_20221127_230854090.jpg
    176.8 KB · Views: 23
  • PXL_20221127_230746241.jpg
    PXL_20221127_230746241.jpg
    186.9 KB · Views: 25
  • PXL_20221127_230809178.jpg
    PXL_20221127_230809178.jpg
    201.7 KB · Views: 24
  • PXL_20221127_230650712.jpg
    PXL_20221127_230650712.jpg
    211.2 KB · Views: 34
OP
OP
gnsteam

gnsteam

Contributor
Bronco Guru
Joined
Jan 29, 2010
Messages
3,522
Loc.
Lincoln NE
There hasn't been much to report lately. Took the last three months away from the Bronco for family time and home projects. Yesterday was a big day. The body is finally going to a shop for restoration. I've been an a wait list at a local shop from 07/21, and still waiting with no movement in site. A couple weeks ago. I discovered another local shop I somehow overlooked. The owner and his lead metal guy stopped over Yesterday afternoon to see my project. Great news, they have an opening and they will schedule me in this month. They are very excited to have another Bronco project, so not there first. They will look at there notes and give me a pickup date next week. Just the motivation I needed to get me back in the shop, warmer weather also helps. More to come!
 

Attachments

  • PXL_20211103_023914857.jpg
    PXL_20211103_023914857.jpg
    194 KB · Views: 36
  • PXL_20211103_023855403.MP.jpg
    PXL_20211103_023855403.MP.jpg
    212 KB · Views: 33
  • PXL_20220216_021235510.jpg
    PXL_20220216_021235510.jpg
    170.8 KB · Views: 36

Oldtimer

Contributor
Jr. Member with Sr. moments
Joined
Feb 4, 2005
Messages
821
Loc.
Sunnyvale, CA
Fred,

Make & Model?
Are you happy with it or would you buy different now that you have used it?

2023-03-04_090339.jpg

Thanks, Geoff
 
OP
OP
gnsteam

gnsteam

Contributor
Bronco Guru
Joined
Jan 29, 2010
Messages
3,522
Loc.
Lincoln NE
If you can afford it and have the space. I would purchase a stand alone lathe and milling machine. The mill is this machines very weak link. It does get the job done but you have to take very lite cuts. So it take a lot of time and patience to hit your dimensions and achieving an acceptable finish. The lathe portion works OK but lacks rigidity and horse power when turning larger diameters over 2", cutting steel. Reliability is another issue. I've owned it for 18-20 years and have replaced the control circuit board once and two motors. Getting parts and accessories isn't an issue and Smithy's customer service is good. I am a tooling and die design engineer with 35 years of tool and die experience. And I still have limited access to the equipment at work. So every time a home project comes along. I think about how can I get the job done in my off time at work. Bridgeport mills and Hardinge lathes , makes one very spoiled.
The model is a Smithy Granite 1324 from the late nineties.
Smithy.com
 
OP
OP
gnsteam

gnsteam

Contributor
Bronco Guru
Joined
Jan 29, 2010
Messages
3,522
Loc.
Lincoln NE
Finally a little update on my build. The body was transported to the restoration shop last Thursday. This is the new shop I found a few weeks ago. The shop is Bombers Garage in Lincoln NE. They are very confident that they could knock this out in a few months. So hopefully ready this fall. Sorry for the same old picture. I forgot to take pictures on transport day.
 

Attachments

  • PXL_20220216_021235510.jpg
    PXL_20220216_021235510.jpg
    170.8 KB · Views: 18
OP
OP
gnsteam

gnsteam

Contributor
Bronco Guru
Joined
Jan 29, 2010
Messages
3,522
Loc.
Lincoln NE
Yep, I feel pretty comfortable leaving the body in their hands. I had been on a wait list at an other shop from July of 2021. And I was still third in line when I discovered this shop. Gave them a deposit in April and today it went into media blasting. They are not wasting any time. I hope to have it back later this summer.
 
OP
OP
gnsteam

gnsteam

Contributor
Bronco Guru
Joined
Jan 29, 2010
Messages
3,522
Loc.
Lincoln NE
The new shop is moving along. They have started by doing localized media blasting in the know rust trouble spots. So far very little rust to report. The usual engine bay inter fenders, a little at each end of the cowl area and a few very tiny pin holes at the bend of the driver floor pan. Remarkable how solid this tub is, I'm so lucky.
 

Attachments

  • PXL_20230510_201812259.jpg
    PXL_20230510_201812259.jpg
    110 KB · Views: 36
  • PXL_20230510_201809426.jpg
    PXL_20230510_201809426.jpg
    114.9 KB · Views: 34
  • PXL_20230510_202227651.jpg
    PXL_20230510_202227651.jpg
    136 KB · Views: 33
  • PXL_20230510_202044909.jpg
    PXL_20230510_202044909.jpg
    96.7 KB · Views: 31
  • PXL_20230510_201831529.jpg
    PXL_20230510_201831529.jpg
    81.1 KB · Views: 33
  • PXL_20230510_202109009.jpg
    PXL_20230510_202109009.jpg
    112.8 KB · Views: 30
  • PXL_20230510_201825276.jpg
    PXL_20230510_201825276.jpg
    112.6 KB · Views: 29
  • PXL_20230510_202009253.jpg
    PXL_20230510_202009253.jpg
    112 KB · Views: 39
OP
OP
gnsteam

gnsteam

Contributor
Bronco Guru
Joined
Jan 29, 2010
Messages
3,522
Loc.
Lincoln NE
And a few more pictures just because.
 

Attachments

  • PXL_20230510_201842565.jpg
    PXL_20230510_201842565.jpg
    106.6 KB · Views: 31
  • PXL_20230510_201658784.jpg
    PXL_20230510_201658784.jpg
    144.9 KB · Views: 30
  • PXL_20230510_202126892.jpg
    PXL_20230510_202126892.jpg
    204.2 KB · Views: 28
  • PXL_20230510_202128906.jpg
    PXL_20230510_202128906.jpg
    197.4 KB · Views: 26
  • PXL_20230510_202122086.jpg
    PXL_20230510_202122086.jpg
    136.2 KB · Views: 27
  • PXL_20230510_202116586.jpg
    PXL_20230510_202116586.jpg
    176.6 KB · Views: 32
  • PXL_20230510_201802968.jpg
    PXL_20230510_201802968.jpg
    151 KB · Views: 27
  • PXL_20230510_201756439.jpg
    PXL_20230510_201756439.jpg
    177.7 KB · Views: 27
  • PXL_20230510_201805740.jpg
    PXL_20230510_201805740.jpg
    127 KB · Views: 26
  • PXL_20230510_202012431.jpg
    PXL_20230510_202012431.jpg
    145.4 KB · Views: 32
OP
OP
gnsteam

gnsteam

Contributor
Bronco Guru
Joined
Jan 29, 2010
Messages
3,522
Loc.
Lincoln NE
More? Why not.
 

Attachments

  • PXL_20230510_202058110.jpg
    PXL_20230510_202058110.jpg
    68 KB · Views: 25
  • PXL_20230510_201828175.jpg
    PXL_20230510_201828175.jpg
    127.8 KB · Views: 25
  • PXL_20230510_202052991.jpg
    PXL_20230510_202052991.jpg
    107.9 KB · Views: 20
  • PXL_20230510_202014938.jpg
    PXL_20230510_202014938.jpg
    119.3 KB · Views: 18
  • PXL_20230510_201950378.jpg
    PXL_20230510_201950378.jpg
    157.3 KB · Views: 19
  • PXL_20230510_201952236.jpg
    PXL_20230510_201952236.jpg
    144.6 KB · Views: 19
  • PXL_20230510_201921120.jpg
    PXL_20230510_201921120.jpg
    180.6 KB · Views: 17
  • PXL_20230510_201837956.jpg
    PXL_20230510_201837956.jpg
    113.6 KB · Views: 19
  • PXL_20230510_201935844.jpg
    PXL_20230510_201935844.jpg
    148.6 KB · Views: 18
  • PXL_20230510_201929869.jpg
    PXL_20230510_201929869.jpg
    164.7 KB · Views: 24
OP
OP
gnsteam

gnsteam

Contributor
Bronco Guru
Joined
Jan 29, 2010
Messages
3,522
Loc.
Lincoln NE
And some overall shots.
 

Attachments

  • PXL_20230510_201935844.jpg
    PXL_20230510_201935844.jpg
    148.6 KB · Views: 28
  • PXL_20230510_202209810.jpg
    PXL_20230510_202209810.jpg
    148.5 KB · Views: 22
  • PXL_20230510_202216662.jpg
    PXL_20230510_202216662.jpg
    134.8 KB · Views: 20
  • PXL_20230510_202227651.jpg
    PXL_20230510_202227651.jpg
    136 KB · Views: 21
  • PXL_20230510_202148946.jpg
    PXL_20230510_202148946.jpg
    168.9 KB · Views: 29
OP
OP
gnsteam

gnsteam

Contributor
Bronco Guru
Joined
Jan 29, 2010
Messages
3,522
Loc.
Lincoln NE
Today I made another stop at the body shop. They are moving right along. Raising thr cowl, patching up the rust in the engine compartment and filling in unwanted holes. They also asked me, if I could bring over the chassis next week. So they can get everything squared up. So far I'm very impressed with this shop. Here are some more progress pictures Also a picture of what $3900.00 in paint and prep supplies looks like.
 

Attachments

  • PXL_20230526_203128804.jpg
    PXL_20230526_203128804.jpg
    180.9 KB · Views: 39
  • PXL_20230526_203408146.jpg
    PXL_20230526_203408146.jpg
    156.6 KB · Views: 35
  • PXL_20230526_203439676.jpg
    PXL_20230526_203439676.jpg
    137.5 KB · Views: 28
  • PXL_20230526_203141394.jpg
    PXL_20230526_203141394.jpg
    151.8 KB · Views: 27
  • PXL_20230526_203338080.jpg
    PXL_20230526_203338080.jpg
    220.6 KB · Views: 28
  • PXL_20230526_203116201.jpg
    PXL_20230526_203116201.jpg
    138.8 KB · Views: 31
  • PXL_20230522_204619374.jpg
    PXL_20230522_204619374.jpg
    225.5 KB · Views: 35
  • PXL_20230526_203314289.jpg
    PXL_20230526_203314289.jpg
    213.8 KB · Views: 36
  • PXL_20230526_203217751.jpg
    PXL_20230526_203217751.jpg
    146 KB · Views: 37

LUBr LuvR

Contributor
Bronco Guru
Joined
Dec 31, 2015
Messages
1,956
Nice to see a lot of progress after the other shop had stalled out on you for so long. Looking good, and yes - that body is better than most could hope for!
 

JeffG

Contributor
Sr. Member
Joined
May 7, 2004
Messages
510
Loc.
San Antonio, TX
They are moving right along! The pic of the passenger side rear corner; are you flipping the marker lights vertical like a '77? I didn't see a close up of the driver side, but I assume you are adding a fuel door. I just picked up a fuel door cut-out to add to my project. I'm building a '77 that came to me with an earlier tub. I decided to add the main fuel door only and I'm on the fence on moving the marker lights too or eliminating them.
 
OP
OP
gnsteam

gnsteam

Contributor
Bronco Guru
Joined
Jan 29, 2010
Messages
3,522
Loc.
Lincoln NE
Hi Jeff, I was going to have the shop install one of their take off fuel doors from various vehicles that they had stashed. When adding the fuel door, I was assuming the side marker light needed to be moved to the tail light housing for clearance reasons. Now I am going in another direction and the side marker light will remain in the original location. I purchased a motorcycle fuel tank, pop up fuel filler cap. I saw this application on JefeAz's, F8 Lubr Build. Doing this will save me a little cost at the shop. The following pictures are from JefeAZ's build. I hope he doesn't mind me posting them here. It's a great build.
 

Attachments

  • pMtyqgy.jpg
    pMtyqgy.jpg
    187.5 KB · Views: 20
  • XQeqFBZ.jpg
    XQeqFBZ.jpg
    70.5 KB · Views: 18
  • Y7l84zf.jpg
    Y7l84zf.jpg
    107.9 KB · Views: 15
  • xywDSDl.jpg
    xywDSDl.jpg
    175.9 KB · Views: 14
  • AUnIfSu (1).jpg
    AUnIfSu (1).jpg
    86.2 KB · Views: 18
  • bBQ0FIi.jpg
    bBQ0FIi.jpg
    154.7 KB · Views: 20
Top