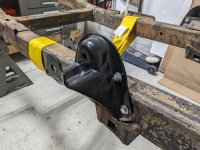
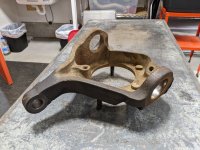
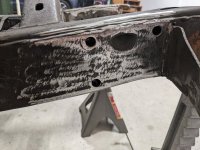
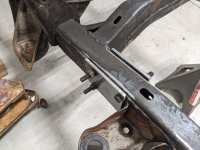
• Welcome to ClassicBroncos! - You are currently viewing the forums as a GUEST. To take advantage of all the site features, please take a moment to register. It's fast, simple and absolutely free. So please join our community today!
    If you have problems registering or can't log into your account, please contact Admin.

Project: 76, Orange Special Decor

OP
OP
gnsteam

gnsteam

Contributor
Bronco Guru
Joined
Jan 29, 2010
Messages
3,522
Loc.
Lincoln NE
Woke up before everyone else in my house this morning and spent the Early morning hours reading through your whole build thread. This is a great read, all the way from when you first bought it up until now. All the distractions like other hobbies, building houses and all the other projects that go along with it. Then eventually getting back to the Bronco as your main focus of interest. Just goes to show that there are more people a lot like myself out there. I enjoyed the first few hours of my day catching up on the story of your Bronco. Keep up the good work and I am going to follow along to see how it turns out.
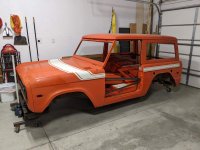
Thank you for the kind words. I’m glad you enjoyed reading through my build. Many more posts to come. I’m expecting January to be a busy month making progress on the build.

Again thanks for watching and Happy Holidays.

Fred
 
OP
OP
gnsteam

gnsteam

Contributor
Bronco Guru
Joined
Jan 29, 2010
Messages
3,522
Loc.
Lincoln NE
Happy new year everyone. I had to work overtime both days this weekend but I did manage to get a little done on the 76. I clean all the grunge off the steering box and Dana 20. I will be sending the steering box out for rebuild but I’m going to go through the Dana 20 myself. I pressed the old ball joints out of the front knuckles. And I also got the new front, leaf spring hangers positioned and bolted to the frame. I will remove them and clean up the frame more before welding.

My next project will be reinforcement of the frame at the steering box. The frame in that area is in good shape but that area is a weak point on our Broncos. Especially when running larger tires.
 

Attachments

  • 658E8A04-2F3E-41A5-BEA2-5BC68CBA5355.jpeg
    658E8A04-2F3E-41A5-BEA2-5BC68CBA5355.jpeg
    202.2 KB · Views: 39
  • 26F1A871-14B2-4BEE-BEAE-0D35E0D5202B.jpeg
    26F1A871-14B2-4BEE-BEAE-0D35E0D5202B.jpeg
    222.1 KB · Views: 39
  • CEDFFEED-9C98-484C-9441-7BFFD8FECB5F.jpeg
    CEDFFEED-9C98-484C-9441-7BFFD8FECB5F.jpeg
    212.5 KB · Views: 37
  • 64E644B3-8D94-47CF-8BFD-91021EF9C79D.jpeg
    64E644B3-8D94-47CF-8BFD-91021EF9C79D.jpeg
    208.4 KB · Views: 37
  • 7B96CBA5-8213-48D0-ACF0-4B1CF61902A5.jpeg
    7B96CBA5-8213-48D0-ACF0-4B1CF61902A5.jpeg
    235 KB · Views: 37
OP
OP
gnsteam

gnsteam

Contributor
Bronco Guru
Joined
Jan 29, 2010
Messages
3,522
Loc.
Lincoln NE
This week I had a blessing in disguise. I was asked to work the evening shift this week and maybe next week to cover for co-works out on Covid. Thus this is giving me more time in the garage and the freedom to take items to the welding shop.

So far this week. I fabricated the parts to reinforce the mount area on the frame where the power steering box mounts. I used 1/4" CRS for the plates. I am not going to replace the factory installed internal frame supports. Because my frame is in good shape and I will not be hard core rock crawling. I have an appointment next Wednesday to have the frame reinforcements and the new front leaf spring hanger welded up. Then the frame will be ready for blasting and paint. I also took the rear 9" to the weld shop and had the new spring perches weld onto the rear 9". A few more items to test fit on the 9" and then the 9" and dana 44 will be ready for blasting and paint.
 

Attachments

  • PXL_20220112_161622728.jpg
    PXL_20220112_161622728.jpg
    211.9 KB · Views: 46
  • PXL_20220112_183011752.jpg
    PXL_20220112_183011752.jpg
    182.2 KB · Views: 42
  • PXL_20220112_183020001.MP.jpg
    PXL_20220112_183020001.MP.jpg
    204.1 KB · Views: 45
  • PXL_20220113_170402231.jpg
    PXL_20220113_170402231.jpg
    182.6 KB · Views: 46
  • PXL_20220113_170409432.jpg
    PXL_20220113_170409432.jpg
    212.2 KB · Views: 49

JeffG

Contributor
Sr. Member
Joined
May 7, 2004
Messages
510
Loc.
San Antonio, TX
Great progress! I'm thinking most Bronco owners have lists in their head for various upgrades and changes. I have had an item on my list for years that I haven't gotten around to doing and that is removing the 9", cutting off the leaf spring perches and welding on new ones for an optimum angle on the yoke.

Maybe 2022 will be my year.
 
OP
OP
gnsteam

gnsteam

Contributor
Bronco Guru
Joined
Jan 29, 2010
Messages
3,522
Loc.
Lincoln NE
Hi Jeff, yes I have a list in my head as well. If I wrote it down I would just loose the list. So as I move along I try to remember all the great mods and ideas I’ve seen from all the greats on this site.
 
Last edited:
OP
OP
gnsteam

gnsteam

Contributor
Bronco Guru
Joined
Jan 29, 2010
Messages
3,522
Loc.
Lincoln NE
Its been very cold this week, so not much work in the garage. But I did manage to take the frame to the welding shop yesterday. Where they welded up the new leaf spring hangers and the reinforcement plates at the power steering mounting point. Sorry no new pictures, man it’s cold again today. Sometime next week, I will be picking up the rebuilt 5.0.
 
OP
OP
gnsteam

gnsteam

Contributor
Bronco Guru
Joined
Jan 29, 2010
Messages
3,522
Loc.
Lincoln NE
Today I picked up the rebuilt 4R70W, from a local rebuilder. The transmission basically a stock rebuild with higher quality parts and fitted with the AA adaptors tail shaft and new housing. Going to mate up to the Dana 20. Which I will try to rebuild myself. Tomorrow is another milestone. I will be picking up the 96, 5.0 from the engine shop.
 

Attachments

  • PXL_20220131_004440882.jpg
    PXL_20220131_004440882.jpg
    227.5 KB · Views: 27
  • PXL_20220131_004448275.jpg
    PXL_20220131_004448275.jpg
    229.9 KB · Views: 26
  • PXL_20220131_004501543.jpg
    PXL_20220131_004501543.jpg
    210.5 KB · Views: 24
  • PXL_20220131_004506898.jpg
    PXL_20220131_004506898.jpg
    183.9 KB · Views: 26
  • PXL_20220131_004538687.jpg
    PXL_20220131_004538687.jpg
    232.4 KB · Views: 26
  • PXL_20220131_004552711.jpg
    PXL_20220131_004552711.jpg
    226.8 KB · Views: 26
  • PXL_20220131_004611813.jpg
    PXL_20220131_004611813.jpg
    189.2 KB · Views: 26
OP
OP
gnsteam

gnsteam

Contributor
Bronco Guru
Joined
Jan 29, 2010
Messages
3,522
Loc.
Lincoln NE
Monday afternoon I picked up the rebuilt 96, 5.0 from the builder. Kent did a great job. The motor had 228000 miles on it. Once tore down and inspected it was in great shape. However it did have to bored and honed. The rebuild is a stock rebuild other than the Comp Cams, K35-349-8 cam, complete valve train kit.
Here is a short list of other things done by the shop.
Line hone main bearing bores
Surface block
Balance complete
Surface head
Valve job
Machine valve guides
Recondition connecting rods
Surface intake manifold
Machine valve spring seats for duel springs.
Install cam bearings and freeze plugs
Assemble engine complete and paint.

Quite a ways to go before first start. But relieved to have this step behind me. Now to get focused on frame and drive train clean up and paint. So reassembly can began.
 

Attachments

  • PXL_20220202_001459246.jpg
    PXL_20220202_001459246.jpg
    190.1 KB · Views: 35
  • PXL_20220202_001510460.jpg
    PXL_20220202_001510460.jpg
    185.4 KB · Views: 30
  • PXL_20220202_001519706.jpg
    PXL_20220202_001519706.jpg
    206.4 KB · Views: 26
  • PXL_20220202_001526297.jpg
    PXL_20220202_001526297.jpg
    193.6 KB · Views: 29
  • PXL_20220202_001538081.jpg
    PXL_20220202_001538081.jpg
    178.9 KB · Views: 29
  • PXL_20220202_001553243.jpg
    PXL_20220202_001553243.jpg
    190.3 KB · Views: 29
  • PXL_20220202_001829719.jpg
    PXL_20220202_001829719.jpg
    195.3 KB · Views: 36

stupidboy

Contributor
My wifes porn star.
Joined
Dec 29, 2009
Messages
5,789
Loc.
Morrisdale Pa.
Woke up before everyone else in my house this morning and spent the Early morning hours reading through your whole build thread. This is a great read, all the way from when you first bought it up until now. All the distractions like other hobbies, building houses and all the other projects that go along with it. Then eventually getting back to the Bronco as your main focus of interest. Just goes to show that there are more people a lot like myself out there. I enjoyed the first few hours of my day catching up on the story of your Bronco. Keep up the good work and I am going to follow along to see how it turns out.
I'm with him, just did the same thing. Great work you're doing keep it up. I would have a hard time painting it if that is the original paint, probably would keep it more like Scoops Patina Build. But either way your bronco is in great shape.
 
OP
OP
gnsteam

gnsteam

Contributor
Bronco Guru
Joined
Jan 29, 2010
Messages
3,522
Loc.
Lincoln NE
I'm with him, just did the same thing. Great work you're doing keep it up. I would have a hard time painting it if that is the original paint, probably would keep it more like Scoops Patina Build. But either way your bronco is in great shape.
Thanks Pat,

A couple years back, a patina build was my plan. Mostly due to financial reasons and wanting to keep it on the road as much as possible. But now that I have given up an other hobby I was very invested into, and giving up my reservation for a new Bronco Badlands Sasquatch. The wife and I have decided to go all in and build me, an as new as possible, 76 Decor with modern goodies.

Fred

P.S. I've been following your build from day one. I'm so pleased to see that you are back and look forward to seeing the results of your talent.
 
OP
OP
gnsteam

gnsteam

Contributor
Bronco Guru
Joined
Jan 29, 2010
Messages
3,522
Loc.
Lincoln NE
A little more work today. I tore down the front hub/rotor assembly. Hubs will get cleaned up to receive new bearing races, wheel studs and rotors. I also started gathering up parts I want to send off for powder coating. The Dana 44 knuckles, caliper mounts and brake shields. Going along with these parts. Will be the frame, Dana 44 housing, 9" housing and Ruff stuff pinion guard. I took the time to make plugs for the axle housings to seal of the housings and protect the bearing surfaces from media blasting and paint. Not sure if I needed to do this, but did it anyway.
 

Attachments

  • PXL_20220202_002053745.jpg
    PXL_20220202_002053745.jpg
    190.7 KB · Views: 29
  • PXL_20220202_002102013.jpg
    PXL_20220202_002102013.jpg
    222.8 KB · Views: 30
  • PXL_20220206_215955963.jpg
    PXL_20220206_215955963.jpg
    263.1 KB · Views: 29
  • PXL_20220206_220014209.jpg
    PXL_20220206_220014209.jpg
    251.8 KB · Views: 27
  • PXL_20220202_001904267.jpg
    PXL_20220202_001904267.jpg
    168.3 KB · Views: 23
  • PXL_20220202_001928200.jpg
    PXL_20220202_001928200.jpg
    194.2 KB · Views: 30
OP
OP
gnsteam

gnsteam

Contributor
Bronco Guru
Joined
Jan 29, 2010
Messages
3,522
Loc.
Lincoln NE
This morning I drop of the frame, axle housings and other miscellaneous parts for powder coating, Boy was this place busy, 6-8 week lead time from the day you drop them off. Oh well, still plenty to do while we wait. So I rolled the body back over to the work side of the garage. So I can work on a few mod to the body, before going off to the restoration shop. I need to cut the ECU mounting hole in the center section of the fire wall. And look at mods to brake peddle assembly and fire wall area for hydro boost mounting.

Stay tuned, more to come.
 

Attachments

  • PXL_20220216_021235510.jpg
    PXL_20220216_021235510.jpg
    170.8 KB · Views: 41
  • PXL_20220216_123424813.jpg
    PXL_20220216_123424813.jpg
    208.5 KB · Views: 41
OP
OP
gnsteam

gnsteam

Contributor
Bronco Guru
Joined
Jan 29, 2010
Messages
3,522
Loc.
Lincoln NE
Tonights work, dissecting the Dana 20. My first time but thanks to Jason and Joni’s Builds video it went very well. Having only watched their video. I was pleasantly surprised that the later model (76) does not have that difficult snap ring to remove. Tomorrow night I will clean and inspect everything and order a rebuild kit. Any recommendations for the best kit out there?
 

Attachments

  • 7720E434-50A5-427E-8D31-41BF24CBE820.jpeg
    7720E434-50A5-427E-8D31-41BF24CBE820.jpeg
    217.3 KB · Views: 17
  • F1DDE5E7-9DFF-4A58-BFB2-679E97744B2F.jpeg
    F1DDE5E7-9DFF-4A58-BFB2-679E97744B2F.jpeg
    271.9 KB · Views: 16
  • 62D2D2B2-0AB4-4911-A552-8DD41A4BE7A5.jpeg
    62D2D2B2-0AB4-4911-A552-8DD41A4BE7A5.jpeg
    214.8 KB · Views: 17

green61bug

Contributor
Sr. Member
Joined
Mar 25, 2018
Messages
923
Loc.
Greensboro
Tonights work, dissecting the Dana 20. My first time but thanks to Jason and Joni’s Builds video it went very well. Having only watched their video. I was pleasantly surprised that the later model (76) does not have that difficult snap ring to remove. Tomorrow night I will clean and inspect everything and order a rebuild kit. Any recommendations for the best kit out there?
What gets replaced with the rebuild kit? Bearings and Seals? I reckon I will need to dive into mine eventually.
 

DirtDonk

Contributor
Bronco Guru
Joined
Nov 3, 2003
Messages
47,355
There are kits with just about everything, which probably adds up to about 100 parts. Gaskets, seals, main caged ball bearings, loose roller bearings, thrust washers, o-rings for the shift shafts, and other stuff like that.
At least optionally, there are even replacement idler shafts available.
 

sprdv1

Contributor
REBEL
Joined
Mar 8, 2007
Messages
81,734
There are kits with just about everything, which probably adds up to about 100 parts. Gaskets, seals, main caged ball bearings, loose roller bearings, thrust washers, o-rings for the shift shafts, and other stuff like that.
At least optionally, there are even replacement idler shafts available.

yes they do.... just got to do the research
 

904Bronco

Contributor
Bronco Guru
Joined
Sep 28, 2004
Messages
5,749
Loc.
San Martin, CA
This morning I drop of the frame, axle housings and other miscellaneous parts for powder coating, Boy was this place busy, 6-8 week lead time from the day you drop them off. Oh well, still plenty to do while we wait. So I rolled the body back over to the work side of the garage. So I can work on a few mod to the body, before going off to the restoration shop. I need to cut the ECU mounting hole in the center section of the fire wall. And look at mods to brake peddle assembly and fire wall area for hydro boost mounting.

Stay tuned, more to come.
Just caught up on your build, nice work so far.
Powder coating... It used to take a week and was $400 just for the frame, blast, Zinc coat, then Satin black final coat. In January of this year it took 3 weeks to get it back and it went up to $600. Some business are busier than snot, like my engine rebuilder, and other are not? Here a motivation picture for you... Keep up the great work. Doug.
 

Attachments

  • IMG_20220225_204842285_HDR.jpg
    IMG_20220225_204842285_HDR.jpg
    230.5 KB · Views: 40
OP
OP
gnsteam

gnsteam

Contributor
Bronco Guru
Joined
Jan 29, 2010
Messages
3,522
Loc.
Lincoln NE
Just caught up on your build, nice work so far.
Powder coating... It used to take a week and was $400 just for the frame, blast, Zinc coat, then Satin black final coat. In January of this year it took 3 weeks to get it back and it went up to $600. Some business are busier than snot, like my engine rebuilder, and other are not? Here a motivation picture for you... Keep up the great work. Doug.
Hi Doug, thanks for the picture of your chassis, looks great. We have three power coat companies that can do large parts. They are all way behind and very close in pricing. The one I chose, Kaiser coatings. Come recommend by other car guys I know. However they do a lot of production coating for local industry. So they fit smaller jobs in as they can. That the reasoning behind the long lead time. They Said I may get lucky with scheduling and get it sooner. As for pricing. The frame is $750 and axles at $200 each. With a few other loose parts, the total came to $1480.

Not having the frame. Forces me to do the not so fun part of cleaning and painting, to keep me busy. Heading out to the shop in a few minutes to continue on the Dana 20 rebuild.
 
Top