• Just a reminder that you won't be able to start new posts or reply to existings posts in the Archive forum.

    This is where all the old posts go so they can still be used for reference and searched.
  • Welcome to ClassicBroncos! - You are currently viewing the forums as a GUEST. To take advantage of all the site features, please take a moment to register. It's fast, simple and absolutely free. So please join our community today!
    If you have problems registering or can't log into your account, please contact Admin.

Project "Bom Chicka Wah Wah!!"

OP
OP
Heus33

Heus33

Bronco Guru
Joined
Jun 1, 2005
Messages
7,408
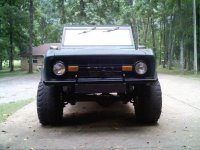
I like it. Makes me want to get some and tint the lens around the projector red for the evil eye look.

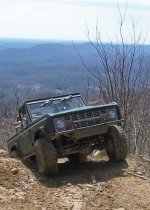
Yeah - I've been trying to get a blacked out grill for some time. I think it looks mean. Red might get you in trouble with the police though.

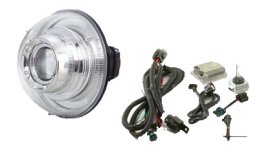
So everything just plugs in?

Yes, everything plugs in. The relay has 4 wire outputs.
1) Fused wire that goes to the battery
2) H4 Harness connection that connects to only one of the stock headlight plugs (this is to provide the signal to tell the relay on/off/high/low)
3) One wire that connects to the right ballast
4) One wire that connects to the left ballast

Then each ballast has a pigtail with nice weatherproof connectors that plugs into the back of the headlights.

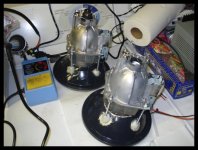
How long did the swap take?

The swap took me about an hour and a half. I went slow and pulled the battery and routed some of the extra wires to make sure everything looked good.

And noticably brighter than the standard out-dated halogens from the looks of it.

Noticably brighter doesn't even begin to explain this. I had stock halogens in there to begin with - then upgraded to cheap blue H4 bulbs and diamond cut headlights and that was about a 50% improvement. The HIDs are at least another 100% improvement over the H4s and about a 300% improvment over stock halogens.

Are the lenses plastic or glass?

These lenses are glass.
 

msweb

Bronco Guru
Joined
Aug 29, 2003
Messages
2,377
Thanks for the feedback Tom. What are you doing with your old lights?? ;D

My main interest in the conversion (other than actually being able to see at night) and all of it's wiring is getting away from the stock headlight switch. Could you go to a dedicated on/off/on with that harness?

I also like the blacked out grill. I finally painted mine and got rid of the steel (peeled paint) and white grill on my Bronco. Gave it a whole new attitude :cool:
 

Attachments

  • Top of the World.jpg
    Top of the World.jpg
    214.3 KB · Views: 59
  • downsized_0817091344b.jpg
    downsized_0817091344b.jpg
    36.9 KB · Views: 74
OP
OP
Heus33

Heus33

Bronco Guru
Joined
Jun 1, 2005
Messages
7,408
With the lights adjusted down like that, do you still have lots of light on the road? Or did you have to compromise a bit between seeing and being seen? That beam pattern looks practically like a driving light! Which is why I'm curious.
With that much output though, perhaps you got lucky and have lots of light even with the lack of width and cutoff.
Been driving much at night since the change?

Haven't driven at night yet Paul - I'll give some feedback once I get some time behind the wheel at night.

How far have you gotten in your search for different lens/reflector assemblies? With the money you saved with this kit (great price!), you can certainly justify experimenting with something out of another vehicle or aftermarket kit. The hard part I guess is going to be finding a true drop-in assembly for the Bronco's shallow buckets. Even some standard H4 replacements don't fit well.
Hopefully there is something out there that is appropriate for an HID and a Bronco.

Did you already have to remove any material from behind the lights for these to fit?

Good luck.

Paul

I didn't have to remove any material from the stock buckets for this swap, but you're right - as you build out custom projectors the new projector lense housings have to go somewhere. Some aftermarket lights push this setup out towards the front of the lense - making the lense more conical shaped and bug-eyed (pic 1). Others keep the lense stock and use the space behind the lights (pic 2). The challenge for us would be to find a projector that was small enough to fit in these stock-ish sized headlights so they didn't look silly (aka pic 1) but still fit in the buckets with little to no trimming (unlike pic 2). I'll do some googlight and see what I can come up with as I continue to try and find a good solution for us.
 

Attachments

  • hd6024_set.jpg
    hd6024_set.jpg
    16.5 KB · Views: 61
  • tl10.jpg
    tl10.jpg
    189.9 KB · Views: 69
OP
OP
Heus33

Heus33

Bronco Guru
Joined
Jun 1, 2005
Messages
7,408
Thanks for the feedback Tom. What are you doing with your old lights?? ;D

This will sacrifice their lives if I try to convert them to HIDs with some different projectors. :cool:

My main interest in the conversion (other than actually being able to see at night) and all of it's wiring is getting away from the stock headlight switch. Could you go to a dedicated on/off/on with that harness?
You'd have to figure out a way to send that on/off/high/low signal. So theoretically it can be done but the actual schematics of it are not known to me.
 

msweb

Bronco Guru
Joined
Aug 29, 2003
Messages
2,377
You'd have to figure out a way to send that on/off/high/low signal. So theoretically it can be done but the actual schematics of it are not known to me.

I was thinking one "On" would be low, the other high. I wonder how I could do that through the dimmer switch...... Viperwolf???
 
OP
OP
Heus33

Heus33

Bronco Guru
Joined
Jun 1, 2005
Messages
7,408
Radiator Air Dam update

Built a quick radiator air dam - total cost: $12.00

(1) Bought two sheets of galvanized sheet metal from Home Depot - got this in the duct section, it already had one bend in it. $5.93 a sheet. You need at least 45" of length - I picked up two 36" sheets so I have lots of scrap. Its not stainless but it'll do for now.

(2) Cut it down to size, a little trimming here and there. I just used a standard set of tin snips.

(3) My make shift brake - bends came out pretty good.

(4) Fit and trim - you can see some of the jagged edges

(5) Used a small piece of aluminum L channel to cap off the ends and make it look a little better. If I had access to a real break and could make cleaner cuts it would have looked better.

Not bad for 45 min of work.


Just a quick update guys - I had some time to drive around in sunny weather yesterday and the reflection from the sun bouncing off the verticle part of the air dam was very annoying. It would light up the reflectors, signs and licence plates in front of me and was very distracting. I'll be taking these off and spraying them with some silver paint to prevent that from happening again.
 

msweb

Bronco Guru
Joined
Aug 29, 2003
Messages
2,377
Just a quick update guys - I had some time to drive around in sunny weather yesterday and the reflection from the sun bouncing off the verticle part of the air dam was very annoying. It would light up the reflectors, signs and licence plates in front of me and was very distracting. I'll be taking these off and spraying them with some silver paint to prevent that from happening again.

Wow, I was hesitant about making my dash out of diamond plate because of the sun and glare. I'd have never thought something under the hood would be a problem! You sure it isn't those fancy headlights? ;D
 
OP
OP
Heus33

Heus33

Bronco Guru
Joined
Jun 1, 2005
Messages
7,408
Wow, I was hesitant about making my dash out of diamond plate because of the sun and glare. I'd have never thought something under the hood would be a problem! You sure it isn't those fancy headlights? ;D

Its the gap between the front lip of the hood and the grill. Sun hits it and reflects it straight forward - its like driving with a mirror strapped to the front grill. It took me a few minutes to realize what was going on. :p
 
OP
OP
Heus33

Heus33

Bronco Guru
Joined
Jun 1, 2005
Messages
7,408
2-into-1 Super Single Exhaust installed

Built this little beaut yesterday. 2.5" from the collectors to the magnaflow 3 chamber stainless muffler - out to a single 3" tailpipe.

FYI I used about six feet of 2.5" pipe, two 90* elbows, two collectors and one 3" u-bend for the tailpipe. All from Summit. I'll probably redo the tailpipe to try and get it to exit out behind the passenger tire.

Sounds great - nice deep tone without being too loud.
 

Attachments

  • tailpipe.jpg
    tailpipe.jpg
    134.4 KB · Views: 81
  • muffler.jpg
    muffler.jpg
    131.1 KB · Views: 83
  • tcase.jpg
    tcase.jpg
    112.5 KB · Views: 86
  • headers.jpg
    headers.jpg
    126 KB · Views: 89

msweb

Bronco Guru
Joined
Aug 29, 2003
Messages
2,377
Built this little beaut yesterday. 2.5" from the collectors to the magnaflow 3 chamber stainless muffler - out to a single 3" tailpipe.

FYI I used about six feet of 2.5" pipe, two 90* elbows, two collectors and one 3" u-bend for the tailpipe. All from Summit. I'll probably redo the tailpipe to try and get it to exit out behind the passenger tire.

Sounds great - nice deep tone without being too loud.

Looks good. Sounds like a lot of people are really digging tha Magnaflow these days, I may have to consider that when I run mine.

Tailpipe looks awful close to the fuel tank. Any issues there?
 
OP
OP
Heus33

Heus33

Bronco Guru
Joined
Jun 1, 2005
Messages
7,408
Tailpipe looks awful close to the fuel tank. Any issues there?

Its not touching but it is close, about 1/4" away. I'll remove it and cut it down a bit. I'm going to redo the tailpipe soon and try to get it to exit behind the rear tire.
 

msweb

Bronco Guru
Joined
Aug 29, 2003
Messages
2,377
Its not touching but it is close, about 1/4" away. I'll remove it and cut it down a bit. I'm going to redo the tailpipe soon and try to get it to exit behind the rear tire.

Yeah, I read where you were going to do that but personally, I like it tucked up high like you hae it now. I hardly ever run the top on mine so I'm not worried about fumes.
 
OP
OP
Heus33

Heus33

Bronco Guru
Joined
Jun 1, 2005
Messages
7,408
Update on HIDs

For those interested in the HID kit here's an update after some night driving.

The black housings, while looking cool do very little for reflecting the light onto the road at night (and the included projectors pretty much suck too). Even though it looks like I'm throwing light for days in the pics I posted I found myself wondering if my lights were even on at times :eek:

I'm going to play around with aiming the lights the next time I can get it out at night but take this as the initial recommedation to NOT use the black housings - stick with the chrome ones. I'll update this when I can get more time behind the wheel.
 

DirtDonk

Contributor
Bronco Guru
Joined
Nov 3, 2003
Messages
47,934
Well that sucks! Sorry to hear that.
Have you been following the other thread about lights recently? A couple of interesting garage-door shots of light patterns there. http://classicbroncos.com/forums/showthread.php?t=163149&page=3&highlight=Cibi%E9
The one with the HID bulbs inserted into a Cibé-clone lamp housing looked kind of like you're describing here. Although he said that he liked the pattern better when compared to the lamps that came with the HID's originally, the pictures looked very dark.
Hard to tell from pics of course, but interesting nonetheless.

Paul
 

sprdv1

Contributor
REBEL
Joined
Mar 8, 2007
Messages
81,824
For those interested in the HID kit here's an update after some night driving.

The black housings, while looking cool do very little for reflecting the light onto the road at night (and the included projectors pretty much suck too). Even though it looks like I'm throwing light for days in the pics I posted I found myself wondering if my lights were even on at times :eek:

I'm going to play around with aiming the lights the next time I can get it out at night but take this as the initial recommedation to NOT use the black housings - stick with the chrome ones. I'll update this when I can get more time behind the wheel.


Good to know bro! You'll get it figured out, I'm sure
 
OP
OP
Heus33

Heus33

Bronco Guru
Joined
Jun 1, 2005
Messages
7,408
Bilstein shocks and 2.5" Deaver coils installed

Put in a set of 2.5" Deaver coils from JBG and 4 5100 series Bilsteins and the ride is SO much better.

Here are the details:

Springs: 2.5" Deaver "Superflex" Springs from JBG http://broncograveyard.com/bronco/i-13205-super-flex-coil-springs-2-.html

Shocks:
For my 2.5" lift I chose the 5100 series:

BE5-6528-H6 FRONT
BE5-6253-H5 REAR

Got mine from www.shockwarehouse.com but am still waiting on a backordered front shock so order with caution from these guys.

Still have the stiff rear leafs on there now but don't feel the need to upgrade those now.
 

Attachments

  • Bilstein1.jpg
    Bilstein1.jpg
    155.8 KB · Views: 51
  • Bilstein2.jpg
    Bilstein2.jpg
    144.5 KB · Views: 47

Sporto

Sr. Member
Joined
Oct 10, 2005
Messages
908
Built this little beaut yesterday. 2.5" from the collectors to the magnaflow 3 chamber stainless muffler - out to a single 3" tailpipe.

FYI I used about six feet of 2.5" pipe, two 90* elbows, two collectors and one 3" u-bend for the tailpipe. All from Summit. I'll probably redo the tailpipe to try and get it to exit out behind the passenger tire.

Sounds great - nice deep tone without being too loud.

Thanks for the great idea! I just did the same thing on mine. I was pondering how to do my exhaust for months until I saw your pix. Damn that magna flow sounds great! I am still working on the tailpipe. Thanks again. I keep checking your pages for more ideas!!
:p
 
OP
OP
Heus33

Heus33

Bronco Guru
Joined
Jun 1, 2005
Messages
7,408
Video of my exhaust

Here's a video of my 2 into 1 super single. Writeup is on the previous page.

[youtube]u98OuHwFWys[/youtube]
 
Top