• Just a reminder that you won't be able to start new posts or reply to existings posts in the Archive forum.

    This is where all the old posts go so they can still be used for reference and searched.
  • Welcome to ClassicBroncos! - You are currently viewing the forums as a GUEST. To take advantage of all the site features, please take a moment to register. It's fast, simple and absolutely free. So please join our community today!
    If you have problems registering or can't log into your account, please contact Admin.

Project "Bom Chicka Wah Wah!!"

OP
OP
Heus33

Heus33

Bronco Guru
Joined
Jun 1, 2005
Messages
7,408
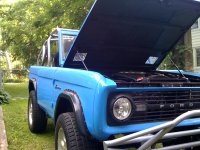
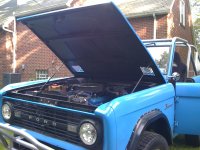
More cage progres...

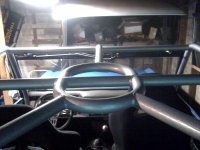
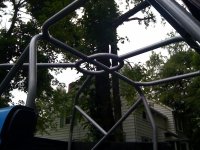
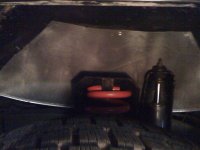
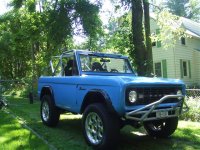
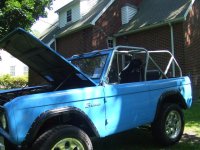
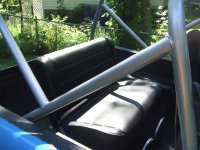
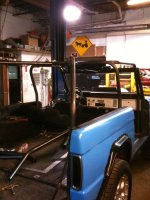
Coming along nicely...hope to have it finished and painted by the weekend. Not sure if you can see but the cage will be a tall cage (probably wont be able to put the hardtop back on - dont care about that) and will have a mean looking brow at the front that will be peaking out above the windsheild frame.
 

Attachments

  • cage1.JPG
    cage1.JPG
    65.1 KB · Views: 83
  • cage2.JPG
    cage2.JPG
    68.7 KB · Views: 61
  • cage3.JPG
    cage3.JPG
    70.3 KB · Views: 82
OP
OP
Heus33

Heus33

Bronco Guru
Joined
Jun 1, 2005
Messages
7,408
Cage in and painted!

Finally got the cage in and painted. Went with Rustoleum Silver Hammered paint, and I brushed it on using a foam brush! :eek: 
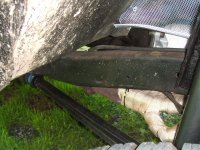
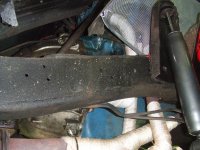
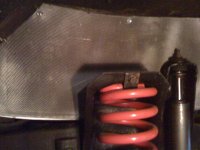
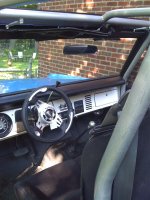
The paint is so think and sets up so quickly that it doesnt show any brush strokes and I only have a few very small runs that are hard to distinuish from the "hammered" effect.

Also got my turnbuckles installed and got a steel hood that I painted body color to replace the white fiberglass one with the scoop.
 

Attachments

  • new cage6.JPG
    new cage6.JPG
    55.2 KB · Views: 97
  • new cage5.JPG
    new cage5.JPG
    62.4 KB · Views: 116
  • new cage4.JPG
    new cage4.JPG
    77.5 KB · Views: 98
  • new cage3.JPG
    new cage3.JPG
    87.1 KB · Views: 125
  • new cage2.JPG
    new cage2.JPG
    97 KB · Views: 108
  • new cage1.JPG
    new cage1.JPG
    97.9 KB · Views: 153
OP
OP
Heus33

Heus33

Bronco Guru
Joined
Jun 1, 2005
Messages
7,408
Hood Shocks installed

A couple of pics of the new hood and hood shocks.

Used a pair of liftgate shocks from a camaro and built my own brackets.
 

Attachments

  • hood shocks1.jpg
    hood shocks1.jpg
    169.8 KB · Views: 55
  • hood shocks2.jpg
    hood shocks2.jpg
    162.5 KB · Views: 57
OP
OP
Heus33

Heus33

Bronco Guru
Joined
Jun 1, 2005
Messages
7,408
New Starter

Installed a mini starter...high torque, gear reduction unit. Wrapped the starter and half of the headers to try and keep the heat down.

New ignition switch and new starter too - starting problems be gone!
 

Attachments

  • DSCF0184.jpg
    DSCF0184.jpg
    167.9 KB · Views: 90
  • DSCF0185.jpg
    DSCF0185.jpg
    165.3 KB · Views: 91
OP
OP
Heus33

Heus33

Bronco Guru
Joined
Jun 1, 2005
Messages
7,408
Mesh inner fenders

I cut my inner fenders last year to allow additional cooling for the engine and headers. I always wanted to put those Broncool inserts in but couldnt justify the purchase. Inspiration struck and I grabbed one of those mesh trash cans that you can get a wal-mart for $9 and went to town.

Came out pretty good for 10 min worth of work. And only cost me $9 for one extra trash can since I already had one trash can in the basement.
 

Attachments

  • inner fender mesh 003.jpg
    inner fender mesh 003.jpg
    94.8 KB · Views: 96
  • inner fender mesh 002.jpg
    inner fender mesh 002.jpg
    127.5 KB · Views: 116
  • inner fender mesh 004.jpg
    inner fender mesh 004.jpg
    76.2 KB · Views: 72
OP
OP
Heus33

Heus33

Bronco Guru
Joined
Jun 1, 2005
Messages
7,408
Vent windows installed

Also chopped up my window frames and made these cool vent windows (yes I have spares if I need to go back). I wanted something that would allow me to roll my window up 3/4 of the way on those cool nights and this works perfectly. And they unbolt from the doors if needed.

Also took a pic of the rear seat with speakers and sub installed. The sub is mounted behind the seat and is a 10" Infinity Basslink all in one unit. Sound great and has a gain control knob that I mounted under the dash that lets me adjust the bass for each song.

And FINALLY got around to driving the truck today. What a stress reliever! :cool:

Enjoy the latest installment.
 

Attachments

  • DSCF0186.jpg
    DSCF0186.jpg
    191.5 KB · Views: 94
  • DSCF0189.jpg
    DSCF0189.jpg
    194.3 KB · Views: 109
  • DSCF0190.jpg
    DSCF0190.jpg
    135.8 KB · Views: 105
  • DSCF0188.jpg
    DSCF0188.jpg
    114.7 KB · Views: 107

DirtDonk

Contributor
Bronco Guru
Joined
Nov 3, 2003
Messages
47,934
Now that's using the old noggin! That mesh is a great setup. What implements of destruction did you utilize to get that worked out?

On your header wrap, it looks like that one down-tube that's so close to the starter's end is the main culprit. Perhaps a little bit from the one behind the frame rail too (where you were not able to wrap it), but mainly from that close one. All the other areas appear to be far enough away from the starter so as not to cause too much concern.
Or ZERO concern, now that they're wrapped! Just for future reference if you end up re-doing any of it.
And those new-fangled flow-through wheel-wells are going to help keep the starter cool too. I think any heat-related starter issues are a think of the past.

Sorry about not remembering I could come to this thread for reference when working on your other detailed projects. 'Fraid I haven't viewed it since it's early days. If so, I might have seen pics of your headers sooner and been a better help with your starter issue.
Are those Blackjack/Thrush/Dynomax multi-piece headers that go around the engine mounts?

Paul
 
OP
OP
Heus33

Heus33

Bronco Guru
Joined
Jun 1, 2005
Messages
7,408
Now that's using the old noggin! That mesh is a great setup. What implements of destruction did you utilize to get that worked out?

Cut off wheel and dremel for the thick area but tin snips for the rest of it.

On your header wrap, it looks like that one down-tube that's so close to the starter's end is the main culprit. Perhaps a little bit from the one behind the frame rail too (where you were not able to wrap it), but mainly from that close one. All the other areas appear to be far enough away from the starter so as not to cause too much concern.
Or ZERO concern, now that they're wrapped! Just for future reference if you end up re-doing any of it.
And those new-fangled flow-through wheel-wells are going to help keep the starter cool too. I think any heat-related starter issues are a think of the past.

Sorry about not remembering I could come to this thread for reference when working on your other detailed projects. 'Fraid I haven't viewed it since it's early days. If so, I might have seen pics of your headers sooner and been a better help with your starter issue.
Are those Blackjack/Thrush/Dynomax multi-piece headers that go around the engine mounts?

Paul

Thanks Paul. Not sure of the brand of the headers (PO installed) but yes, they go around the engine mounts and have a split flange. The tube you noticed was about 1/8" from the original starter but now that the mini starter is in, its about 1" away so it'll have some extra room to breathe now.
 

DirtDonk

Contributor
Bronco Guru
Joined
Nov 3, 2003
Messages
47,934
Well there 'ya go then. Even if your starter was fine before, it was living on borrowed time. That's just too close to a starter for a normal life.
Even that inch is somewhat close, but more than enough to at least get a break from the heat. That 1/8" though, was just cookin' it.
Now that it's wrapped though, you should be golden.

If you ever have the headers out for any reason, I'd take the week or two to have them coated. Plays two roles. Keeps the heat down and keeps the corrosion/rust at bay for awhile longer. And they look great too! Ok, three roles.

Paul
 
OP
OP
Heus33

Heus33

Bronco Guru
Joined
Jun 1, 2005
Messages
7,408
New Ashtray Cover

Check out my new ashtray cover. Stainless with the Bronco script engraved. I'm going to light the back up in sync with the instrument lights for the night time.

Thanks Carl! Great work! :cool: ;D
 

Attachments

  • Ashtray cover 004.jpg
    Ashtray cover 004.jpg
    113.3 KB · Views: 148
  • Ashtray cover 003.jpg
    Ashtray cover 003.jpg
    86.2 KB · Views: 125
  • Ashtray cover 002.jpg
    Ashtray cover 002.jpg
    95.9 KB · Views: 136
  • Ashtray cover 001.jpg
    Ashtray cover 001.jpg
    84.9 KB · Views: 152
OP
OP
Heus33

Heus33

Bronco Guru
Joined
Jun 1, 2005
Messages
7,408
Some night shots with it lit up at night...
 

Attachments

  • Ashtray cover 005.jpg
    Ashtray cover 005.jpg
    76.3 KB · Views: 81
  • Ashtray cover 007.jpg
    Ashtray cover 007.jpg
    69 KB · Views: 84

69BroncoDad

Sr. Member
Joined
Jul 6, 2009
Messages
460
Loc.
Rutland
Very cool....Very niiice EB. Excellent job on all your mods.....I love it
Love the roll pan ...i was thinking about one but with some kind of bumper behind it for impact reasons.....
 
OP
OP
Heus33

Heus33

Bronco Guru
Joined
Jun 1, 2005
Messages
7,408
Very cool....Very niiice EB. Excellent job on all your mods.....I love it
Love the roll pan ...i was thinking about one but with some kind of bumper behind it for impact reasons.....

Good idea but the fit is tight! Not much room for anything else unless you shift the gas tank forward.
 
OP
OP
Heus33

Heus33

Bronco Guru
Joined
Jun 1, 2005
Messages
7,408
Refurbed Speedo

Refurbished the speedometer.

New bulbs
Painted the needles
Reset the odometer to 0000000
Removed the black paint and polished the stainless

My odometer jammed (before I got it) and the force of the gear actually broke the housing :eek: A little JB weld and its good as new. Took it for a ride tonight and put 1.3 miles on it! Fresh oil change too - should be easy to monitor it now!

Also oiled the unit with WD-40 - no more shaky speedo!
 

Attachments

  • New Speedo 001.jpg
    New Speedo 001.jpg
    105.5 KB · Views: 110
  • New Speedo 002.jpg
    New Speedo 002.jpg
    110.1 KB · Views: 156

tasker

Contributor
all knowing of nothing
Joined
Jun 2, 2006
Messages
20,850
Loc.
NH
have a spare speedo head if you need some parts Tom, looking good!
 
Top