yes, I have always used a mig. I run a lincoln 255 that reads volts and IPM. I run 320-330ipm at 21.5 volts and double pass all the welds with a root and a cap, and I keep going until its done so everything is good and hot for the cap


Community
Message Forum
Photo Gallery
Event Calendar
Book Reviews
Bronco Wallpaper
Bronco FAQ
Link Back to CB!
Photo Gallery
Event Calendar
Book Reviews
Bronco Wallpaper
Bronco FAQ
Link Back to CB!

Buy / Sell


Bronco Tech
3 Arm Wiper Setup
Fix Motor Mount
Roll Cage Braces
Throttle Body 65mm
Wheel Alignment
Heat Riser Replacement
Vent Window Repair
Center Console Mount
Straighten Bumper
Ford 6R80 6 spd
More Tech...
Fix Motor Mount
Roll Cage Braces
Throttle Body 65mm
Wheel Alignment
Heat Riser Replacement
Vent Window Repair
Center Console Mount
Straighten Bumper
Ford 6R80 6 spd
More Tech...

Install the app
-
Welcome to ClassicBroncos! - You are currently viewing the forums as a GUEST. To take advantage of all the site features, please take a moment to register. It's fast, simple and absolutely free. So please join our community today!If you have problems registering or can't log into your account, please contact Admin.
You are using an out of date browser. It may not display this or other websites correctly.
You should upgrade or use an alternative browser.
You should upgrade or use an alternative browser.
Project "BOB - Big Orange Bronco" Wheeling pics addded
- Thread starter SC74
- Start date
Love your crawler...
Mine Buggy has parts from a bronco but thats about it. I love to the old style broncos turned into crawlers.
Mine Buggy has parts from a bronco but thats about it. I love to the old style broncos turned into crawlers.
OP
OP
- Joined
- May 24, 2004
- Messages
- 3,413
Almost 13 months later it's time to bring this thread back to life!
I know I've been steady working on nic nacs on it and haven't posted any updates. I did upgrade the plastic fuel cell I had. The top kept denting in with heat and would leak around the sending unit and filler. The smell was horrible and it got to be un enjoyable for friends due to the gas smell and headache that followed. Upgraded to the RCI aluminum cell and Artec mount. So far, several rides later, no smell and I'm wondering why I didn't do this sooner.
I know I've been steady working on nic nacs on it and haven't posted any updates. I did upgrade the plastic fuel cell I had. The top kept denting in with heat and would leak around the sending unit and filler. The smell was horrible and it got to be un enjoyable for friends due to the gas smell and headache that followed. Upgraded to the RCI aluminum cell and Artec mount. So far, several rides later, no smell and I'm wondering why I didn't do this sooner.
Attachments
OP
OP
- Joined
- May 24, 2004
- Messages
- 3,413
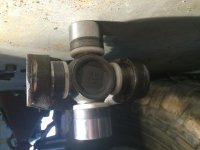
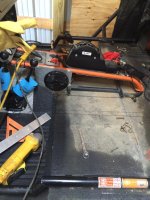
The next thing I noticed was that there was some interference in my front drive shaft at the t-case. I found that 1350 joints don't clear a stock cross member! The fresh rub marks made it easy to spot. I cut the cross member out and welded some stock to it so the strength of that lip wasn't compromised.
While addressing this, I also modified my skid plate to have a removable access cover so that servicing the shaft would be much easier in the future.
Still have some yoke rubbing at full droop that I need to flap disc out of it.
While addressing this, I also modified my skid plate to have a removable access cover so that servicing the shaft would be much easier in the future.
Still have some yoke rubbing at full droop that I need to flap disc out of it.
Attachments
Last pic. Interference is gone!
HaHa!!! Robert, interference ain't what you got on your mind!!!
It's a wedding!!!!;D;D;D
HaHa!!! Robert, interference ain't what you got on your mind!!!
It's a wedding!!!!;D;D;D
Looking good Robert! so what this thing that NGA is referncing?:-*
Mill KNOB
Bronco Guru
HaHa!!! Robert, interference ain't what you got on your mind!!!
It's a wedding!!!!;D;D;D
Ben you took the words right our of my mouth.
Cool! Congrats!
Crawdad
Bronco Guru
- Joined
- Feb 16, 2011
- Messages
- 3,635
Between marriage, two new rug rats, huntn, deployments and, of course, Dabo and the gang have made my urge to work on my 76 very minimal! I'm actually gonna miss the first half of the footbal season. But hopefully I'll bring back some bronco money and get things slowly rolling again. Dabo makes me spend bronco money when he goes on to Charlotte and Miami! Go Tigers and good luck Robert!
Matt
Matt
Looks good Robert... slow a steady is the name of the game- and free time will slow after the pending nuptials... My latest target (after missing several) is Labor day weekend to have mine mobile...
OP
OP
- Joined
- May 24, 2004
- Messages
- 3,413
Looks good Robert... slow a steady is the name of the game- and free time will slow after the pending nuptials... My latest target (after missing several) is Labor day weekend to have mine mobile...
We should set a tentative ride in Harlan for the fall, maybe October.
OP
OP
- Joined
- May 24, 2004
- Messages
- 3,413
I started a project this past weekend (had to wait for the hottest day of the year of course) that I've been wanting to do for a LONG time. A lot of you know that I've picked your brains about it.
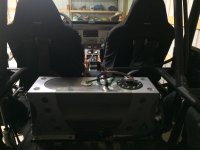
I took my seats out and cut the roll cage bars they bolted to out. It's time to get my butt lower! My cage is short and I either needed to raise my cage or lower my seat for safety. After riding in some lowered seats and feeling how much more stable the COG is I was sold!
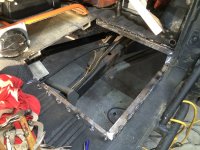
A new cross-member has been made and connects the two cage feet at the main hoop. My cage seat belt hoops also tie back into the same cross member. It's aprox. 8" or a little more back from stock. I've fabbed new body mounts that also connect to the new cross-member. Now that I've got some back-up structure, it's time to start cutting the floor out and seeing how low I can go!
I took my seats out and cut the roll cage bars they bolted to out. It's time to get my butt lower! My cage is short and I either needed to raise my cage or lower my seat for safety. After riding in some lowered seats and feeling how much more stable the COG is I was sold!
A new cross-member has been made and connects the two cage feet at the main hoop. My cage seat belt hoops also tie back into the same cross member. It's aprox. 8" or a little more back from stock. I've fabbed new body mounts that also connect to the new cross-member. Now that I've got some back-up structure, it's time to start cutting the floor out and seeing how low I can go!
your not going to regret this. I love how mine sits (I know you do too...LOL). Visibility isn't a problem on the trail and I don't get a neck ache sitting at a red light on the street
OP
OP
- Joined
- May 24, 2004
- Messages
- 3,413
your not going to regret this. I love how mine sits (I know you do too...LOL). Visibility isn't a problem on the trail and I don't get a neck ache sitting at a red light on the street
I rode around my pastures slumped down in the seat to check visibility. The crown of those fenders can't hide and I don't think I'll lose any visibility!
OP
OP
- Joined
- May 24, 2004
- Messages
- 3,413
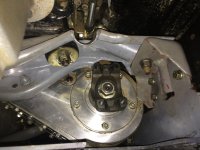
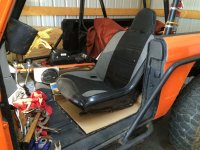
Here are a few pics of the new body mounts I made. I used the same bushing, just a new mount in a new location. It's about 8" back from the stock tower.
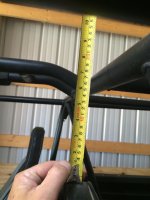
Also, a before pic with a measurement from top of seat. I'm curious to see where the finished seat height lands. This was with the seat mounted as low as it possibly could be on the 1" tubing that sat on the floor. Yes, I know, my cage is low - but I like it that way and it lets me slip by some things that a taller cage wouldn't.
Also, a before pic with a measurement from top of seat. I'm curious to see where the finished seat height lands. This was with the seat mounted as low as it possibly could be on the 1" tubing that sat on the floor. Yes, I know, my cage is low - but I like it that way and it lets me slip by some things that a taller cage wouldn't.
Attachments


OP
OP
- Joined
- May 24, 2004
- Messages
- 3,413
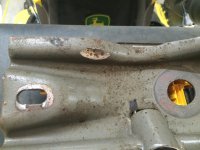
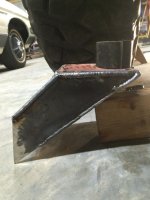
We got a little demolition work done on the driver side floor this weekend. The plan changed several times as we cut, and then cut more. The stock body mount is removed and the new one is burned in. The cardboard template will be nice when it comes time to bend the sheet metal. An angle iron frame has been tacked around the perimeter of the hole to provide a support and welding surface for the new floor pan.
It's still up in the air how the seats will mount, but we have a few ideas and as it comes together we will run the direction that makes best sense.
My original seats were mounted flat, and this time around they will have a rake in them to lean back.
It's still up in the air how the seats will mount, but we have a few ideas and as it comes together we will run the direction that makes best sense.
My original seats were mounted flat, and this time around they will have a rake in them to lean back.
Attachments


Looking good Robert, I did something similar on "Stretch'. A bit lower and a bit back makes a lot of difference. The seat's in my Crawler look tilted way back but they work well.
Good Luck!!!;D;D;D
Good Luck!!!;D;D;D
Similar threads
- Replies
- 116
- Views
- 20K
City: Lafayette
Price: $7000
- Replies
- 0
- Views
- 92
City: Eugene
Price: $25000
- Replies
- 0
- Views
- 259
City: El Paso, Texas 79922
Price: $4000
- Replies
- 2
- Views
- 291