• Welcome to ClassicBroncos! - You are currently viewing the forums as a GUEST. To take advantage of all the site features, please take a moment to register. It's fast, simple and absolutely free. So please join our community today!
    If you have problems registering or can't log into your account, please contact Admin.

Project "BOB - Big Orange Bronco" Wheeling pics addded

OP
OP
SC74

SC74

Contributor
Bronco Guru
Joined
May 24, 2004
Messages
3,413
Here are a few pics!

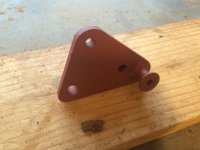
The WH brackets are made to prep lace the driver side explorer bracket. One bracket is for the top pulley and the other is for a Saginaw or p-pump. The two plates came with an assortment of washers and spacers. I ended up tacking the spacers to the brackets where the directions said to install them to make it much cleaner and save me the headache of losing one when I have to remove them and/or not remember where the heck they were. In my opinion, the kit could be much improved and cleaner by coming pre-tacked to save everyone the hassle.

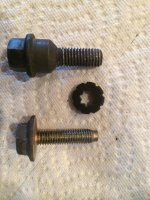
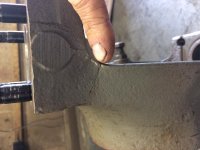
On the pulley bracket, it says to use the factory spacers and washers and then stack another washer and a 7/8" spacer and a longer 10mm bolt through the pulley and a nut on the the backside of the plate bracket. First, My stock bolt was a shoulder bolt (see pic). The explorers must have come two different ways - this type shoulder bolt or a standard bolt with a plastic type insert to center the bolt on the ID of the pulley bearing. The second bolt in the pic is from a different idler on the explorer brackets but same exact set up in a smaller size. Ford replaces that top idler with a cheaper pulley (no shoulders to keep the belt on and this plastic insert style inner) and costs $44 (You can buy the pulley from any parts house but it doesn't come with that spacer or a bolt)!! I wasn't excited about leveraging a plastic spacer and then bolting it to a plate. My solution was to keep my original shouldered bolt. I went to Ace Hardware and bout a 5/16 ID 1" spacer (perfect for tapping to 10mm). I welded the spacer to the plate and then welded a washer to increase the surface area where it rides on the bearing (used a washer the same OD as the explorer bracket surface was).

It's the little things like this that take so long!!!
 

Attachments

  • image.jpg
    image.jpg
    83.3 KB · Views: 41
  • Bolts.jpg
    Bolts.jpg
    112.4 KB · Views: 38
OP
OP
SC74

SC74

Contributor
Bronco Guru
Joined
May 24, 2004
Messages
3,413
And here is proof that she stands up on her own two front tires now!

I didn't say it could brake itself yet!!
 

Attachments

  • image.jpg
    image.jpg
    91.8 KB · Views: 134
OP
OP
SC74

SC74

Contributor
Bronco Guru
Joined
May 24, 2004
Messages
3,413
Between fighting for hood clearance and making sure I have good flow, I found the fitting to make both happen. Now that I know where it will be I can build the frame to mount the reservoir to (welded to the PS pump bracket so it's all one unit). 2 more hoses are ready for me to pickup tomorrow and I should be able to plumb this mess :cool:
 

Attachments

  • image.jpg
    image.jpg
    105.8 KB · Views: 120
OP
OP
SC74

SC74

Contributor
Bronco Guru
Joined
May 24, 2004
Messages
3,413
HA you are funny! I did take it on a trial tip down through my gulley/rock garden on the farm. It performed great and a major improvement over what I had.

Now I've got my knuckles off and plating them to help handle the extra stress. In the process, I'm replacing my driver side spindle since it's got some battle scars.
 
OP
OP
SC74

SC74

Contributor
Bronco Guru
Joined
May 24, 2004
Messages
3,413
It's a good thing I took Yeller's advise to inspect and plate my knuckles... This is what I found after cleaning the driver side. The crack goes all the way through.... But I V ground it out and welded it up. I was on borrowed time!
 

Attachments

  • image.jpg
    image.jpg
    84.1 KB · Views: 120
Last edited:
OP
OP
SC74

SC74

Contributor
Bronco Guru
Joined
May 24, 2004
Messages
3,413
And the inside...
 

Attachments

  • image.jpg
    image.jpg
    96.6 KB · Views: 102

GRN_MEANIE

Sr. Member
Joined
Aug 2, 2005
Messages
553
I copied the TMR setup when I plated mine. I would keep those as spares and find another set tho.
 

Yeller

Contributor
Bronco Guru
Joined
Mar 27, 2012
Messages
6,747
Loc.
Rogers County Oklahoma
I've fixed a bunch of them and have yet to have a failure, most were much worse than that. I usually work for guys that can break a steel ball in a sand box with a rubber hammer, myself included.....
 
OP
OP
SC74

SC74

Contributor
Bronco Guru
Joined
May 24, 2004
Messages
3,413
I bought the kit from rydelfab.com. His reviews on Pirate were good and they are pre-bent. I might try to finish burning it on today, but it's a good fit.
 
OP
OP
SC74

SC74

Contributor
Bronco Guru
Joined
May 24, 2004
Messages
3,413
Those knuckles are cast right? Ho well will the welds hold?

I think pre-heat is the key. I've got it tacked together on now with mig but plan on using a 7018 rod to burn them on for good.
 

Mountain Ram

Contributor
Recovering Masshole
Joined
May 8, 2011
Messages
3,387
Loc.
Abingdon, VA
I think pre-heat is the key. I've got it tacked together on now with mig but plan on using a 7018 rod to burn them on for good.


I only have a mig and even though I have access to a stick welder at work, I have never welded with one. Is it possible to weld this with a 220V Mig?
 
Top