Went thru all of ur posts and I just want to say dang good and clean job bro, had a couple of questions for u and they all have to do with the electrical wiring work u have done to your bronco.i want to re wire my 66 but dont know where to start since it doesnt have any wiring in it do u are u using any references for urs or u just know how it goes in?


Community
Message Forum
Photo Gallery
Event Calendar
Book Reviews
Bronco Wallpaper
Bronco FAQ
Link Back to CB!
Photo Gallery
Event Calendar
Book Reviews
Bronco Wallpaper
Bronco FAQ
Link Back to CB!

Buy / Sell


Bronco Tech
3 Arm Wiper Setup
Fix Motor Mount
Roll Cage Braces
Throttle Body 65mm
Wheel Alignment
Heat Riser Replacement
Vent Window Repair
Center Console Mount
Straighten Bumper
Ford 6R80 6 spd
More Tech...
Fix Motor Mount
Roll Cage Braces
Throttle Body 65mm
Wheel Alignment
Heat Riser Replacement
Vent Window Repair
Center Console Mount
Straighten Bumper
Ford 6R80 6 spd
More Tech...

Install the app
-
Welcome to ClassicBroncos! - You are currently viewing the forums as a GUEST. To take advantage of all the site features, please take a moment to register. It's fast, simple and absolutely free. So please join our community today!If you have problems registering or can't log into your account, please contact Admin.
You are using an out of date browser. It may not display this or other websites correctly.
You should upgrade or use an alternative browser.
You should upgrade or use an alternative browser.
Sam P. 71 Bronco Tub rebuild.
- Thread starter sp71eb
- Start date
BroncoLuke
Jr. Member
- Joined
- Oct 30, 2006
- Messages
- 96
I noticed in some of your photos that to brace the doors you used the striker post mounting point and what looks like a hinge mounting point. I am interested if this worked well or not? I am getting ready to do the floorpans and potentially the rocker panels and need to brace but don't want to weld onto the door mount panel or the striker panel.
A penny for your thoughts or anyone elses?
A penny for your thoughts or anyone elses?
OP
OP
sp71eb
Full Member
Went thru all of ur posts and I just want to say dang good and clean job bro, had a couple of questions for u and they all have to do with the electrical wiring work u have done to your bronco.i want to re wire my 66 but dont know where to start since it doesnt have any wiring in it do u are u using any references for urs or u just know how it goes in?
I didn't use any references to do the wiring. I used a ezwiring harness. In it all of the wires are labeled. Obviously it looks nice and clean now but I didn't take pictures of moving and removing wires around before finalizing the harness. The best way I found to run the wiring is make a list of what you have in your setup that need power and then lay out the harness on the floor and move the wires accordingly. If you haven't done much wiring it is a big job to tackle.
I noticed in some of your photos that to brace the doors you used the striker post mounting point and what looks like a hinge mounting point. I am interested if this worked well or not? I am getting ready to do the floorpans and potentially the rocker panels and need to brace but don't want to weld onto the door mount panel or the striker panel.
A penny for your thoughts or anyone elses?
The door braces did work good but it would be nice to brace the tub up alittle higher. The braces I made do bolt to the top hinge and striker post. When I had everything cut apart I also braced across the tub. In my opinion this is very important to keep the tub square side to side. Once things are welded up this is relatively permanent. I've found that if your door opening isn't 100% perfect that it can be fixed by shimming the body mounts with large washers. I luckily didn't have to do this.
OP
OP
sp71eb
Full Member
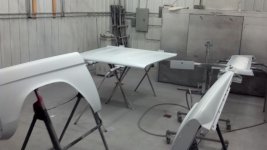
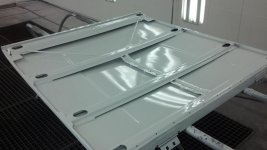
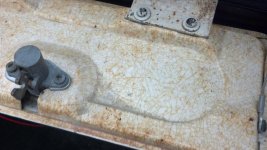
Went ahead and primed the remainder of body parts that I have laying around. I decided to throw a coat of primer on the new body parts. Some of them had deep grinder scratches under the e-coat that I wanted to take care of. I also stripped the paint on my refurbished gauge cluster because it was chipping off, you can see in the picture what it looked like under the paint. I then powder coated it white. Went ahead and sprayed the underside of the hood. I'm a big fan of spraying panels all at once but these hoods are pretty large and much easier to spray each side separately. And finally the tub is back on the frame for the last time! Time to start reassembly.
Attachments
-
 broncorebuildrazr20 003.jpg49.2 KB · Views: 102
 -
 broncorebuildrazr20 025.jpg59.3 KB · Views: 118
 -
 broncorebuildrazr20 020.jpg55.5 KB · Views: 114
 -
 broncorebuildrazr20 018.jpg68 KB · Views: 107
 -
 broncorebuildrazr20 017.jpg63.7 KB · Views: 103
 -
 broncorebuildrazr20 016.jpg60.1 KB · Views: 107
 -
 broncorebuildrazr20 014.jpg60.6 KB · Views: 102
 -
 broncorebuildrazr20 011.jpg53 KB · Views: 105
broncoitis
Bronco Guru
- Joined
- Jul 23, 2010
- Messages
- 4,449
Sahweet! Looking Good. Can't wait to see this come back together. Carefull with the wrenches and the PURDY new paint. Awesome!
OP
OP
sp71eb
Full Member
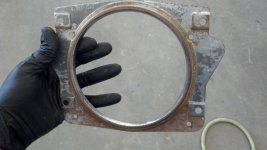
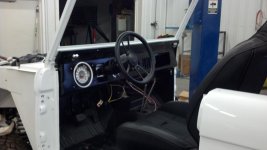
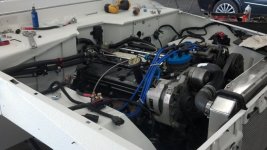
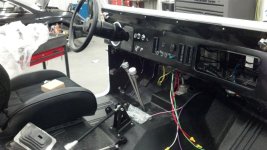
Saturday I went ahead and powder coated the rest of my small parts to go onto the bronco. I made a nice little fuel line bracket and finally got it mounted. I also primed my oil pump, ran spark plug wires, and got all of my wiring installed. I was pretty excited to see how the dash looked in the truck and I am really happy with it. I also hooked up my entire cooling and a/c systems. If I'm feelin spry today I'm going to try to get it fired up but I have no guarantees. Its starting to look like a truck.
Attachments
-
 broncorebuildrazr21 018.jpg77.5 KB · Views: 195
 -
 broncorebuildrazr21 016.jpg70.5 KB · Views: 188
 -
 broncorebuildrazr21 015.jpg51.6 KB · Views: 175
 -
 broncorebuildrazr21 012.jpg66.7 KB · Views: 173
 -
 broncorebuildrazr21 009.jpg69.1 KB · Views: 178
 -
 broncorebuildrazr21 008.jpg87.6 KB · Views: 175
 -
 broncorebuildrazr21 007.jpg83.9 KB · Views: 186
 -
 broncorebuildrazr21 003.jpg46.4 KB · Views: 176
 -
 broncorebuildrazr21 025.jpg54.6 KB · Views: 168
 -
 broncorebuildrazr21 021.jpg81 KB · Views: 177
 -
 broncorebuildrazr21 020.jpg68.3 KB · Views: 170
OP
OP
sp71eb
Full Member
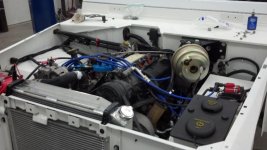
ITS ALIVE!!!! Well after almost 2 hours of chasing a non issue, its running!. I hooked up everything on the efi harness and I didn't have power to my fuel relay. So I chased the wires and tried to look for a short or broken fusible link. And low and behold I forgot to hook up the ECC power wire. After I hooked it up it sputtered a bit and a little movement of the dizzy she fired right up. Here is a link to a crappy shaky video of it.
http://youtu.be/EyUxck1Z38g
http://youtu.be/EyUxck1Z38g
reynard101
Bronco Guru
- Joined
- Aug 19, 2006
- Messages
- 1,098
Good job! It's been awesome watching this Bronco come to life!
OP
OP
sp71eb
Full Member
Got a few things done today and yesterday. Yesterday I figured out my timing issue and got the bronc running good. Also a friend of mine sprayed the rest of the satin black parts. He sprayed the tailgate plate holder, the glove box door, and center of the grill. I decided to black out the door frames and think it will look good with the soft top. Today I installed the vent and defrost hoses under the dash. I also installed the glove box and fired up the A/C. The air is nice and cold and you can see I kept the inside of the glove box as it was, I like the patina it has. This weekend we plan to spray the rest of the body parts.
Attachments
-
 Broncorebuildrazr22 015.jpg85.2 KB · Views: 121
 -
 Broncorebuildrazr22 014.jpg82.3 KB · Views: 109
 -
 Broncorebuildrazr22 013.jpg57.8 KB · Views: 122
 -
 Broncorebuildrazr22 011.jpg73.9 KB · Views: 125
 -
 Broncorebuildrazr22 009.jpg39.3 KB · Views: 95
 -
 Broncorebuildrazr22 008.jpg55.8 KB · Views: 96
 -
 Broncorebuildrazr22 007.jpg52.4 KB · Views: 94
 -
 Broncorebuildrazr22 006.jpg60.9 KB · Views: 99
broncoitis
Bronco Guru
- Joined
- Jul 23, 2010
- Messages
- 4,449
Lookin Good! Have you considered making a small shield to protect the drier that you mounted on the Kickpanel? Would suck to have a rock kick up and pucture or damage it. Keep it up. ;D
OP
OP
sp71eb
Full Member
I am planning on making fender liners for front and rear. I'm thinking either from rubber sheeting or kydex, like what they use to make holsters.
Lookin Good! Have you considered making a small shield to protect the drier that you mounted on the Kickpanel? Would suck to have a rock kick up and pucture or damage it. Keep it up. ;D
OP
OP
sp71eb
Full Member
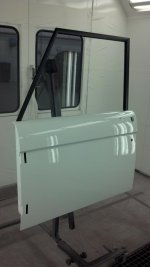
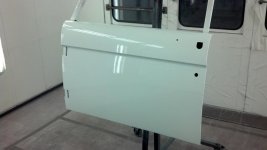
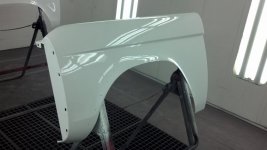
Well it drives! Today and yesterday I put in some good work. I bled the brake system and also spent about an hour trying to bleed the power steering system. I also drained my dana 20 and got rid of the gasket on the cover and replaced it with RTV adhesive. Turns out a new gasket installed on two clean mating surfaces won't seal. Then with the help of a friend we painted the doors, fenders, and grill. They all came out really nice and I'm hoping to have all of the parts on the truck in the next few days. And also as stated it drives. I don't have a rear drive shaft yet so its a fwd bronco. I just pulled it out into the parking lot and back in to make sure nothing catastrophic would happen. Lit both front tires up no problem with tons of torque steer%). Today I also ordered some really cool truck lite led headlights.
Attachments
-
 broncorebuildrazr23 024.jpg69.1 KB · Views: 86
 -
 broncorebuildrazr23 023.jpg40.3 KB · Views: 89
 -
 broncorebuildrazr23 020.jpg40.5 KB · Views: 84
 -
 broncorebuildrazr23 018.jpg53.1 KB · Views: 88
 -
 broncorebuildrazr23 016.jpg39.3 KB · Views: 91
 -
 broncorebuildrazr23 010.jpg63.2 KB · Views: 108
 -
 broncorebuildrazr23 008.jpg86.9 KB · Views: 119
 -
 broncorebuildrazr23 006.jpg76.3 KB · Views: 106
 -
 broncorebuildrazr23 026.jpg72.9 KB · Views: 90
 -
 broncorebuildrazr23 012.jpg47.2 KB · Views: 86
blazinchuck
Bronco Guru
- Joined
- Jul 14, 2005
- Messages
- 3,319
one helluva job! i was surprised to see someone else using the southern rods..soutthern air system. i havent finished my ac install yet. i installed everything inside the bronco...just nothing on the outside/engine bay. i like how you raised the section where the fresh air vent on pass side went...i would probably like mine more if i had done the same thing. i have the vents under the dash and cant stand that i still see the vent hoses...ugh. but you've done a great job.
OP
OP
sp71eb
Full Member
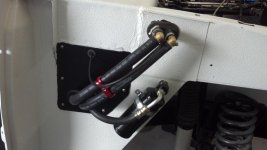
Yeah the a/c unit would sit pretty low if I hadn't cut the cowl section. I'm sure your will still fit good. One thing I did run into is getting all three vent hoses to fit behind the glove box. The a/c unit seems to run good with 1.75 lbs of freon in it. I havn't run it much yet because I have yet to hook up my fan. But will update with any issues or helpful things I find.
one helluva job! i was surprised to see someone else using the southern rods..soutthern air system. i havent finished my ac install yet. i installed everything inside the bronco...just nothing on the outside/engine bay. i like how you raised the section where the fresh air vent on pass side went...i would probably like mine more if i had done the same thing. i have the vents under the dash and cant stand that i still see the vent hoses...ugh. but you've done a great job.
broncoitis
Bronco Guru
- Joined
- Jul 23, 2010
- Messages
- 4,449
Nice job! Truck is gonna get tons of attention. Checked out your engine and it sounds great as well. Can't wait to see it all finished up and the Truck Lite are very impressive. Don't know if you saw it but somebody on here installed tham on his rig and they were VERY BRIGHT with a nice defined cutoff and seemed to be a simple install. ;D
blazinchuck
Bronco Guru
- Joined
- Jul 14, 2005
- Messages
- 3,319
Nice job! Truck is gonna get tons of attention. Checked out your engine and it sounds great as well. Can't wait to see it all finished up and the Truck Lite are very impressive. Don't know if you saw it but somebody on here installed tham on his rig and they were VERY BRIGHT with a nice defined cutoff and seemed to be a simple install. ;D
I think it was Dusty
Sent using my HTC ONE via Tapatalk
OP
OP
sp71eb
Full Member
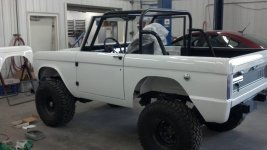
Thought I would post a few pictures of the reassembly process. We went ahead and sprayed the hood earlier in the week and then started the careful parts install. So far I have installed the roll cage, hung the doors, tailgate, hood, and L fender. Things are moving along good and steady. Hopefully by the end of next week the body will be almost fully assembled. Also I got my Truck lite headlights. They are pretty badass and light up really bright and crisp.
Attachments
-
 broncorebuildrazr24 012.jpg47.7 KB · Views: 90
 -
 broncorebuildrazr24 011.jpg59.8 KB · Views: 99
 -
 broncorebuildrazr24 019.jpg61.9 KB · Views: 99
 -
 broncorebuildrazr24 017.jpg65.5 KB · Views: 103
 -
 broncorebuildrazr24 014.jpg61.9 KB · Views: 90
 -
 broncorebuildrazr24 006.jpg61.4 KB · Views: 97
 -
 broncorebuildrazr24 001.jpg66 KB · Views: 85
 -
 broncorebuildrazr24 009.jpg45 KB · Views: 82
broncoitis
Bronco Guru
- Joined
- Jul 23, 2010
- Messages
- 4,449
All I can say is two words about the bronco, "LOVE IT!"
Yes it was Dusty about he truck lite's. I like how they look compared to the Speaker LED's Lookin Good!
Yes it was Dusty about he truck lite's. I like how they look compared to the Speaker LED's Lookin Good!
Similar threads
- Replies
- 15
- Views
- 11K