


Community
Message Forum
Photo Gallery
Event Calendar
Book Reviews
Bronco Wallpaper
Bronco FAQ
Link Back to CB!
Photo Gallery
Event Calendar
Book Reviews
Bronco Wallpaper
Bronco FAQ
Link Back to CB!
Buy / Sell


Bronco Tech
3 Arm Wiper Setup
Fix Motor Mount
Roll Cage Braces
Throttle Body 65mm
Wheel Alignment
Heat Riser Replacement
Vent Window Repair
Center Console Mount
Straighten Bumper
Ford 6R80 6 spd
More Tech...
Fix Motor Mount
Roll Cage Braces
Throttle Body 65mm
Wheel Alignment
Heat Riser Replacement
Vent Window Repair
Center Console Mount
Straighten Bumper
Ford 6R80 6 spd
More Tech...

Install the app
-
Welcome to ClassicBroncos! - You are currently viewing the forums as a GUEST. To take advantage of all the site features, please take a moment to register. It's fast, simple and absolutely free. So please join our community today!If you have problems registering or can't log into your account, please contact Admin.
You are using an out of date browser. It may not display this or other websites correctly.
You should upgrade or use an alternative browser.
You should upgrade or use an alternative browser.
Sam P. 71 Bronco Tub rebuild.
- Thread starter sp71eb
- Start date
OP
OP
sp71eb
Sr. Member
Transmission #2 time
Well thought I would do another update. I went ahead and got all of the advance adapter parts to install the ax15. I found a used ax15 on craigslist for 75 bucks. That helped to offset the $850 for the adapters and cross member. All of the parts came well packed and look really nice and the fitment almost justifies the price. The nice thing about the ax15 is that you don't have to cut a hole in your bellhousing and only have to trim the transmission case a small amount for bolt clearance to the bellhousing.
Well thought I would do another update. I went ahead and got all of the advance adapter parts to install the ax15. I found a used ax15 on craigslist for 75 bucks. That helped to offset the $850 for the adapters and cross member. All of the parts came well packed and look really nice and the fitment almost justifies the price. The nice thing about the ax15 is that you don't have to cut a hole in your bellhousing and only have to trim the transmission case a small amount for bolt clearance to the bellhousing.
Attachments
-
 broncorebuildrazr33 001.jpg63 KB · Views: 36
 -
 broncorebuildrazr33 012.jpg64 KB · Views: 40
 -
 broncorebuildrazr33 011.jpg46.1 KB · Views: 40
 -
 broncorebuildrazr33 009.jpg56.1 KB · Views: 40
 -
 broncorebuildrazr33 008.jpg60.8 KB · Views: 34
 -
 broncorebuildrazr33 006.jpg64 KB · Views: 36
 -
 broncorebuildrazr33 003.jpg62.8 KB · Views: 37
 -
 broncorebuildrazr33 002.jpg84.2 KB · Views: 36
OP
OP
sp71eb
Sr. Member
I went ahead and pulled the exhaust(was easy because I made it modular), driveshafts, and transfer case. I had a friend help me pulling the transfer case and transmission. We strapped the trans to a jack with a cargo strap. Once the trans was out we replaced the clutch disc and pilot bearing. The rear adapter kit comes with a new spud shaft, seal, and bearing for the adapter plate. these all went together very nicely and installed smoothly. The kit included a bracket for the transfer case shifter. The bracket doesn't allow my JB fab twin sticks to line up correctly. These took a lot of bending and fabrication to make them fit the setup. I recommend contacting JB fab and getting a set of their twin stick shifters designed for the ax15/nv3550 setup. You also need to remove a bolt boss on the rear of the trans and clearance it for the adapter(this is not stated in the instructions because it isn't necessary with a nv3550). After drilling and retapping all of the holes for the crossmember(all of the old bolts snapped) I installed the trans and then transfer case. I found that all of the components fit very well. I did have to shorten my driveshaft by about 1 1/2" but I had a custom made driveshaft and it was a little longer than then it should have been to begin with. I will update with some more pictures and a driving update later in the week with pictures of the modified exhaust and shifters.
Attachments
-
 broncorebuildrazr33 038.jpg62.8 KB · Views: 60
 -
 broncorebuildrazr33 035.jpg51.7 KB · Views: 64
 -
 broncorebuildrazr33 033.jpg71.6 KB · Views: 56
 -
 broncorebuildrazr33 032.jpg69.8 KB · Views: 63
 -
 broncorebuildrazr33 028.jpg40.7 KB · Views: 49
 -
 broncorebuildrazr33 027.jpg50.4 KB · Views: 50
 -
 broncorebuildrazr33 025.jpg58.3 KB · Views: 52
 -
 broncorebuildrazr33 024.jpg58.6 KB · Views: 56
 -
 broncorebuildrazr33 042.jpg67.9 KB · Views: 79
 -
 broncorebuildrazr33 040.jpg64.4 KB · Views: 64
OP
OP
sp71eb
Sr. Member
Well finally drove the bronco home today!!! After about a month of fighting some gremlins here and there. Thanks to everyone on this site for all of the efi diag and words of encouragement. Turns out after a lot of searching for my backfire and idle problems it was a incorrectly calibrated maf sensor. It drives pretty nice down the road, but does wander a little over large bumps at speed. I got it up to around 65mph and it is a little noisy but manageable. I still have a few small things to tidy up and need to install my led backup lights. But as they say no project is ever really done. And it fits pretty nicely in my garage.
Attachments

OP
OP
sp71eb
Sr. Member
Just thought I would give a little update. The Bronco has been running good. Have been working out the little bugs here and there but everything is pretty good overall. I have about 675 miles on the truck so far. I took it across the state to go deer hunting for late muzzleloader season. And also have had it out ice fishing and to the shooting range. After about 600 miles I noticed a light miss under load. And from some help from others having the same problem found that I had some melted plug wires. Only the front 3 driver sides plugs seem to have a problem. I replaced my 30 dollar USA made Summit Racing plug wires for some 120 dollar Chinese made Accel ceramic plug wires. Hopefully these will fix my plug wire burning problem. Only time will tell. I also installed my led reverse lights. They are super bright and are almost as headlights. Also my led Trucklite headlights are really awesome at night and are a great upgrade.Thought I would post up some pictures of having her out hunting and doing some other activities. Next upgrades are finally installing my console and radio.
Attachments


OP
OP
sp71eb
Sr. Member
Sorry lots of pics;D
Attachments


OP
OP
sp71eb
Sr. Member
Bronco looks good, man you guys have had a heck of a winter up there. How long has it been since you were able to get out and ice fish like that?
We ice fish every year. Just don't have to drill through 24" of ice usually. Winter has been terrible this year. My car said -20 yesterday morning. I'm over it!
Turned out super nice! Thanks for posting all the detail.
broncojim2
Jr. Member
Thanks
Great job!!!
Great job!!!
OP
OP
sp71eb
Sr. Member
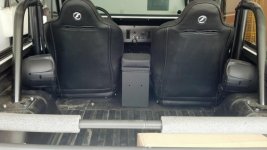
I just wanted to do a quick update on my build. The spark plug wires seem to be holding up well. I have almost 1100 miles on the truck so far. I was having some serious bump steer issues on the truck so I went ahead and got rid of the drop pitman arm. Wow what a difference that made. I can now accelerate from a dead stop through the gears without even touching the steering wheel and keep in a straight line. It really makes the truck a dream to drive. I also finally installed my stereo console and speakers. I modified the Smittybilt console by cutting off the cup holder and raising it up so the console will sit forward. I bought some 6.5 inch wakeboard tower speakers and mounted them on my roll cage. They sound pretty nice but could use a little bass. I might add a small subwoofer under the passenger seat in the future. The truck has been a lot of fun driving and the wife enjoys going out for weekend drives. The truck gets lots of looks and thumbs up. And everyone in jeeps wave at me like they want me to date their sisters%).
Attachments


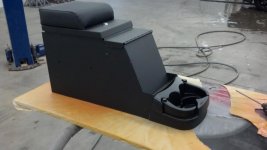


Good to hear you are enjoying the Bronco! The center console was bothering me for the same reasons, and I made similar modifications this weekend.
BradtheWelder
Full Member
So how has the Bronco been treating you? Any new modifications?
Similar threads
- Replies
- 15
- Views
- 10K