• Welcome to ClassicBroncos! - You are currently viewing the forums as a GUEST. To take advantage of all the site features, please take a moment to register. It's fast, simple and absolutely free. So please join our community today!
    If you have problems registering or can't log into your account, please contact Admin.

The ZF install begins

barronj

Bronco Guru
Joined
Jun 6, 2009
Messages
1,859
I bought my ZF 4 years ago? It sat on the side of the house, on the pallet it was shipped in on, wrapped in plastic, for 2 years. Then, in 2014, I started forward motion, had the ZF rebuilt (reverse and 5th were gone, and I discovered that one of the cross member mount bolt holes had been knocked off), bought the advance adapters kit from BC Broncos, the slave and master cylinder from the parts store, and then it sat, again.

Last night, I backed her in, dropped the exhaust, both driveshafts disconnected, unbolted most everything, and this morning, the 3 speed was divorced from the Bronco for good.

I have a few questions, naturally. My '68 came with a T shift. Has anyone installed the ZF and kept the T handled transfer case shifter? Seems like everyone goes to the JB Fab twin sticks.

The pressure plate is still the 3 prong; do I need to update this to the multi-tined pressure plate, or are we good here?

Pilot bearing, does it need to be changed?

Speedo cable- can't see where this plugs in

I had hydraulic hoses made when i did the Hydroboost back in the day (2009?), so I was planning to have hoses cut for this; Anyone care to give me an average length for the slave to MC hose?

I plan to fab up my own x member, will add pics of that.

Is there a special starter for this transmission? I just had to buy a starter to get if from the driveway (neighbor's) to my garage. She's an old lady and liked the extra car in her driveway.

Engine: '95 roller 351, AFR 185 heads, E303 cam, performer intake, BC Broncos headers & 2:1 exhaust. 4.10 gears, 33" tire.

EDIT: PHOTOBUCKET PHOTOS REPLACED BY IMGUR PHOTOS as of 2/14/2018
 
Last edited:

sykanr0ng

Bronco Guru
Joined
Aug 11, 2014
Messages
5,363
Yes you are going to need a diaphragm clutch, the hydraulic throw-out bearing/slave cylinder does not work well with the three finger clutches.

Speedo cable plugs into the rear output of the Dana 20 transfer case just like it did with the three speed transmission installed.

Same starter works.

Why not twin stick it?
(Just me being curious)
 

Crush

Contributor
Bronco Guru
Joined
May 30, 2007
Messages
3,463
Loc.
Greenbottom, WV
I used the three finger pressure plate with my
M5od install and it works fine. Same slave as the zf cause thats what i ordered it for. Unless u have an external slave zf
 

hankjr

Contributor
Bronco Guru
Joined
May 11, 2013
Messages
1,761
Rock auto has (or recently had) the reverse switch connector if you looking for it. I can get you a ball park hose length if you still need it. Consider cutting the top of your tunnel and up the angle completely off and then fabbing a cover versus just the hole for the shifter. Other option is to remove shifter to get tranny in and out.

Hank
 
OP
OP
barronj

barronj

Bronco Guru
Joined
Jun 6, 2009
Messages
1,859
Speedo cable plugs into the rear output of the Dana 20 transfer case just like it did with the three speed transmission installed.
Oh yeah, that was one of two holes that the differential fluid was pouring out of, don't know how I forgot about that!

Same starter works.
Thanks!

Why not twin stick it?
(Just me being curious)

Along with this ZF install, I'm putting in new interior (previously Miata seats and Jeep fold and tumble rear), carpet & insulation the front 1/2 for the wife who hates how hot the PS floor board gets, new rear leafs and safety belts in the rear for the kids, so I'm over extended on budget. If I don't have to drop another $200-$250 on twin sticks, I probably won't.

I used the three finger pressure plate with my
M5od install and it works fine. Same slave as the zf cause thats what i ordered it for. Unless u have an external slave zf
Internal slave.

Rock auto has (or recently had) the reverse switch connector if you looking for it. I can get you a ball park hose length if you still need it. Consider cutting the top of your tunnel and up the angle completely off and then fabbing a cover versus just the hole for the shifter. Other option is to remove shifter to get tranny in and out.

Hank

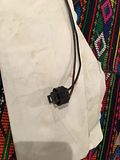
I might have that already. Is that what this plug is?


Please, I would appreciate the ballpark hose length.

Do you have a picture of the cutting/fabricating you're talking about, and is there an advantage?
 

hankjr

Contributor
Bronco Guru
Joined
May 11, 2013
Messages
1,761
yes thats the plug!

will get you a length tonight

i have some pics. PM me an email or phone # i can text too. i festered and festered on the shifter hole location so as not to be too big and got it perfect before cutting. the shifter fits like a glove in the hole, however there is no room at all to adjust drivetrain angle to facilitate hood clearance for me (351W EFI, 1"BL.) and i cant imagine doing a clutch job or engine pull as it sits. i lowered the entire body onto chassis so shifter hole location worked well. however down the road there is no clearance to pull tranny out. When i pull body off for final sheet metal work and paint, i will cut out the top of the tunnel and fab a cover.

Hank
 

naneumranch

Sr. Member
Joined
Sep 17, 2011
Messages
405
My tunnel had been cut a couple different times by PO. But here's my tunnel for ZF and twin stick set up.
c7f849a8ee9f28ee052913f43a8bcee2.jpg
4eb46fdab51bf438fb88b5472cafe34b.jpg
d87ad46ccff91958860fd2f32e4881a8.jpg


Sent from my iPhone using Tapatalk
 

naneumranch

Sr. Member
Joined
Sep 17, 2011
Messages
405
For a shifter just heat and bend some stainless steel.
7d308a97b7494215ad20ceb365ed2379.jpg


Sent from my iPhone using Tapatalk
 
OP
OP
barronj

barronj

Bronco Guru
Joined
Jun 6, 2009
Messages
1,859
8/15 progress update

I've spoken to a few of you offline and I really appreciate your help.

I probably should have switched to the diaphragm pressure plate, but I went with what was on there, the 3 finger.

I couldn't get it to stab though, something was interfering. I pulled it back out, and noticed a rub spot on an internal casting fin (bellhousing) and it corresponded to a spot on the pressure plate. I took some material out of the fin and it all went right in.

Now I start designing/building/measure-once-cut-twice method to fab up the cross member.

The advance adapter kit I got was missing a few things, and Advance Adapters made quick work of getting my needs filled. The gaskets are at my PO Box today. Will put the adapter stuff together, get the transfer case up and then do the cross member.

I took out a .5" x 1.25" section of this fin:
ewNddkD.jpg
 
Last edited:

DirtDonk

Contributor
Bronco Guru
Joined
Nov 3, 2003
Messages
48,830
Working on a '73 with a ZF install and the guys used a GearBanger to get the shifter back and shorten the throws. Seems to be working really slick so far, but haven't driven it extensively enough yet to know for sure.

Paul
 
OP
OP
barronj

barronj

Bronco Guru
Joined
Jun 6, 2009
Messages
1,859
8/16 progress update

I went with the master cylinder out of the 1990 F250 6 cyl (others are similar) because the hose connects to the end. I'd previously bought matching parts for a mid 90's F250 and it had the hose coming out of the bottom, but this created interference with the fender. I went through the speedo cable hole, opened it up with a step bit. I still need to drill a new hole for the speedo cable.

I had the hose made at the hydraulic house (Austin, off Montopolis & Burleson) took my master and slave cylinders and they put the right ends on for me. Someone else suggested 48", I went with 40" and it's spot on for length. A little longer or a little shorter could still work.

I made the push rod out of a 5/16 heim joint (Bohm Bearing Supply, off 183 & E 290/71). I used a 3" 5/16 bolt to mate to the 24tpi fine thread pitch that was on the heim joint. I used a 4.5" 5/16 bolt (18tpi) for the second section, joined by a 5/16 union. The union was course thread (18tpi), so I drilled out 40% w/ a 5/16 drill bit, cut the head off the 3" 5/16 bolt and tapped it down in the union. I drilled a small hole through the two (union & 3" bolt) and stuck a cotter pin in. I might've welded it, but the welder comes out later this week for cross member.
Total length for the pushrod is just under 8". Your mileage may vary, but I will put it on the tape tomorrow and get an exact length.

I used a 2" 5/16 bolt, drilled through the clutch pedal, spacer, nut, nylock nut.

jN7UnOb.jpg
 
Last edited:
OP
OP
barronj

barronj

Bronco Guru
Joined
Jun 6, 2009
Messages
1,859
I was exploring the backside of our property in CO and found an old (like 70-80 years old) discarded implement that I spotted a useful piece on, plucked it free and I'm going to try to utilize it for my shifter. I'll have to cut it down, maybe cut a section out of the middle and weld it back, not sure. I have a 9 ball and a cue ball for the shifter handle (8 ball on the throttle in the ski boat).

Transfer case got 50 years of grime scrubbed off and a few coats of semi gloss. The PTO cover got new stainless bolts.

ls4MY0w.jpg
 
Last edited:
OP
OP
barronj

barronj

Bronco Guru
Joined
Jun 6, 2009
Messages
1,859
8/17 progress update

When you get the advance adapters kit, you don't get instructions that specify that two things (spud shaft and bearing) need to be pressed in to place. I don't have a press, but I know that a press is but a bottle jack with a fancy stand, so I improvised.

I started with putting the bearing in the retainer ring (aluminum). It wasn't seating, and at this point, I hadn't called AA and found out about the pressing part, so I turned the oven to 350 and let the retainer piece heat up (and expand) for 20 minutes. I pulled it out with a towel, and the bearing dropped in with only a small amount of tap. I then set the retainer in a bowl of room temp water to cool it off so that it wouldn't damage the seals on the bearings; they are plastic or something that could melt.

0rVv1Uf.jpg


The next thing to go is the spud shaft, and it was going most of the way, but getting stuck at the last 5/8", the 5/8" that it needed to seat in the bearing. It must seat true because the next piece to go on (not mentioned in any instructions either) is the output gear off the old transmission, held on by a stubborn ring clip. I was freezing the spud shaft and massaging things with a BFH, but to no avail. I went to Home Depot and bought a piece of plumbing, a 1.5" nipple, 6" long. You can see what I did next to get it to seat.

yjzcJ2u.jpg

0JPEtbd.jpg


What you pull off the stock transmission:

xkXM8dB.jpg


The gear just slips down the splines easily and seats, then you put the clip on.

oqNiZUb.jpg


retainer clip installed:

M1YQYae.jpg


Once you have the gear clipped in, you put the rubber o-ring in the only exterior groove, apply a little RTV, lay the gasket down, and set the gear/spud shaft/bearing retainer in to place.

LznDjm4.jpg


Then you put the adapter ring over that, and button it all up. The adapter ring must be clocked correctly. The holes look somewhat uniform at a glance, but when you get that adapter ring on the D20 and you're bench pressing this thing in to position, a few bolts will take, but they won't all go unless you have it clocked on the D20 correctly. I put the adapter ring on the tail housing first, bolted it up, marked the bottom of it and the transmission together, and reinstalled it on the D20 the right way.

sqpHFGA.jpg


All buttoned up now and ready to go on the transmission.
 
Last edited:

savage

Contributor
Bronco Nut
Joined
Apr 18, 2007
Messages
2,483
Loc.
Renton
Is this the same ZF that is in my 97 HD F250 4x4? Which has overdrive.
 

sykanr0ng

Bronco Guru
Joined
Aug 11, 2014
Messages
5,363
Is this the same ZF that is in my 97 HD F250 4x4? Which has overdrive.

Probably.
Depends on what engine, since the 'bellhousing' is part of the transmission case.
But at least the same design.
 

savage

Contributor
Bronco Nut
Joined
Apr 18, 2007
Messages
2,483
Loc.
Renton
Probably.
Depends on what engine, since the 'bellhousing' is part of the transmission case.
But at least the same design.
Ok ,it's a 460 so the bell housing would be to big. So you would want one off a small block.
 
OP
OP
barronj

barronj

Bronco Guru
Joined
Jun 6, 2009
Messages
1,859
8/19 progress update

Got the transfer case installed and the exhaust hooked back up today so I could construct the cross member. The cross member isn't finished, needs a tweak and caps cut/welded for the ends, to seal them up. I used 1x2 rectangular tubing. It bolts to the original cross member hangers on the frame (the 90 degree) with 1/2" bolts, and the flat bottom/middle section will weld to a plate that bolts to the transmission with rubber isolators.

DFjc4dB.jpg

FP1r1SR.jpg

Ea7fTVF.jpg

TadlVvc.jpg
 
Last edited:
Top