• Welcome to ClassicBroncos! - You are currently viewing the forums as a GUEST. To take advantage of all the site features, please take a moment to register. It's fast, simple and absolutely free. So please join our community today!
    If you have problems registering or can't log into your account, please contact Admin.

tie rod ream question

Oldtimer

Contributor
Jr. Member with Sr. moments
Joined
Feb 4, 2005
Messages
1,795
Loc.
Sunnyvale, CA
Don't understand a scenario that would need to be welded. TRE is at big end of taper, nut & cotterpin is at small end of taper. How would insert walk out?

 

ntsqd

heratic car camper
Joined
Jan 30, 2005
Messages
5,953
Loc.
Upper SoKA
Typically the dimension across the corners of the nut is smaller than the OD of the cylinder or right about the same dim. Unless there's enough length in the TRE stud to allow a large OD, thick flat washer there's nothing holding the insert in place in the arm except for maybe a press-fit.
It was Toyota parts, but I've built this sort of assembly from scratch in the past.

ETA: I had to as James suggests and counter-bore the arm for the flange to get all of the thicknesses and lengths to play well together.
 

Apogee

Contributor
Bronco Guru
Joined
Nov 26, 2005
Messages
6,345
Loc.
Tangent, OR
...If you end up using the split sleeve, and a thru hole, you WILL end up needing to counter-bore the knuckle for that flange head. The arms are just too thick for the additional shoulder sticking up. Don't be tempted to make the arms thinner. That's cheating....

X2...I used the Ruff Stuff split inserts for my current setup and machined counterbores in the steering arms to account for the added thickness associated with the flange on the insert and maintain proper thread engagement with the nuts. FWIW, I put counterbores top and bottom and run a hardened washer under the nut, as this theoretically would have allowed me to use the knuckles in a TRO or TRU configuration, as well as provides a full hardened seat for the nut given the now-oversized hole through the steering arm for the OD of the insert. I did this because it both made sense to me at the time and if my TRO hit a snag for any reason, I could always fall back to TRU since packaging the new steering, bigger link diameters, custom track bar, hydro-assist, etc ended up being a fairly challenging packaging exercise. Just an aside, but I also machined parallel flats on either side of the ends of the steering arms first to make fixturing it in the milling machine vice much easier and more direct. While I'm sure it could be done by hand or in a drill press with the proper tools and more ingenuity than I possess, I personally wasn't going to risk putting in all that work just the scrap the knuckles at the end of the day.
 

jamesroney

Contributor
Bronco Guru
Joined
Sep 11, 2007
Messages
2,596
Loc.
Fremont, CA
X2...I used the Ruff Stuff split inserts for my current setup and machined counterbores in the steering arms to account for the added thickness associated with the flange on the insert and maintain proper thread engagement with the nuts. FWIW, I put counterbores top and bottom and run a hardened washer under the nut, as this theoretically would have allowed me to use the knuckles in a TRO or TRU configuration, as well as provides a full hardened seat for the nut given the now-oversized hole through the steering arm for the OD of the insert. I did this because it both made sense to me at the time and if my TRO hit a snag for any reason, I could always fall back to TRU since packaging the new steering, bigger link diameters, custom track bar, hydro-assist, etc ended up being a fairly challenging packaging exercise. Just an aside, but I also machined parallel flats on either side of the ends of the steering arms first to make fixturing it in the milling machine vice much easier and more direct. While I'm sure it could be done by hand or in a drill press with the proper tools and more ingenuity than I possess, I personally wasn't going to risk putting in all that work just the scrap the knuckles at the end of the day.
Similar story when someone put heim joints on with 3/4” thru bolts. Had to bore thru and counterbore for the shoulder. Never thought of making it symmetric. Easy enough to do when it’s on the Bridgeport, and making the permanent camber correction at the same time. I spend a fair amount of time scavenging old Dodge Castle nuts to get the bigger 1-1/16 wrench ones…so I don’t need the washer.
 
OP
OP
73azbronco

73azbronco

Contributor
Bronco Guru
Joined
Nov 11, 2007
Messages
8,778
You seem like a decent guy. So take this from someone that has done it wrong every way possible.

As with any machining operation, you want the correct cutting speed, pressure, and angle. Not too fast, not too slow. The reamer from Wild H does not like to go too fast.

You will be tempted to ream that hole with the knuckle on the Bronco. That is fine. Take the time to build a fixture (I use angle iron and clamps) to hold the right hand knuckle all the way OUTBOARD. (so a hard right turn.) Keep in mind that there is no situation where the reaming of the hole requires you to hold the drill vertical. It is always at some strange angle that must be perpendicular to the arm. You might be tempted to drill it when it is pointing forward. Don't do that. Once you start drilling, if the knuckle starts to want to "steer" then the knuckle flops, the reamer bites, and bad things happen. You want the knuckle arrested, so it does not move, and the most secure is to put it up against one side. (trust me on this.)

The split bushing is looking for a straight thru hole. The cone shaped one (frustrum) is looking for a tapered hole. There is no welding required on anything for any reason.

Make sure to mark your reamer at the top with indelible paint, or marker at the correct depth. You don't want to go too deep, and it ALWAYS seems like you are almost there, until you've gone too far. I usually just put the reamer into a correct sized hole, tape it with electrical tape, and then paint it with light colored paint. You are lucky, because you will be drilling from the top, which is a LOT easier than drilling from the bottom, upside down, with hot shavings burning holes in your face.

If you end up using the split sleeve, and a thru hole, you WILL end up needing to counter-bore the knuckle for that flange head. The arms are just too thick for the additional shoulder sticking up. Don't be tempted to make the arms thinner. That's cheating.

Don't worry about pitman arm angle now. You can worry about that after this tie rod end is right. I'm going to say that once you fix this, you won't need any further corrections.
excellent thanks

I plan to bore slow speed per recommendation, going to have to jury rig a tow strap or the like to keep knuckle from moving.

Will worry about bushing if taper does not improve the tie rod end fitment. I think if I make the hole circular and not oblong that should cure it.


got alignment checked today, pretty good except camber: .8 left .6 right, should be 1.0 to 2.0. Im thinking of tapered shims, ingalls no longer around but IH parts has them, if i install at 1.0 degree, it will be center of tolerance.

Question using the shim, I'm guessing the shim also effects caster depending how you rotate the camber?.

my caster now at 2.6 left, 3.0 right, should be 2.8 to 4.3, thats the wedge angle so one side is fine, ill go flex it and make it work:)

Toe in .48deg in, tracks perfectly straight.

Odd, rear wheels show a .48deg toe out....

https://www.ihpartsamerica.com/store/SII-SHIM-CAMBER.html
 
Last edited:

DirtDonk

Contributor
Bronco Guru
Joined
Nov 3, 2003
Messages
51,616
I would NOT go to the trouble to change those camber numbers.
The cross-camber may be right or wrong, but others will have to chime in on that. I never remember which was is the preferred. More on the driver, or less on the driver.
The factory specs were fine back when, but the ones you're lucky enough to have right now are generally preferred over the too-much original specification.
In fact, only the toe-in spec is still used as-is most of the time. We try to reduce the camber and increase the caster over the original specs more often than not.

Paul
 
OP
OP
73azbronco

73azbronco

Contributor
Bronco Guru
Joined
Nov 11, 2007
Messages
8,778
well there ya have it. I'll just solve my egg shaped tie rod hole issue!
 

Oldtimer

Contributor
Jr. Member with Sr. moments
Joined
Feb 4, 2005
Messages
1,795
Loc.
Sunnyvale, CA
Tom's has 5 bolt and 6 bolt camber shims.
1784067009844.jpeg
 

jamesroney

Contributor
Bronco Guru
Joined
Sep 11, 2007
Messages
2,596
Loc.
Fremont, CA
Typically the dimension across the corners of the nut is smaller than the OD of the cylinder or right about the same dim. Unless there's enough length in the TRE stud to allow a large OD, thick flat washer there's nothing holding the insert in place in the arm except for maybe a press-fit.
It was Toyota parts, but I've built this sort of assembly from scratch in the past.

ETA: I had to as James suggests and counter-bore the arm for the flange to get all of the thicknesses and lengths to play well together.
5/8-18 normal hex nut is 15/16 across the flats. Exactly as you descibed.
5/8-18 Heavy Hex nut comes with a 1-1/16 hex across the flats, which plays very well with the split bushing at .875 on the little end. But of course the heavy hex castle nut is proportionally thicker. So I have to trim them on the lathe to make it the same height, and get the cotter pin to fit.

I used to find them on late 70's Dodge D44, but it MIGHT be that they used them on the drag link. I just know I had a handful, and they are getting harder to find. Of course if you are willing to buy qty 100, they are like $1.00 each brand new.
 

lars

Contributor
Been here awhile
Joined
Jun 29, 2001
Messages
3,333
Loc.
NorCal flatlands
How to make your tie rod not weebly-wobbly when using straight split inside taper adapters. In this case (late 70's F150 knuckles I think but I've forgotten exactly) the sleeve still didn't emerge below the arm and the castle nut sucked the taper down enough to get the cotter pin in with a washer under the nut.

IMG_3317.jpeg IMG_3318.jpeg IMG_3319.jpeg IMG_3320.jpeg IMG_3321.jpeg IMG_3322.jpeg
 

Tamnative3

Jr. Member
Joined
Feb 12, 2026
Messages
71
excellent thanks

I plan to bore slow speed per recommendation, going to have to jury rig a tow strap or the like to keep knuckle from moving.

Will worry about bushing if taper does not improve the tie rod end fitment. I think if I make the hole circular and not oblong that should cure it.


got alignment checked today, pretty good except camber: .8 left .6 right, should be 1.0 to 2.0. Im thinking of tapered shims, ingalls no longer around but IH parts has them, if i install at 1.0 degree, it will be center of tolerance.

Question using the shim, I'm guessing the shim also effects caster depending how you rotate the camber?.

my caster now at 2.6 left, 3.0 right, should be 2.8 to 4.3, thats the wedge angle so one side is fine, ill go flex it and make it work:)

Toe in .48deg in, tracks perfectly straight.

Odd, rear wheels show a .48deg toe out....

https://www.ihpartsamerica.com/store/SII-SHIM-CAMBER.html
 

Tamnative3

Jr. Member
Joined
Feb 12, 2026
Messages
71
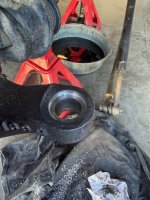
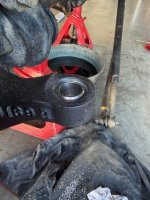
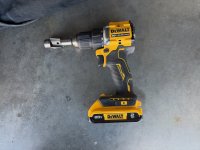
I have a 74 that the previous owner put either 70,s era Bronco or F-150 knuckles on. He had a Heim linkage setup that was shot. I got in touch with WH and the set me up with the reamer and the inserts . I went with TRO installation as said before it is much easier. The conical 7* insert once installed can not fall out so there’s no need for weld. Mark your reamer with tape as the black marker will disappear. It isn’t all that hard just time consuming. I used cordless drill as you have more control, I did try the 2 handle electric drill but it is way over kill and a lot harder to handle plus you are going to be lifting it out to check your progress a lot so I would use te cordless. Get in touch with WH and they will set you up with what you need and give good advice.
Have fun
 
Top