• Welcome to ClassicBroncos! - You are currently viewing the forums as a GUEST. To take advantage of all the site features, please take a moment to register. It's fast, simple and absolutely free. So please join our community today!
    If you have problems registering or can't log into your account, please contact Admin.

Tony's 69 Bronco Build

DirtDonk

Contributor
Bronco Guru
Joined
Nov 3, 2003
Messages
47,821
Hey Tom. Do you know in what month the truck was built by any chance? I don't remember seeing it listed, so thought I'd ask.
Reason I'm wondering is the lack of a return vent on the aux tank.

I was aware that prior to approx. '70.5 or so, there was no evap canister or small 1/4" vent line in the aux tank, but thought the larger fill-vent had been added by '69.
So maybe it was an early-'69 kind of thing?

Like to keep the info as up-to-date as possible on the website and in the book.

Thanks!

Paul
 
OP
OP
Tom Hartz

Tom Hartz

Full Member
Joined
May 18, 2010
Messages
209
Hey Tom. Do you know in what month the truck was built by any chance? I don't remember seeing it listed, so thought I'd ask.
Reason I'm wondering is the lack of a return vent on the aux tank.

I was aware that prior to approx. '70.5 or so, there was no evap canister or small 1/4" vent line in the aux tank, but thought the larger fill-vent had been added by '69.
So maybe it was an early-'69 kind of thing?

Like to keep the info as up-to-date as possible on the website and in the book.

Thanks!

Paul

Paul,

Sorry it took me so long to get back to you, it is that work thing again. This next week I hope to get back to the Bronco and post some more of the build.

To answer your question the VIN on the frame looks like it reads E14100 so it was built in Oct. 1969?
Hope this helps.

Thank you...
Tom
 

DirtDonk

Contributor
Bronco Guru
Joined
Nov 3, 2003
Messages
47,821
Thanks. So it's "semi-early" but not really that early.
I'll do some more digging to see what Broncos have what.

Paul
 

Numberfool

Full Member
Joined
Sep 8, 2012
Messages
173
Hello Tom,

Can you tell me if you went with the short or long tube headers and maybe the why?

It's time to buy headers for my 71' build and I want to avoid the routing issues I had on my 75'.

I am going with the same tranny swap you did and it appears you did the cross over right after the bell housing?

Thanks

Wayne
 
OP
OP
Tom Hartz

Tom Hartz

Full Member
Joined
May 18, 2010
Messages
209
Hello Tom,

Can you tell me if you went with the short or long tube headers and maybe the why?

It's time to buy headers for my 71' build and I want to avoid the routing issues I had on my 75'.

I am going with the same tranny swap you did and it appears you did the cross over right after the bell housing?

Thanks

Wayne

Wayne,

I went with short tube headers because I am looking for more low end power. This Bronco will not be raced or wound up tight.
The carb is only 500 CFM so the throttle response should be crisp. The fit of the headers are great.
I picked them up from Wild Horses 4WD.
The cross over is just forward of the bell housing under the back of the pan.

If you need any info or pictures, let me know.

Thank you.
Tom
 

Numberfool

Full Member
Joined
Sep 8, 2012
Messages
173
Thanks Tom,

Our last real muffler shop in Camarillo closed a year or so back. Since my eldest goes to school out your direction, I may end up just loading the rolling chassis on the trailer and have the guy you recommended do the exhaust tubing and hanging.

I'll call WH and see what they recommend then on the header lengths. I have a crate built up Ford Racing motor. I believe the X302 is a decently mild build at 9:1 compression , so the shorties are probably a good fit for my application as well.

Looking forward to seeing your build progress along. It is looking great. Real curious to see if the body settles on the suspension when you post up some of your assembly phase pics.
 
OP
OP
Tom Hartz

Tom Hartz

Full Member
Joined
May 18, 2010
Messages
209
Thanks Tom,

Our last real muffler shop in Camarillo closed a year or so back. Since my eldest goes to school out your direction, I may end up just loading the rolling chassis on the trailer and have the guy you recommended do the exhaust tubing and hanging.

I'll call WH and see what they recommend then on the header lengths. I have a crate built up Ford Racing motor. I believe the X302 is a decently mild build at 9:1 compression , so the shorties are probably a good fit for my application as well.

Looking forward to seeing your build progress along. It is looking great. Real curious to see if the body settles on the suspension when you post up some of your assembly phase pics.

This seems to be a sign of the times. Don't load up the chassis yet. The guy that did the Bronco no longer works at Midas. There are some small shops still in Simi and that is closer to you.

Thanks for the compliments and good luck.
 

SSDDBRONCO

Bronco Guru
Joined
Nov 12, 2009
Messages
2,171
Loc.
Los Angeles
Tom is actually correct. Im out in Simi and there is one guy that does some really nice exhaust work. Never did a car of mine with him but i stopped by to see his work and he was working on a bad ass nova and his exhaust work was like art. I would have to stop by to get his name and number cant remember right now, but he's like 5 min from my house.
 
OP
OP
Tom Hartz

Tom Hartz

Full Member
Joined
May 18, 2010
Messages
209
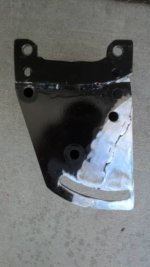
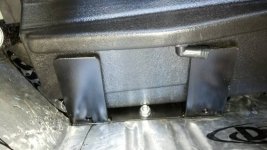
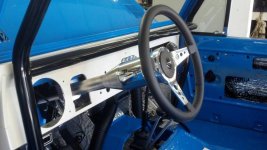
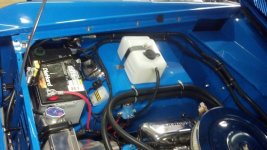
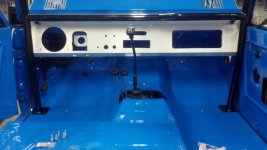
I did some more on the AC/Heat. The unit was mounted to the fire wall and on top of the bracket I made for more support.

attachment.php


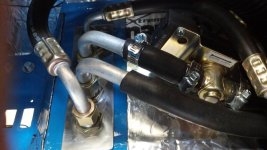
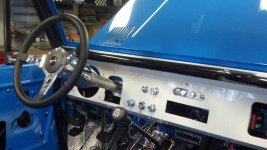
After the unit was mounted I ran the hoses under the dash. They are tight but it all worked out.

attachment.php


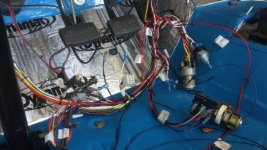
With the lines done under the dash I decided to go back under the hood. This is when the fun started, NOT.
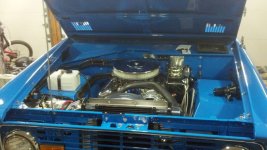
I was planning on using a electric fan because I can't stand the sound of a direct drive fan. The fan I picked had a high CFM rating and it was 3.0 inches thick. That seemed fine until I found I had 2.9 inches of room. You all know the saying "one modification leads to another" it is so true.

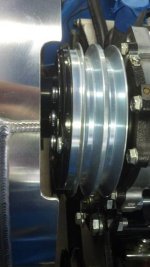
I found a Haden clutch #2765 and fan #3618 that looks like it will work, with some help. The clutch cleared the radiator by .400 on a inch.

attachment.php


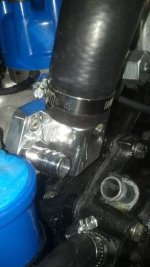
However the fan hit the AC Compressor.
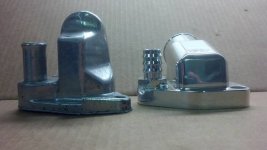
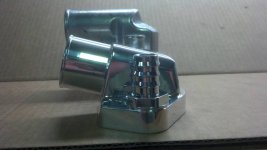
The only thing I could see to do was move the AC Compressor back and use the front belt groove. I modified the bracket so it went back and up a little to clear the valve cover.
Now the fan clears by about .300 of a inch.
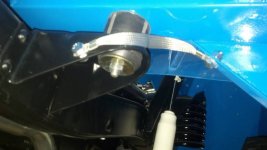
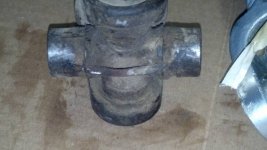
The clutch was a real pain mounting it to the water pump with bolts so I went with studs.
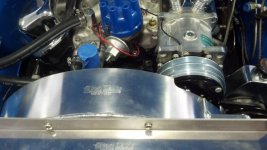
Next came the shroud. It cleared the fan after I made a new lower mount. I had to drop it some to make up for the 1" body lift that was done to clear the 5 speed. Even with the compressor moved back it still hit the shroud.
I notched the side for the compressor and I had to do the bottom to clear the clutch when installing it. The shroud would not fit between the clutch and the radiator.

attachment.php


attachment.php


I knew the belt would be short after raising the compressor about .500 of a inch. No problem I thought I will get the next one bigger. Not so easy. The next Gates number was not big enough and the one after that was too big. I need a size in between. After looking at it I decided to modify the Power Steering adjusting bracket so it can travel a little further and I can run the bigger belt.

attachment.php


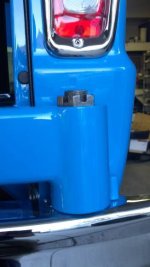
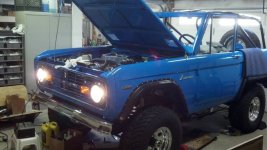
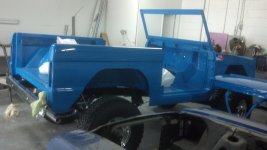
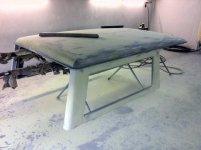
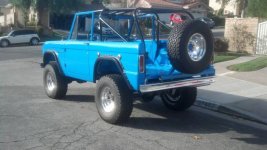
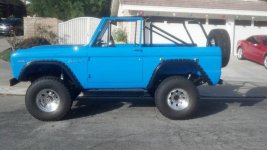
I did however pick up the painted tire carrier and it looks great.
Nick did a fantastic job blending in all of my welds.

attachment.php


attachment.php


Well I am done for now. I will post more pictures when I get them.

Thanks... Tom
 

Attachments

  • Photo Aug 30, 9 30 25 PM.jpg
    Photo Aug 30, 9 30 25 PM.jpg
    81.3 KB · Views: 197
  • Photo Aug 30, 9 30 06 PM.jpg
    Photo Aug 30, 9 30 06 PM.jpg
    53.9 KB · Views: 195
  • Photo Aug 30, 9 30 03 PM.jpg
    Photo Aug 30, 9 30 03 PM.jpg
    46.4 KB · Views: 195
  • Photo Aug 30, 9 28 59 PM.jpg
    Photo Aug 30, 9 28 59 PM.jpg
    39.2 KB · Views: 194
  • Photo Aug 30, 9 30 00 PM.jpg
    Photo Aug 30, 9 30 00 PM.jpg
    80.5 KB · Views: 195
  • Photo Aug 30, 9 30 16 PM.jpg
    Photo Aug 30, 9 30 16 PM.jpg
    89.3 KB · Views: 195
  • Photo Aug 30, 9 29 57 PM.jpg
    Photo Aug 30, 9 29 57 PM.jpg
    42.7 KB · Views: 192
  • Photo Aug 30, 9 29 47 PM.jpg
    Photo Aug 30, 9 29 47 PM.jpg
    40.2 KB · Views: 194
Last edited:
OP
OP
Tom Hartz

Tom Hartz

Full Member
Joined
May 18, 2010
Messages
209
Here is a shot of the steering column and steering wheel installed. I am going to leave the column raw stainless because it looks good and it matches the twin sticks.

attachment.php


Now on the the electrical. Good grounds are important so we reduce the chance of electrical gremlins and everything will work properly.
Here is the ground from the engine to the frame and the frame to the body.

attachment.php


attachment.php


I am installing the Painless wiring kit. The first look is impressive. Everything seems to be laid out very nice, I will keep you posted.
The kit came with a new plastic glove box that holds the fuse block.

attachment.php


Here is a shot of the harness before it is laid out.

attachment.php


Harness is laid out under the hood and I had it exit the firewall in 3 places.

attachment.php


attachment.php


I started making the connections under the dash and moving away from the fuse block.

attachment.php


That is it for now. Back to the garage.

Thanks for looking...
 

Attachments

  • Photo Aug 30, 9 26 40 PM.jpg
    Photo Aug 30, 9 26 40 PM.jpg
    83.1 KB · Views: 9
  • Photo Aug 30, 9 28 52 PM.jpg
    Photo Aug 30, 9 28 52 PM.jpg
    100.4 KB · Views: 190
  • Photo Aug 30, 9 29 21 PM.jpg
    Photo Aug 30, 9 29 21 PM.jpg
    46.3 KB · Views: 197
  • Photo Aug 30, 9 29 34 PM.jpg
    Photo Aug 30, 9 29 34 PM.jpg
    70.5 KB · Views: 199
  • Photo Aug 30, 9 29 32 PM.jpg
    Photo Aug 30, 9 29 32 PM.jpg
    55.5 KB · Views: 198
  • Photo Aug 30, 9 29 11 PM.jpg
    Photo Aug 30, 9 29 11 PM.jpg
    107 KB · Views: 194
  • Photo Aug 30, 9 28 49 PM.jpg
    Photo Aug 30, 9 28 49 PM.jpg
    86.5 KB · Views: 198
  • Photo Aug 30, 9 28 36 PM.jpg
    Photo Aug 30, 9 28 36 PM.jpg
    89.8 KB · Views: 190
  • Photo Aug 30, 9 28 42 PM.jpg
    Photo Aug 30, 9 28 42 PM.jpg
    90.2 KB · Views: 195
Last edited:
OP
OP
Tom Hartz

Tom Hartz

Full Member
Joined
May 18, 2010
Messages
209
The Painless kit worked out great and everything worked with no problems.
It's alive !!!

attachment.php


The new drive shafts arrived however the silver is not going to work. I don't want them to stick out that much. They will be painted black.

attachment.php


The front drive shaft still has a original u-joint.

attachment.php


Nick the bodyman had some pictures that he took at his shop. They are out of order of the build. However I am posting them here so they are easier to see.

The dash was part aftermarket and part original. The glove box was moved over to clear the roll cage and I had to add the AC controls.

attachment.php


attachment.php


Nick was able to set the body on the frame with the engine installed. That made my life easier.

attachment.php


attachment.php


attachment.php


The tailgate was also modified. I had the licence plate moved to the left so it would clear the spare tire that has been centered.

attachment.php


Nick is working the top now. It should be shot in the next week or so. It will be the same color as the dash. He can lay paint. The dash looks like porcelain. The top is going to look great.

attachment.php


attachment.php


I hope to start the engine this weekend. I will let you all know how that goes.

Again, thanks for looking.
 

Attachments

  • Photo Aug 30, 9 28 19 PM.jpg
    Photo Aug 30, 9 28 19 PM.jpg
    41.3 KB · Views: 186
  • Photo Aug 30, 9 28 15 PM.jpg
    Photo Aug 30, 9 28 15 PM.jpg
    85.3 KB · Views: 185
  • Photo Aug 30, 9 28 10 PM.jpg
    Photo Aug 30, 9 28 10 PM.jpg
    67.5 KB · Views: 187
  • Photo Aug 31, 10 26 12 PM.jpg
    Photo Aug 31, 10 26 12 PM.jpg
    92.7 KB · Views: 186
  • Photo Aug 30, 9 26 31 PM.jpg
    Photo Aug 30, 9 26 31 PM.jpg
    66.2 KB · Views: 188
  • Photo Aug 30, 9 26 34 PM.jpg
    Photo Aug 30, 9 26 34 PM.jpg
    65.2 KB · Views: 188
  • Photo Aug 30, 9 26 43 PM.jpg
    Photo Aug 30, 9 26 43 PM.jpg
    60.9 KB · Views: 185
  • Photo Aug 30, 9 26 22 PM.jpg
    Photo Aug 30, 9 26 22 PM.jpg
    63.3 KB · Views: 186
  • Photo Aug 31, 10 26 22 PM.jpg
    Photo Aug 31, 10 26 22 PM.jpg
    120.8 KB · Views: 187
  • Photo Aug 30, 9 32 26 PM.jpg
    Photo Aug 30, 9 32 26 PM.jpg
    95.3 KB · Views: 187
  • Photo Aug 30, 9 28 39 PM.jpg
    Photo Aug 30, 9 28 39 PM.jpg
    79.9 KB · Views: 187
Last edited:

DirtDonk

Contributor
Bronco Guru
Joined
Nov 3, 2003
Messages
47,821
Lookin' great there Tom. Glad to see it's progress again. And thanks for the additional pics from during the body work stage too. Always glad to see stuff like that no matter what order they're in.

What a great feeling to get the battery hooked up and have things actually turn on when you flip a switch!
Going to be working towards that goal on a friend's '73 tomorrow in fact. Just starting the wiring basically though, so likely won't be starting the engine for another couple of weeks.

Ya know... That Bronco is going to be part of the family and won't want to leave the garage when you're done. Just going to have to get another one for Tony!
Keep the pics coming.

Paul
 
OP
OP
Tom Hartz

Tom Hartz

Full Member
Joined
May 18, 2010
Messages
209
It Runs !!!!!
I have a video but I can't get it to download.
The engine was easy to start but it was running on 6 cylinders. After a hour or so trying to figure out what was going on I found out the electronic pick up in the distributor was acting up. I went old school and put points in it. After that the engine ran great. The throttle response is fantastic. This Bronco should be real fun to drive.
 

gnsteam

Contributor
Bronco Guru
Joined
Jan 29, 2010
Messages
3,573
Loc.
Lincoln NE
Sweet build!!:cool::cool: I always look forward to seeing updates of this build. Great workmanship Tom.:cool:
 
OP
OP
Tom Hartz

Tom Hartz

Full Member
Joined
May 18, 2010
Messages
209
Time for a update. I have been working a ton lately and that keeps eating away at the Bronco time.
There have been a couple of little things I have been battling. One has been the leaking thermostat housing. I had to go to one from a Explorer with a 5.0 to clear the AC pump. The factory housing and the stock housing are close but not exactly the same where they bolt to the manifold. The Explorer housing is also real close to the bypass hose on the water pump, so some grinding had to be done. After fighting a leak at the gasket, changing gasket manufacturers, making sure everything is clean and flat it still leaked. I think the groove that holds the thermostat was not deep enough and that was holding the housing out a little. I ended up going with one from Summit Racing that was a little shorter and it uses a O-Ring instead of a gasket. So far it has done the trick.

attachment.php


Here you can see it is shorter and the fit is much better.

attachment.php


attachment.php


The other thing I am battling and so far not winning is a brake fluid leak where the braided hose connects to the front brake caliper. I contacted Wild horses about this and Johnny sent me a new hose and some copper washers, however it is still seeping. I am not sure why but I will figure it out. It is so frustrating when all of the parts are new and stupid little problems like this happen.

Some good news is the Bronco came out of the garage today on its own power. I drove it about 5 miles and it sure feels good.

attachment.php


attachment.php


attachment.php


attachment.php


After that she was loaded on a trailer and back to the body shop to have the top installed. I will post pictures when I get them.

Thanks for looking.
Tom
 

Attachments

  • Photo Aug 30, 9 25 42 PM.jpg
    Photo Aug 30, 9 25 42 PM.jpg
    47.9 KB · Views: 182
  • Photo Aug 30, 9 25 52 PM.jpg
    Photo Aug 30, 9 25 52 PM.jpg
    53.7 KB · Views: 181
  • Photo Aug 30, 9 26 15 PM.jpg
    Photo Aug 30, 9 26 15 PM.jpg
    49.8 KB · Views: 181
  • Photo Aug 30, 9 25 56 PM.jpg
    Photo Aug 30, 9 25 56 PM.jpg
    90.3 KB · Views: 186
  • Photo Aug 30, 9 26 06 PM.jpg
    Photo Aug 30, 9 26 06 PM.jpg
    95.3 KB · Views: 182
  • Photo Aug 30, 9 26 10 PM.jpg
    Photo Aug 30, 9 26 10 PM.jpg
    84.5 KB · Views: 181
  • Photo Aug 30, 9 26 18 PM.jpg
    Photo Aug 30, 9 26 18 PM.jpg
    86.8 KB · Views: 181
Last edited:

DirtDonk

Contributor
Bronco Guru
Joined
Nov 3, 2003
Messages
47,821
Inspect the mating surface on the caliper itself Tom. I've seen just slightly deformed, or not fully machined surfaces where the copper washer goes, cause trouble like this.
If the washers don't look like they're getting the sealing rings pressed into them evenly all the way around, that could do it.
Let us know and, if that appears to be the case, we'll send you another caliper.

It's not common, but I've seen it happen. It's hard to detect until you look at the washers to see if they're getting evenly seated when you tighten the bolt.

Paul
 
Top