


Community
Buy / Sell


Bronco Tech
3 Arm Wiper Setup
Fix Motor Mount
Roll Cage Braces
Throttle Body 65mm
Wheel Alignment
Heat Riser Replacement
Vent Window Repair
Center Console Mount
Straighten Bumper
Ford 6R80 6 spd
More Tech...
Fix Motor Mount
Roll Cage Braces
Throttle Body 65mm
Wheel Alignment
Heat Riser Replacement
Vent Window Repair
Center Console Mount
Straighten Bumper
Ford 6R80 6 spd
More Tech...

-
Welcome to ClassicBroncos! - You are currently viewing the forums as a GUEST. To take advantage of all the site features, please take a moment to register. It's fast, simple and absolutely free. So please join our community today!If you have problems registering or can't log into your account, please contact Admin.
You are using an out of date browser. It may not display this or other websites correctly.
You should upgrade or use an alternative browser.
You should upgrade or use an alternative browser.
Tony's 69 Bronco Build
- Thread starter Tom Hartz
- Start date
OP
OP
Tom Hartz
Full Member
- Joined
- May 18, 2010
- Messages
- 214
Wow that is really coming together nice. I drove by about 3 weeks ago in my Bronco and saw it in there as your garage door was up. I was going to stop but didn't see anyone around and I had the family and dog.
Stop by anytime. If the door is up someone is out there.
OP
OP
Tom Hartz
Full Member
- Joined
- May 18, 2010
- Messages
- 214
Inspect the mating surface on the caliper itself Tom. I've seen just slightly deformed, or not fully machined surfaces where the copper washer goes, cause trouble like this.
If the washers don't look like they're getting the sealing rings pressed into them evenly all the way around, that could do it.
Let us know and, if that appears to be the case, we'll send you another caliper.
It's not common, but I've seen it happen. It's hard to detect until you look at the washers to see if they're getting evenly seated when you tighten the bolt.
Paul
Thank you Paul.
I will check it out when I get the Bronco back with the top on.
I will also post some updated pictures.
Tom
WASP1971
Jr. Member
That looks like it came off the show overhaulin. What a beautiful Bronco. You sir, are a bad ass
OP
OP
Tom Hartz
Full Member
- Joined
- May 18, 2010
- Messages
- 214
The Bronco came back from the body shop with the top installed. Here are some pictures.


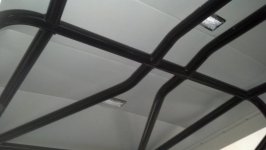
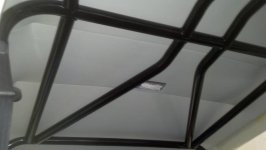
I would like the Bronco to be quiet and comfortable so we added some braces to the top and it will Dynamated along with the body.

After I meet with the upholster to discuss how much I can cover on the floor I will get started on that.
One problem I was having before it went to the body shop was a brake fluid leak at the front calipers that I could not get to seal.
The original braided lines that came with the disc brake kit are .585 thick with a + or - .006 to .010 of a taper, that is at the fitting where the banjo bolt goes thru.
I had a thin copper washer on each side that are .038 thick. It seems like they are just too thin to make up the difference in the fittings. I talked to Wild Horses and they sent me some thicker and softer copper washers to try.
The problem was with the thicker washers the banjo bolt would only have two threads into the calipers and that will not work. So I went to our local hose shop to see what they thought. He took one look and said lets make up some new hoses with thinner ends. The new ends are .375 thick and even with the thicker washers the bolt has plenty of threads to go into the caliper. Now we have no leaks.
Looks like we are getting to the final touches, I hope. I did mount the mirrors. Measure 4 times drill once. I needed a beer after that.


That is it for now.
Thanks for looking.
I would like the Bronco to be quiet and comfortable so we added some braces to the top and it will Dynamated along with the body.
After I meet with the upholster to discuss how much I can cover on the floor I will get started on that.
One problem I was having before it went to the body shop was a brake fluid leak at the front calipers that I could not get to seal.
The original braided lines that came with the disc brake kit are .585 thick with a + or - .006 to .010 of a taper, that is at the fitting where the banjo bolt goes thru.
I had a thin copper washer on each side that are .038 thick. It seems like they are just too thin to make up the difference in the fittings. I talked to Wild Horses and they sent me some thicker and softer copper washers to try.
The problem was with the thicker washers the banjo bolt would only have two threads into the calipers and that will not work. So I went to our local hose shop to see what they thought. He took one look and said lets make up some new hoses with thinner ends. The new ends are .375 thick and even with the thicker washers the bolt has plenty of threads to go into the caliper. Now we have no leaks.
Looks like we are getting to the final touches, I hope. I did mount the mirrors. Measure 4 times drill once. I needed a beer after that.
That is it for now.
Thanks for looking.
Attachments
-
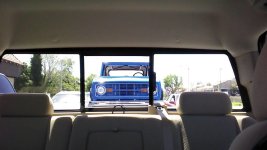 Photo Aug 30, 9 19 10 PM (1).jpg88.4 KB · Views: 286
 -
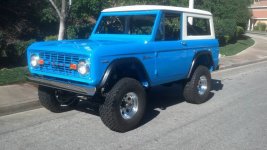 Photo Aug 30, 9 20 32 PM (1).jpg97.4 KB · Views: 284
 -
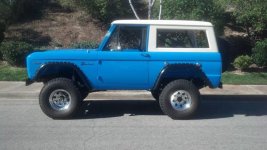 Photo Aug 30, 9 25 09 PM.jpg90.4 KB · Views: 287
 -
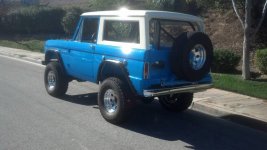 Photo Aug 30, 9 25 16 PM.jpg80.3 KB · Views: 286
 -
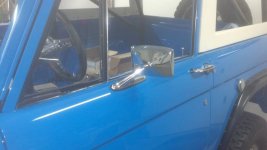 Photo Aug 30, 9 25 06 PM.jpg52.3 KB · Views: 287
 -
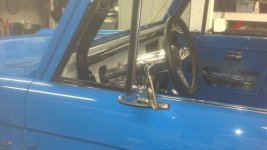 Photo Aug 30, 9 25 19 PM.jpg57.9 KB · Views: 282
 -
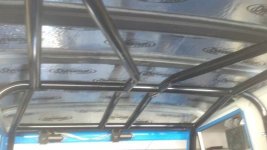 Photo Aug 30, 9 25 26 PM.jpg67.2 KB · Views: 289
Last edited:
- Joined
- Nov 3, 2003
- Messages
- 49,403
Looks great. Gonna be a hit at the beach for sure!
Sorry about the hoses. Interesting issue. I wonder did you try one thick washer and one thin before you had the new hoses made? Looks like the thicker one was only needed on one side is why I am asking.
Might still not have been enough to get you the thread engagement you needed, but I was curious since that will help us determine what's up.
Thanks
Paul
OP
OP
Tom Hartz
Full Member
- Joined
- May 18, 2010
- Messages
- 214
Yes I did do the thick and thin thing. I had the thick one at the caliper. It is all good now.
The Bronco is at the AC shop getting the system charged and one longer hose made because I could not remove the drivers side valve cover.
Tomorrow I hope to install the sway bars I ordered yesterday from you guys.
Wow place a order and get it 24 hours later. I can't ask for anything more.
Thanks for the service...
Tom
Last edited:
OP
OP
Tom Hartz
Full Member
- Joined
- May 18, 2010
- Messages
- 214
I like the tire carrier stealthness! I have to ask, was the stoock sheetmetal( grill, fenders hood etc too far gone?). My bodyman thrives with old OEM sheetmetal.
All of the parts are sold. The braces under the hood where cut. Fenders and grill where rough so it seemed like a better idea to replace them.
I must say the OEM parts do fit better. We had a replacement drivers door that just would not line up. It would have been fine for a wheeler but not a project like this.
OP
OP
Tom Hartz
Full Member
- Joined
- May 18, 2010
- Messages
- 214
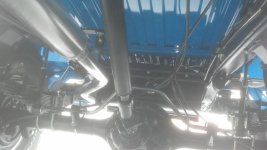
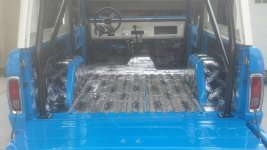
I did some more work this weekend. The Dynamat was completed. The Bronco should be quieter and hopefully cooler in the summer and warmer in the winter.


The black and silver Dynamat is the same, the manufacturer changed the color. I was not too worried because it will be covered up.
I also had the Vintage Air AC charged that we bought from BC Broncos. The heat and AC crank in this thing. I had to have a longer hose made because the drivers side valve cover could not be removed without undoing a line. After the system is charged that would not fly. Other than that the kit fit fine. It is tight under the dash but it all fits.
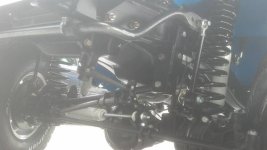
Like I have said in the past this is a over the top street Bronco so I wanted street manners. The Wildhorses 3 1/2" lift is soft so I can see off road it will perform. However on the street a little less lean would be nice. I called Wildhorses and in less than 24 hours I had front and rear sway bars.
The bars are made by Hellwig. The fit and finish is very good. The bars come gray hammertone. The front disconnects are a little hard to undo. Since this will never happen it will not be a problem. The passenger side end link was so close to the factory exhaust hanger a little grinding had to be done, not a big thing. On the road the difference in the sway is like night and day.
Here are some pictures of the rear. Sorry the lighting is off it was a real bright day.

The front is a real big bar and it was nice to see Hellwig included aluminum clamps to keep the sway bar from shifting side to side.

Tomorrow I am going to load her on the trailer and get a quote on the interior.
The project is slowly coming to a end.
Thanks for looking.
Tom
The black and silver Dynamat is the same, the manufacturer changed the color. I was not too worried because it will be covered up.
I also had the Vintage Air AC charged that we bought from BC Broncos. The heat and AC crank in this thing. I had to have a longer hose made because the drivers side valve cover could not be removed without undoing a line. After the system is charged that would not fly. Other than that the kit fit fine. It is tight under the dash but it all fits.
Like I have said in the past this is a over the top street Bronco so I wanted street manners. The Wildhorses 3 1/2" lift is soft so I can see off road it will perform. However on the street a little less lean would be nice. I called Wildhorses and in less than 24 hours I had front and rear sway bars.
The bars are made by Hellwig. The fit and finish is very good. The bars come gray hammertone. The front disconnects are a little hard to undo. Since this will never happen it will not be a problem. The passenger side end link was so close to the factory exhaust hanger a little grinding had to be done, not a big thing. On the road the difference in the sway is like night and day.
Here are some pictures of the rear. Sorry the lighting is off it was a real bright day.
The front is a real big bar and it was nice to see Hellwig included aluminum clamps to keep the sway bar from shifting side to side.
Tomorrow I am going to load her on the trailer and get a quote on the interior.
The project is slowly coming to a end.
Thanks for looking.
Tom
Attachments
Last edited:
OP
OP
Tom Hartz
Full Member
- Joined
- May 18, 2010
- Messages
- 214
Just a quick note to let you all know the project is not dead or done yet.
The Bronco is at the upholstery shop and we are still waiting for the material for the seat and door panel inserts.
The carpet is done in black and it was custom job not a kit. The fit and finish is perfect. I don't have any pictures because the lighting in the shop is way off and they just did not work.
The headliner looks fantastic. It is done in vinyl to match the top and dash.
I do have two pictures but like I said the lighting is off so they don't look that good.


We hope the insert material arrives next week then the seats and door panels can be finished. They both will also be done in vinyl to match the dash and top, with a cloth insert that has some black and dark blue to tie everything together.
When I can get a chance to get the Bronco outside I will take some better quality pictures.
Thanks and I will keep you updated.
Tom
The Bronco is at the upholstery shop and we are still waiting for the material for the seat and door panel inserts.
The carpet is done in black and it was custom job not a kit. The fit and finish is perfect. I don't have any pictures because the lighting in the shop is way off and they just did not work.
The headliner looks fantastic. It is done in vinyl to match the top and dash.
I do have two pictures but like I said the lighting is off so they don't look that good.
We hope the insert material arrives next week then the seats and door panels can be finished. They both will also be done in vinyl to match the dash and top, with a cloth insert that has some black and dark blue to tie everything together.
When I can get a chance to get the Bronco outside I will take some better quality pictures.
Thanks and I will keep you updated.
Tom
Attachments
Last edited:
OP
OP
Tom Hartz
Full Member
- Joined
- May 18, 2010
- Messages
- 214
Time for a update.
The interior is being done by Robert at High Quality Auto Upholstery in Canyon Country (661) 424-9914. The name of his shop tells it all. Robert has been doing this for 30 plus years. The workmanship is simply amazing.
We waited about 3 weeks for the seat insert material to arrive and when it did Robert got right on it.
Here is a sample of the colors.

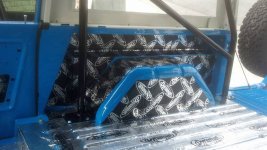
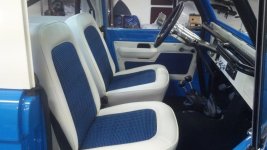
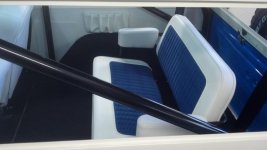
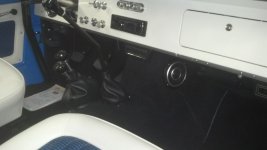
Here are some pictures of the door panels. Even the arm rests where covered in matching vinyl and not just painted. They look unreal.


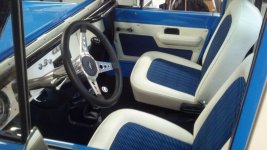
The front seats are done and all I can say is wow. Again the attention to detail is unreal.


The rear side panels hold the speakers and hide the amplifier for the radio. The bolts that hold on the top where also hidden for a smoother clean look.


The interior should be done next week then I will get a chance to shoot some better pictures.
After that it will be coming back to my house for a couple of little things then back to the body shop for the glass and a final touch up.
We are almost done!
Thanks for looking.
Tom
The interior is being done by Robert at High Quality Auto Upholstery in Canyon Country (661) 424-9914. The name of his shop tells it all. Robert has been doing this for 30 plus years. The workmanship is simply amazing.
We waited about 3 weeks for the seat insert material to arrive and when it did Robert got right on it.
Here is a sample of the colors.
Here are some pictures of the door panels. Even the arm rests where covered in matching vinyl and not just painted. They look unreal.
The front seats are done and all I can say is wow. Again the attention to detail is unreal.
The rear side panels hold the speakers and hide the amplifier for the radio. The bolts that hold on the top where also hidden for a smoother clean look.
The interior should be done next week then I will get a chance to shoot some better pictures.
After that it will be coming back to my house for a couple of little things then back to the body shop for the glass and a final touch up.
We are almost done!
Thanks for looking.
Tom
Attachments
-
 Photo Aug 30, 9 19 51 PM (1).jpg38.4 KB · Views: 275
 -
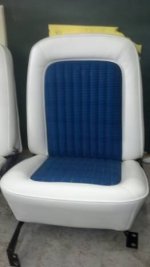 Photo Aug 30, 9 19 31 PM.jpg24.4 KB · Views: 277
 -
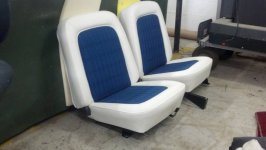 Photo Aug 30, 9 19 19 PM (1).jpg65.7 KB · Views: 278
 -
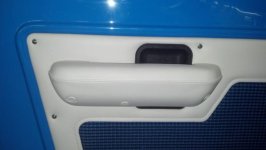 Photo Aug 30, 9 19 24 PM (1).jpg53.1 KB · Views: 277
 -
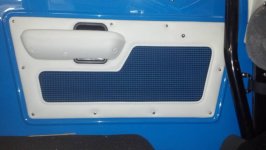 Photo Aug 30, 9 19 13 PM (1).jpg57.8 KB · Views: 277
 -
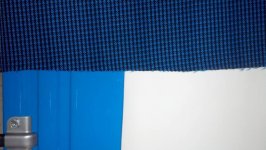 Photo Aug 30, 9 19 34 PM (1).jpg88.7 KB · Views: 274
 -
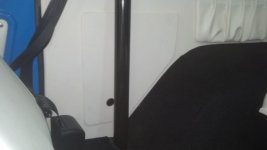 Photo Aug 30, 9 18 36 PM (1).jpg42.5 KB · Views: 277
Last edited:
OP
OP
Tom Hartz
Full Member
- Joined
- May 18, 2010
- Messages
- 214
The interior is done and the Bronco came back to the house.
We had to do a test drive so I let my son Griffin try it out. After all he did help build it.

The interior turned out amazing. I can't say enough about the quality and workmanship that Robert at High Quality Auto upholstery put into the project. The Bronco will be in it's first show June 22 in Newhall, Ca. It will be one of the cars representing High Quality in their booth.


This weekend I hope to finish some little things on the Bronco then it is off to the Body Shop to get the paint cleaned up and glass installed.
Thanks again.
Tom
We had to do a test drive so I let my son Griffin try it out. After all he did help build it.
The interior turned out amazing. I can't say enough about the quality and workmanship that Robert at High Quality Auto upholstery put into the project. The Bronco will be in it's first show June 22 in Newhall, Ca. It will be one of the cars representing High Quality in their booth.
This weekend I hope to finish some little things on the Bronco then it is off to the Body Shop to get the paint cleaned up and glass installed.
Thanks again.
Tom
Attachments


Last edited:
- Joined
- Nov 3, 2003
- Messages
- 49,403
Looks fantastic Tom. I really like the side panels too. Both on the doors and the rear sides.
The "map pockets" are a nice touch. Are there any other interesting little things like that? Hidden speakers maybe? Very cool stuff.
Make sure to take pics at the show! Broncos do very well with the car crowd, and this one should really open some eyes and make everyone happy.
Paul
The "map pockets" are a nice touch. Are there any other interesting little things like that? Hidden speakers maybe? Very cool stuff.
Make sure to take pics at the show! Broncos do very well with the car crowd, and this one should really open some eyes and make everyone happy.
Paul
OP
OP
Tom Hartz
Full Member
- Joined
- May 18, 2010
- Messages
- 214
Looks fantastic Tom. I really like the side panels too. Both on the doors and the rear sides.
The "map pockets" are a nice touch. Are there any other interesting little things like that? Hidden speakers maybe? Very cool stuff.
Make sure to take pics at the show! Broncos do very well with the car crowd, and this one should really open some eyes and make everyone happy.
Paul
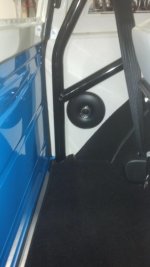
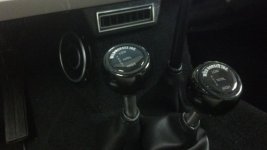
Thanks Paul. The front speakers are in a pod forward of the shifters. Nice twin sticks by the way.
The rear speakers are in the side panels behind the rear seat.
Then to help power the speakers the amp is in the side panel behind the passenger seat.
The other cool touch is, the bolts that hold the top to the body are hidden also.
Today I installed the weather stripping. It was not hard but not one of my favorite jobs.
Well we are almost done. I will hate to see this Bronco go.
Attachments

Last edited:
OP
OP
Tom Hartz
Full Member
- Joined
- May 18, 2010
- Messages
- 214
Well the Bronco is done. At least for now.
The first thing I would like to do is thank Tony for giving me the opportunity to build his Bronco and the one of my dreams. He let me run with the project and his check book until the project was done.
Then I need to thank all of the people on the Classic Bronco forum for the technical help and words of support.
And I cannot say enough about the vendors that supplied the parts to build the Bronco.
BC Broncos
Cylinder Head Exchange
Dennis Carpenter
4X4 Group Buy
High Quality Auto Upholstery
Hoopers Rear End Exchange
Johnny's Auto Parts
Nick (Body and paint)
Powder Craft
Quarter Mile Performance
Sexton Off Road
Tom's Bronco Parts
and last but not least Wildhorses.
Here some Pictures I took today before I give it up.
We had some small details to button up on the tire rack like chrome plating the locking pin and the bearing cap.


The steering column dash cover was polished.

Here are some pictures of the interior lighting. I installed two overhead dome lights and 4 small strip lights under the dash. All lights are LED.


Here some pictures of the completed project.


Again, thanks for looking.
Tom
The first thing I would like to do is thank Tony for giving me the opportunity to build his Bronco and the one of my dreams. He let me run with the project and his check book until the project was done.
Then I need to thank all of the people on the Classic Bronco forum for the technical help and words of support.
And I cannot say enough about the vendors that supplied the parts to build the Bronco.
BC Broncos
Cylinder Head Exchange
Dennis Carpenter
4X4 Group Buy
High Quality Auto Upholstery
Hoopers Rear End Exchange
Johnny's Auto Parts
Nick (Body and paint)
Powder Craft
Quarter Mile Performance
Sexton Off Road
Tom's Bronco Parts
and last but not least Wildhorses.
Here some Pictures I took today before I give it up.
We had some small details to button up on the tire rack like chrome plating the locking pin and the bearing cap.
The steering column dash cover was polished.
Here are some pictures of the interior lighting. I installed two overhead dome lights and 4 small strip lights under the dash. All lights are LED.
Here some pictures of the completed project.
Again, thanks for looking.
Tom
Attachments
-
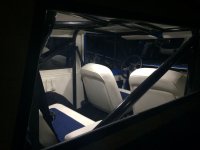 Photo Aug 30, 9 18 20 PM (1).jpg94.1 KB · Views: 405
 -
 Photo Aug 30, 9 18 27 PM (1).jpg92.1 KB · Views: 403
 -
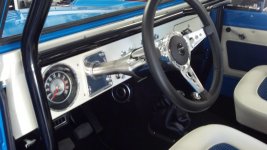 Photo Aug 30, 9 17 46 PM.jpg109.6 KB · Views: 400
 -
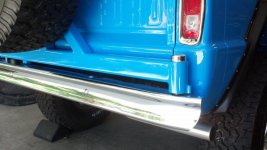 Photo Aug 30, 9 12 23 PM.jpg115.9 KB · Views: 398
 -
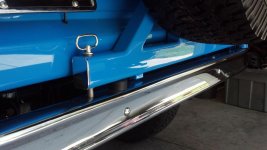 Photo Aug 30, 9 17 42 PM (1).jpg105.7 KB · Views: 400
 -
 Photo Aug 30, 9 17 51 PM (1).jpg153.5 KB · Views: 398
 -
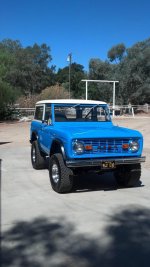 Photo Aug 30, 9 17 56 PM (1).jpg132.6 KB · Views: 393
 -
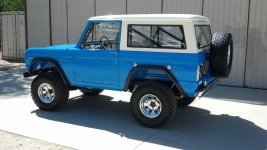 Photo Aug 30, 9 18 00 PM.jpg113.8 KB · Views: 393
 -
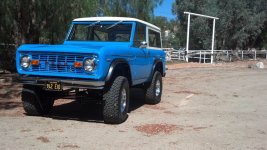 Photo Aug 30, 9 18 04 PM (1).jpg191.7 KB · Views: 399
 -
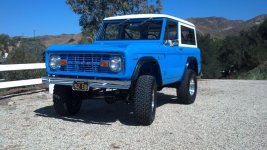 Photo Aug 30, 9 18 17 PM.jpg212.7 KB · Views: 388
 -
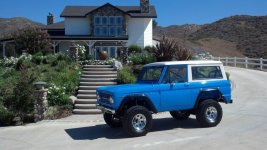 Photo Aug 30, 9 18 10 PM (1).jpg158.4 KB · Views: 399
 -
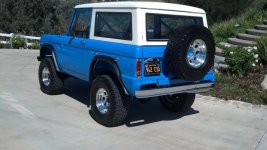 Photo Aug 30, 9 18 07 PM.jpg153.4 KB · Views: 409
Last edited:
What timing! Just earlier this evening I was going through your build. Showing my wife all the attention to detail in this build. One detail in particular, is the original look the tire carrier you built. I also pointed out to her that I wish I had a better picture of how you did the latch for the carrier.
Tom your workmanship in building this Bronco is amazing. You should be very proud of your accomplish. If I had an open checkbook, my 76 would be on it's way to you my man!;D Great job and thanks for the timely posting of pictures. What a great build.
Fred
One detail in particular, is the original look the tire carrier you built. I also pointed out to her that I wish I had a better picture of how you did the latch for the carrier.Tom your workmanship in building this Bronco is amazing. You should be very proud of your accomplish. If I had an open checkbook, my 76 would be on it's way to you my man!;D Great job and thanks for the timely posting of pictures. What a great build.
Fred
Similar threads
- Replies
- 14
- Views
- 3K