Does anyone offer a volt meter that will go in the original gauge cluster, instead of the ammeter?


Community
Message Forum
Photo Gallery
Event Calendar
Book Reviews
Bronco Wallpaper
Bronco FAQ
Link Back to CB!
Photo Gallery
Event Calendar
Book Reviews
Bronco Wallpaper
Bronco FAQ
Link Back to CB!
Buy / Sell


Bronco Tech
3 Arm Wiper Setup
Fix Motor Mount
Roll Cage Braces
Throttle Body 65mm
Wheel Alignment
Heat Riser Replacement
Vent Window Repair
Center Console Mount
Straighten Bumper
Ford 6R80 6 spd
More Tech...
Fix Motor Mount
Roll Cage Braces
Throttle Body 65mm
Wheel Alignment
Heat Riser Replacement
Vent Window Repair
Center Console Mount
Straighten Bumper
Ford 6R80 6 spd
More Tech...

Install the app
-
Welcome to ClassicBroncos! - You are currently viewing the forums as a GUEST. To take advantage of all the site features, please take a moment to register. It's fast, simple and absolutely free. So please join our community today!If you have problems registering or can't log into your account, please contact Admin.
You are using an out of date browser. It may not display this or other websites correctly.
You should upgrade or use an alternative browser.
You should upgrade or use an alternative browser.
Volt meter?
- Thread starter stupidboy
- Start date
Devin
Bronco Kineticist
- Joined
- Apr 29, 2004
- Messages
- 3,956
I don't know of a true plug-n-play, but here is a discussion on some conversions:
http://classicbroncos.com/forums/showthread.php?t=105291&highlight=voltmeter+stock+gauge
http://classicbroncos.com/forums/showthread.php?t=105291&highlight=voltmeter+stock+gauge
zombie66
Sr. Member
No direct bolt in swap that I know of. Just the ones in the tech article here and one on broncofix where you have to cut the back of the gauge cluster out to get a bigger volt gauge to fit.
OP
OP
I don't know of a true plug-n-play, but here is a discussion on some conversions:
http://classicbroncos.com/forums/showthread.php?t=105291&highlight=voltmeter+stock+gauge
Thanks for the link Devin.

Voltmeter into gauge cluster
A member here: fallingdown, does refurbishing of the gauge cluster; he offers voltmeter replacement of the ammeter as one of his services. He has some good feedback from other members here also. The voltmeter replacement looks factory original.
Here is a thread he started as well as his website:
http://classicbroncos.com/forums/showthread.php?t=168804
http://classychassisrestoration.com
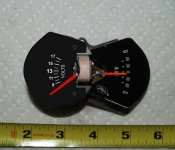
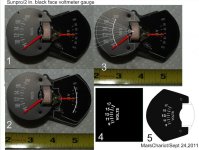
It's fairly easy to do. You get a standard 2 inch voltmeter and cannibalize it. Do a little graphics and mount it in the old housing. The details depend on the exact one you get. But it is fairly straightforward once you get your mind wrapped around what needs to be done.
Attachments
Steve83
Bronco Guru
MC
What brand & model is that meter, where did you buy it, & how much was it?
What brand & model is that meter, where did you buy it, & how much was it?
casadejohnson
Bronco Alchemist
- Joined
- Jan 21, 2005
- Messages
- 3,587
It's fairly easy to do. You get a standard 2 inch voltmeter and cannibalize it. Do a little graphics and mount it in the old housing. The details depend on the exact one you get. But it is fairly straightforward once you get your mind wrapped around what needs to be done.
Am I correct in thinking you made a new gauge face for that volt meter? I would be interested in what exactly you did. That is a very clean installation! If I missed a thread on this please post the link.
bluebronco69
Bronco Guru
i like it
mars, i need info on that gauge!
mars, i need info on that gauge!
- Joined
- Jul 11, 2001
- Messages
- 2,063
It's fairly easy to do. You get a standard 2 inch voltmeter and cannibalize it. Do a little graphics and mount it in the old housing. The details depend on the exact one you get. But it is fairly straightforward once you get your mind wrapped around what needs to be done.
What did you use for your power source? Where did you attach the ground?
Steve83
Bronco Guru
The shell of the cluster or the dash face is the ground, just like for everything else. You can use the switched power coming into the ICVR (Bk/Gn) for voltmeter power, or splice a new one off the ig.sw. as shown here:

OP
OP
That's a good looking install Mars, I like it, if I don't by new gauges that will be what I do.
Airmapper
Foolproofness Tester
Yesterday I put a cheap $10 volt meter from Harbor freight in mine. Brand was CEN-TECH, but something tells me it's not the same one we are used to. I think you can make most any voltmeter fit if it's close.
Not as nice as some but for a trail rig it should be fine, if not I can do it again.
Not as nice as some but for a trail rig it should be fine, if not I can do it again.
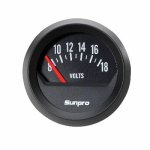
I started with a 2’ Sunpro voltmeter from Autozone. Costs something like 20 bucks.
http://www.autozone.com/autozone/ac...&fromString=search&itemIdentifier=953313_0_0_
The key is that this has a simple needle that pivots from a point like the ammeter.
You remove the innards, which is not elegantly done because it’s pressed together. So I ended up breaking the glass, which isn’t used anyway. Then you save the little post insulators and stuff.
If you look closely it has a face that is held on with small screws. Remove these and you can install a face that duplicates the shape of the old ammeter. To do that you need to make up a new face with a little graphics. I used photographs of both the old ammeter and the new voltmeter (before I removed its face), placed them both in my favorite drafting application and created a voltmeter face that replicated the location and sweep of the ammeter. (You establish the location of the pivot point on the old gauge and make a voltmeter sweep that fits in the same location as the old ammeter sweep.) At this point you draft up the outline of the old face and use it to draft the outline of the new face. Then draft on the numbers in the appropriate places. Then print the new face on stiff photo paper. I was going to mount it on a piece of metal, but the paper is so stiff that it can be used like a thin piece of metal, held on with the screws and all.
It turns out that the depth of the Sunpro is exactly right, so all you need to do besides making the new face, is make up a small sheet metal plate to attach it to, using the old ammeter backing plate (the part that actually bolts to the gauge cluster back) as a pattern.
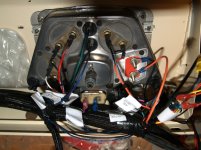
I installed a Painless harness, so I was able to use one of the key-on 12 volt fused circuits for the power. The ground wire went to one of the dash screws where I had grounded other wires for the new harness.
It sounds more complicated than it is. This is a nice project for a cold, snowy day in between real projects.
Here is a short sequence that shows the process of doing up the face.
http://www.autozone.com/autozone/ac...&fromString=search&itemIdentifier=953313_0_0_
The key is that this has a simple needle that pivots from a point like the ammeter.
You remove the innards, which is not elegantly done because it’s pressed together. So I ended up breaking the glass, which isn’t used anyway. Then you save the little post insulators and stuff.
If you look closely it has a face that is held on with small screws. Remove these and you can install a face that duplicates the shape of the old ammeter. To do that you need to make up a new face with a little graphics. I used photographs of both the old ammeter and the new voltmeter (before I removed its face), placed them both in my favorite drafting application and created a voltmeter face that replicated the location and sweep of the ammeter. (You establish the location of the pivot point on the old gauge and make a voltmeter sweep that fits in the same location as the old ammeter sweep.) At this point you draft up the outline of the old face and use it to draft the outline of the new face. Then draft on the numbers in the appropriate places. Then print the new face on stiff photo paper. I was going to mount it on a piece of metal, but the paper is so stiff that it can be used like a thin piece of metal, held on with the screws and all.
It turns out that the depth of the Sunpro is exactly right, so all you need to do besides making the new face, is make up a small sheet metal plate to attach it to, using the old ammeter backing plate (the part that actually bolts to the gauge cluster back) as a pattern.
I installed a Painless harness, so I was able to use one of the key-on 12 volt fused circuits for the power. The ground wire went to one of the dash screws where I had grounded other wires for the new harness.
It sounds more complicated than it is. This is a nice project for a cold, snowy day in between real projects.
Here is a short sequence that shows the process of doing up the face.
Attachments
casadejohnson
Bronco Alchemist
- Joined
- Jan 21, 2005
- Messages
- 3,587
That's very clean work. Looking at your photos it looks like you could use the original gauge face with a little bit of trimming. Am I incorrect? Obviously, you changed the gauge face for a reason so I'm just curious what the reasoning was. I don't have a drafting application (Or the knowledge to use one) so I would be interested in knowing if the original gauge face can be made to work.
- Joined
- Aug 23, 2007
- Messages
- 24,337

casadejohnson, I was going to do that, but the separation of the screws on the new gauge was wider than the old ammeter face at that point. PLus I would have had to destroy the old one.
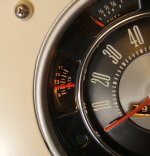
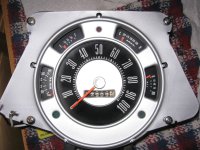
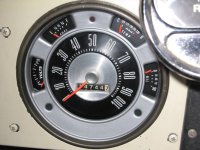
6daze, For safety reasons you should not be going 12 mph while taking a detailed photo like that!;D I like the bright metal faces on the cluster that you and Viper put together. Looks like the Autometer is a simple fit, too.
6daze, For safety reasons you should not be going 12 mph while taking a detailed photo like that!;D I like the bright metal faces on the cluster that you and Viper put together. Looks like the Autometer is a simple fit, too.
Similar threads
- Replies
- 11
- Views
- 870
- Replies
- 0
- Views
- 692