The following is not so much a full tech article as just a step-by-step photo exhibit of how the Chevy conversion is done. There are several write-ups on this popular swap on the web. Below are 2 that I found useful, but there are others in the WebMap too.
Click here for a brief description of the procedure. It was forwarded to me about 5 years ago and I'm not sure who the original author is. Feel free to e-mail me if you have any other questions about this, or any other conversion.
Click here for a partial list of parts and part numbers needed for this conversion. These were taken out of a Hollander's Interchange Manual and generously provided by Phil Lindenmuth.

Bolt on the spindle. If your spindle is used be sure to check it closely for damaged threads. The spindle nuts are ultimately what keep your wheel on the truck, so you don't want to risk them coming loose because of stripped threads on the spindle. Now is also a good time to check the bolts/studs that hold the spindle on to the knuckle.

Bolt on the backing plate/dust shield. There are both 1 piece and 2 piece designs. I prefer the 1 piece (as shown above) because they're thicker.

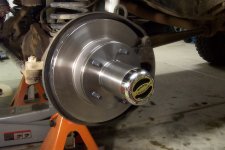
Now install the hub/rotor assembly. If you bought the whole assembly it probably already has wheel studs and bearing races installed. Pack your new bearings with grease and install both inner and outer into the assembly. Tap on the inner grease seal making sure not to damage the lip. Take your time and tap slowly. Now slide the hub/rotor assembly on to the spindle. Push it back as far as it will go. It may not want to go that last 1/2" or so. When you install the spindle nuts (above photo) they should snug it down that last bit.
Thread on the inner spindle nut (the one with the pin) making sure the pin faces out. You'll need a hub tool for this. Torque to specs, which according to the Ford manual is as follows;
1. Tighten the bearing adjusting nut (inner spindle nut) to 50 ft-lb while rotating the wheel back and forth to seat the bearing.
2. Back off the adjusting nut approximately 90 degrees.
3. Assemble the lock ring by turning the nut to the nearest notch for dowel pin installation.
4. Install the outer lock nut and tighten to 80-100 ft-lb. Final end play of the wheel on the spindle should be 0.001 to 0.010 inch.

Install the locking hub body. Shown above is a Warn Premium hub, however do not install the large outer spring if using Warn or other aftermarket hubs. This spring is only used on stock Bronco hubs.


Because of the longer hub/rotor assembly you won't be able to re-install the factory snap ring on the end of the spindle. Instead use a bolt and flat fender washer to keep the locking hub body in place. There is a threaded hole at the end of the axle for this bolt.

Finally install the brake calipers.

Click here for a brief description of the procedure. It was forwarded to me about 5 years ago and I'm not sure who the original author is. Feel free to e-mail me if you have any other questions about this, or any other conversion.
Click here for a partial list of parts and part numbers needed for this conversion. These were taken out of a Hollander's Interchange Manual and generously provided by Phil Lindenmuth.
Bolt on the spindle. If your spindle is used be sure to check it closely for damaged threads. The spindle nuts are ultimately what keep your wheel on the truck, so you don't want to risk them coming loose because of stripped threads on the spindle. Now is also a good time to check the bolts/studs that hold the spindle on to the knuckle.
Bolt on the backing plate/dust shield. There are both 1 piece and 2 piece designs. I prefer the 1 piece (as shown above) because they're thicker.
Now install the hub/rotor assembly. If you bought the whole assembly it probably already has wheel studs and bearing races installed. Pack your new bearings with grease and install both inner and outer into the assembly. Tap on the inner grease seal making sure not to damage the lip. Take your time and tap slowly. Now slide the hub/rotor assembly on to the spindle. Push it back as far as it will go. It may not want to go that last 1/2" or so. When you install the spindle nuts (above photo) they should snug it down that last bit.
Thread on the inner spindle nut (the one with the pin) making sure the pin faces out. You'll need a hub tool for this. Torque to specs, which according to the Ford manual is as follows;
1. Tighten the bearing adjusting nut (inner spindle nut) to 50 ft-lb while rotating the wheel back and forth to seat the bearing.
2. Back off the adjusting nut approximately 90 degrees.
3. Assemble the lock ring by turning the nut to the nearest notch for dowel pin installation.
4. Install the outer lock nut and tighten to 80-100 ft-lb. Final end play of the wheel on the spindle should be 0.001 to 0.010 inch.
Install the locking hub body. Shown above is a Warn Premium hub, however do not install the large outer spring if using Warn or other aftermarket hubs. This spring is only used on stock Bronco hubs.
Because of the longer hub/rotor assembly you won't be able to re-install the factory snap ring on the end of the spindle. Instead use a bolt and flat fender washer to keep the locking hub body in place. There is a threaded hole at the end of the axle for this bolt.
Finally install the brake calipers.