


Hydraulic Clutch Install
Tech article by Desert Thrasher and filed under - Manual, TransmissionAfter you get the coupler nut and rod end properly adjusted, place the rod end through the bolt from your pedal. Then use a nut to secure it in place. Now your master cylinder is all mounted!
The next step is to mount the slave cylinder:
You will need to drill a 5/16″ hole in your clutch fork, where the rounded dimple part of the fork is located. I had a hell of a time drilling my fork, I eventually gave up and pulled it out completely, then used a torch to blow a hole through it. It is a pain in the butt to put the fork back in, but that might be the only way you can do it.
With the hole in the fork (and the fork back in place) place the threaded rod of the slave cylinder through and use the supplied spacer and nuts to support it (don’t bother tightening it now because you will need to make adjustments later).

The rod end of the slave cylinder should be somewhat close to the transfer case crossmember. You will need to fabricate a bracket to mount the rear of the slave cylinder to the transfer-case crossmember lip. I used a 5/16″ threaded rod about 6 inches long, but you can make your own bracket if you wish.
Line up the slave cylinder with the clutch fork, it will approximately be about where the crossmember mounts to the frame, I went a little farther over to the passenger-side and drilled my mounting hole because I didn’t want to drill through the double plate area of the crossmember, see pictures.
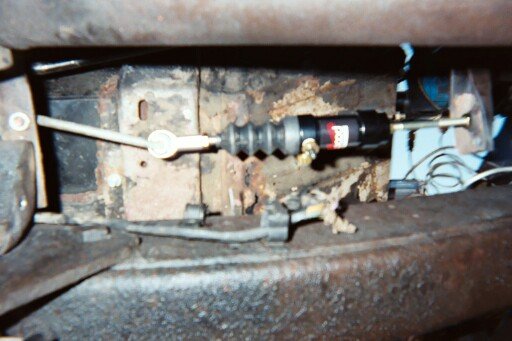

Tech Tip: I have re-drilled my mounting hole through the double plated crossmember on account of some minor binding with the bracket at an angle.
I bent the 5/16″ threaded rod in a 90degree angle at one end, leaving enough room to thread two nuts and the crossmember. Then I bent another 90 degree angle on the other side of the rod but in the opposite direction with enough room to thread two nuts and the rod end of the slave cylinder.

Next I mounted the 5/16″ threaded rod to the crossmember by using two nuts with the crossmember between them to lock it together. Then I mounted the slave cylinder to the threaded rod by placing the slave cylinder rod end between two nuts and locking them together. You have lots of adjustment from both the front and rear of the slave cylinder.

Tech Tip: I had to use a coupler nut to lengthen the bracket for the slave cylinder. I cut my threaded rod bracket in half and placed the coupler nut between them to get more adjustment for the clutch. Depending on the length of the bracket you make you may or may not have to do this.
You may think that the threaded rod is not strong enough to hold the slave cylinder, but I have been using the same type of mounting for the hydraulic clutch in my 1956 F100, for several years now. I have had no problems with it.
OK we are almost done now!
Now you can run your brake line from the master cylinder down to the slave cylinder, remember to use the brake fitting for the master cylinder. It is a good idea to use a slightly longer brake line than you need so that when your body flexes it doesn’t stretch out the brake line, just like the factory spiraled brake lines. You can run your new line anyway you wish, I chose to keep mine close to my firewall because of the fenderwell headers, leaving some attempted spirals for the slack.

Time for that brake fluid!
Fill your master cylinder and have a friend help you bleed the slave and master cylinders.
Make any and all adjustments to get your new clutch to work properly, there is a lot of adjustments you can make so be patient. The front of the slave cylinder is adjustable as with the rear of the slave cylinder, and if you use a coupler nut like I had to then you have even more adjustment.
Now you can enjoy your new hydraulic clutch!
Price List:
| Small Aluminum Master Cylinder | |
| 260-1304 3/4″ bore* | $45.95 |
| 260-2636 5/8″ bore* | $45.95 |
| Large Aluminum Master Cylinder | |
| 260-1101 3/4″ bore* | $49.99 |
| Slave Cylinder | |
| 260-1333 | $55.99 |
| Summit Male Rod End 5/16-24 | |
| SUM-MSM5 | $3.50 |
*You will need to choose one of the 3 master cylinders.
The above prices are from Summit Racing.
The remaining parts can be acquired from local parts stores.
- Brakeline 3/16″ SAE
- Brake fitting
- Brake fluid
- 5/16″ coupler nuts; possibly 2 total
- 5/16″ bolts; 2 short and 1 long
- 5/16″ nuts; 8 total
- 5/16″ flat washers; 2 total
- 5/16″ threaded rod
by Cory Walden
Pages: 1 2
May 17th, 2009 at 6:53 am
As an alternative, you can go to any auto parts store or junk yard and pick up a Master & Slave Cylinder combo for a 89 F150, 300 6cyl and you have a Ford set up ready to go with all the lines, fittings. Plenty of the brackets available from junk yards. Your article is a very good, informative and written well. Good Work!
August 13th, 2013 at 11:35 pm
[…] ha! I think this is a sweet set up. Think it will work? Hydraulic Clutch Install | ClassicBroncos.com Tech Articles __________________ 1974 F250 4X4 Standard Cab, D44 Front, D60 Rear, PS, 390 4BBL Holly DB […]
April 9th, 2014 at 9:59 pm
Thanks. I have been thinkin about this for a while and just now saw your post.