


Community
Message Forum
Photo Gallery
Event Calendar
Book Reviews
Bronco Wallpaper
Bronco FAQ
Link Back to CB!
Photo Gallery
Event Calendar
Book Reviews
Bronco Wallpaper
Bronco FAQ
Link Back to CB!
Buy / Sell


Bronco Tech
3 Arm Wiper Setup
Fix Motor Mount
Roll Cage Braces
Throttle Body 65mm
Wheel Alignment
Heat Riser Replacement
Vent Window Repair
Center Console Mount
Straighten Bumper
Ford 6R80 6 spd
More Tech...
Fix Motor Mount
Roll Cage Braces
Throttle Body 65mm
Wheel Alignment
Heat Riser Replacement
Vent Window Repair
Center Console Mount
Straighten Bumper
Ford 6R80 6 spd
More Tech...

Install the app
-
Welcome to ClassicBroncos! - You are currently viewing the forums as a GUEST. To take advantage of all the site features, please take a moment to register. It's fast, simple and absolutely free. So please join our community today!If you have problems registering or can't log into your account, please contact Admin.
You are using an out of date browser. It may not display this or other websites correctly.
You should upgrade or use an alternative browser.
You should upgrade or use an alternative browser.
migs' build thread - A 1970 Bronco ...an ever evolving project
- Thread starter migs
- Start date
OP
OP
- Joined
- Nov 12, 2011
- Messages
- 1,321
Ok, I'll bite, what are the brackets for? Looks awesome, by the way!
A heim joint....;D
And these go on the other side
Attachments

- Joined
- Sep 26, 2013
- Messages
- 2,394
Ok, I'll bite, what are the brackets for? Looks awesome, by the way!
A heim joint....;D
And these go on the other side
And the intended function of said heim joint???;D
Crawdad
Bronco Guru
- Joined
- Feb 16, 2011
- Messages
- 3,635
And the intended function of said heim joint???;D
The anti-traction bar, pitman arm stabilizer thingy! Come on guys it’s so obvious!

- Joined
- Sep 26, 2013
- Messages
- 2,394
And the intended function of said heim joint???;D
The anti-traction bar, pitman arm stabilizer thingy! Come on guys it’s so obvious!
Figured as much, but really wanted him to cough up the details;D
OP
OP
- Joined
- Nov 12, 2011
- Messages
- 1,321
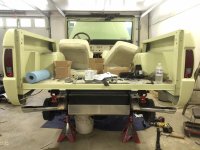
I started mocking up the Duff's dual exhaust kit so I can get an idea where to mount my fuel pump and run the lines. so far it seems to fit quite well with no issues. it is tucked up nice and high. the only thing I'll probably change is moving the rear hangers to in front of the slip on tail pipes and using a band clamp to hold those on so they can be removed easy enough for added clearance off road.
Attachments
-
 IMG_2373.jpg65.7 KB · Views: 134
 -
 IMG_2372.jpg83.2 KB · Views: 162
 -
 IMG_2367.jpg79.9 KB · Views: 151
 -
 IMG_2365.jpg69.1 KB · Views: 152
 -
 IMG_2361.jpg57.6 KB · Views: 156
 -
 IMG_2360.jpg71.3 KB · Views: 160
 -
 IMG_2369.jpg96.7 KB · Views: 178
 -
 IMG_2371.jpg92.4 KB · Views: 178
 -
 IMG_2378.jpg103.9 KB · Views: 166
OP
OP
- Joined
- Nov 12, 2011
- Messages
- 1,321
thanks! So I've been working on it everyday now, not much time left before the round up!
I finished installing the exhaust. all things considered it fits pretty well for a pre-made kit. I did have to really shorten the rear hangers and drill new holes in them to tuck the tail pipes up as high as I could with the one inch body lift. I also cut the ends off of the tail pipes and added some slip on tips.
I finished installing the exhaust. all things considered it fits pretty well for a pre-made kit. I did have to really shorten the rear hangers and drill new holes in them to tuck the tail pipes up as high as I could with the one inch body lift. I also cut the ends off of the tail pipes and added some slip on tips.
Attachments


OP
OP
- Joined
- Nov 12, 2011
- Messages
- 1,321
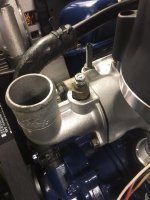
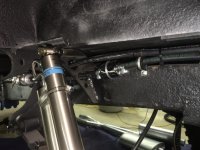
With the exhaust done I could now see where everything needed to route. I ended up running the fuel lines, pump and filters along the upper outer side of the drivers frame rail. I didn't really have any other options for mounting or routing than what you see, but at least it's easy to get to if need be.
Also, slednut10 stopped by to get me started on the engine compartment wiring. He was a huge help in wiring up the alternator and setting me up with relays for the fuel injection and coil power, thanks Art!
Once the wiring was sorted I wrapped it all up and installed the plug wires. I also drilled and tapped the boss on the water neck to accept the original temp gauge sender as the unit from the sniper took the spot on the intake manifold.
Still a ways to go but real close to firing it up.
Attachments
-
 IMG_2453.jpg93.4 KB · Views: 105
 -
 IMG_2447.jpg64.2 KB · Views: 99
 -
 IMG_2493.jpg74 KB · Views: 101
 -
 IMG_2421.jpg89 KB · Views: 109
 -
 IMG_2419.jpg110.8 KB · Views: 109
 -
 IMG_2390.jpg106.7 KB · Views: 114
 -
 IMG_2497.jpg96.6 KB · Views: 104
 -
 IMG_2500.jpg117.7 KB · Views: 106
 -
 IMG_2511.jpg106.1 KB · Views: 117
Vin218
Sr. Member
I'm just catching up on this but damn migs looks like you've been busy over there, everything looks so nice and shiny!
- Joined
- Mar 8, 2007
- Messages
- 81,756
With the exhaust done I could now see where everything needed to route. I ended up running the fuel lines, pump and filters along the upper outer side of the drivers frame rail. I didn't really have any other options for mounting or routing than what you see, but at least it's easy to get to if need be.
Also, slednut10 stopped by to get me started on the engine compartment wiring. He was a huge help in wiring up the alternator and setting me up with relays for the fuel injection and coil power, thanks Art!
Once the wiring was sorted I wrapped it all up and installed the plug wires. I also drilled and tapped the boss on the water neck to accept the original temp gauge sender as the unit from the sniper took the spot on the intake manifold.
Still a ways to go but real close to firing it up.
SO Close, Looks damn good
Similar threads
- Replies
- 421
- Views
- 25K
- Replies
- 16
- Views
- 4K