looking great, love the progress on that dash, it's going to look fantastic


Community
Buy / Sell


Bronco Tech
3 Arm Wiper Setup
Fix Motor Mount
Roll Cage Braces
Throttle Body 65mm
Wheel Alignment
Heat Riser Replacement
Vent Window Repair
Center Console Mount
Straighten Bumper
Ford 6R80 6 spd
More Tech...
Fix Motor Mount
Roll Cage Braces
Throttle Body 65mm
Wheel Alignment
Heat Riser Replacement
Vent Window Repair
Center Console Mount
Straighten Bumper
Ford 6R80 6 spd
More Tech...

-
Welcome to ClassicBroncos! - You are currently viewing the forums as a GUEST. To take advantage of all the site features, please take a moment to register. It's fast, simple and absolutely free. So please join our community today!If you have problems registering or can't log into your account, please contact Admin.
The what did I get myself into 1971 Restomod - BUILD THREAD
- Thread starter Audifan
- Start date
Been making some progress but forgot to take pictures.
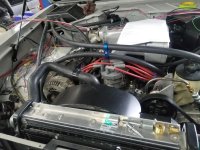
Wiring harness is run through the bronco and making good progress on getting it wired. We went with American Auto Wire as it has TONS of extra circuits for all my accessories and one big block fuse panel.
New Toms 5.0 Reverse mount Radiator installed.
New brake booster and master cylinder installed.
Vintage AC unit installed (that was a nightmare) and all hoses run. Still need to attach the underdash plenum once we're done with the dash wiring.
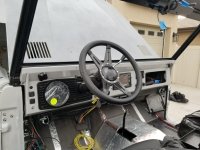
The Dash is installed and most of the way complete. It came out great. I really like the layout and how the satin black contrasts with the Chalk Gray paint.
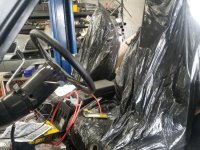
Front seats are in place for mockup and to figure out how to run the wiring for the seat heat/cool units into the console... while still making it so I can remove the seats as needed.
Lots of terminations still to do and have to clean up and bundle the wiring so its not a rats nest, but she is coming together.
Hoping to have her running by end of next week.
Wiring harness is run through the bronco and making good progress on getting it wired. We went with American Auto Wire as it has TONS of extra circuits for all my accessories and one big block fuse panel.
New Toms 5.0 Reverse mount Radiator installed.
New brake booster and master cylinder installed.
Vintage AC unit installed (that was a nightmare) and all hoses run. Still need to attach the underdash plenum once we're done with the dash wiring.
The Dash is installed and most of the way complete. It came out great. I really like the layout and how the satin black contrasts with the Chalk Gray paint.
Front seats are in place for mockup and to figure out how to run the wiring for the seat heat/cool units into the console... while still making it so I can remove the seats as needed.
Lots of terminations still to do and have to clean up and bundle the wiring so its not a rats nest, but she is coming together.
Hoping to have her running by end of next week.
Attachments


Good Progress made there. Wiring - one of the most important things to get done right the first time...
- Joined
- Mar 8, 2007
- Messages
- 81,983
The Dash is installed and most of the way complete. It came out great. I really like the layout and how the satin black contrasts with the Chalk Gray paint.
me too Looks dang cool
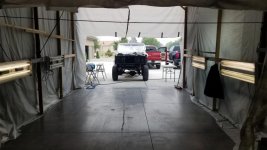
This was a good weekend. Finally got to hear her run. First time in a long time and she sounds great.
Also got to drive her on and off the trailer...ok and around the block for "testing" purposes.
Here's two videos of her running:
https://www.youtube.com/watch?v=OMuvNb5ijn4
https://www.youtube.com/watch?v=Sh-rxu0jQro
Now she's back in the garage for final body work touch ups before we get her into paint (hopefully soon)
She's starting to come together though and now we need to come up with a name for her.
Attachments


- Joined
- Mar 8, 2007
- Messages
- 81,983
Nicely done.... sounds good
This was a good weekend. Finally got to hear her run. First time in a long time and she sounds great.
Also got to drive her on and off the trailer...ok and around the block for "testing" purposes.
Here's two videos of her running:
https://www.youtube.com/watch?v=OMuvNb5ijn4
https://www.youtube.com/watch?v=Sh-rxu0jQro
Now she's back in the garage for final body work touch ups before we get her into paint (hopefully soon)
She's starting to come together though and now we need to come up with a name for her.
A bit more progress. My time line for paint and interior got messed up due to some family health issues, but kept on working on other stuff.
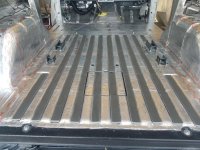
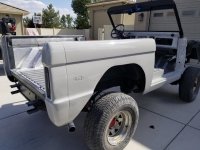
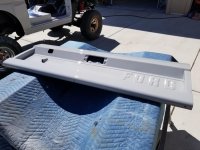
Last weekend I finished installing the sound deadening throughout the tub and also used some of the thicker Noico closed cell insulating foam to fill in the grooves in the bed. It leveled it out nicely.
I think I'm gonna find some 3" or 4" wide aluminum tape and cover it all so it's seamless.
This weekend we started wetsanding with 400 the guide coat off the tailgate, doors and front fenders to get ready for color...but the guide coat did it's job and revealed some small problem areas so they are going to be primed one more time and then we'll do a final wet sand for paint.
Attachments


It's a good thing that progress is still measured by inches, because we are barely inching along here. But moving all the same.
Our goal was to be done before Hot August Nights, but we fell way short with everything taking 3x longer than it should have. But have still been loving seeing all the other broncos and awesome classics at HAN.
In terms of progress on the Bronco.
I reprimed a few parts and then finished wet sanding everything, so she should be ready for color.
My painter backed out on shooting the color and clear, and my back up/2nd choice also flaked. But the silver lining is that I talked with my buddy Marv a fellow CB member and he offered to shoot the sealer, color and clear for me in the next week or two. This is outstanding because Marv is a fantastic painter and was actually my first choice as a body/paint guy over a year ago, but he was swamped at the time and couldn't take it on.
So, I got the paint booth all cleaned out from the bodywork mess, ripped up the old floor, washed down the walls and laid down a new floor. Still need to glue a new back wall to finish sealing it off and hide the garage door.
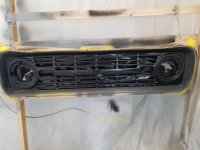
Then just to test it out, I painted the center section of the grill black with satin clear. It came out great. Now I just have to tape off the center, the way I want it to look, sand the overspray edges a bit and it will be ready for main color.
Our goal was to be done before Hot August Nights, but we fell way short with everything taking 3x longer than it should have. But have still been loving seeing all the other broncos and awesome classics at HAN.
In terms of progress on the Bronco.
I reprimed a few parts and then finished wet sanding everything, so she should be ready for color.
My painter backed out on shooting the color and clear, and my back up/2nd choice also flaked. But the silver lining is that I talked with my buddy Marv a fellow CB member and he offered to shoot the sealer, color and clear for me in the next week or two. This is outstanding because Marv is a fantastic painter and was actually my first choice as a body/paint guy over a year ago, but he was swamped at the time and couldn't take it on.
So, I got the paint booth all cleaned out from the bodywork mess, ripped up the old floor, washed down the walls and laid down a new floor. Still need to glue a new back wall to finish sealing it off and hide the garage door.
Then just to test it out, I painted the center section of the grill black with satin clear. It came out great. Now I just have to tape off the center, the way I want it to look, sand the overspray edges a bit and it will be ready for main color.
Attachments


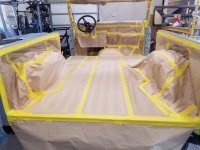
As much as I don't like masking, I almost enjoyed it today as it means I am getting very very close to PAINT!!!
I got most of the tub and engine bay masked off today. Still need to do the wheel wells and rockers.
Need to decide if I am just going to mask all the way down to the floor all the way around, or if I'm going to mask the underside and wrap it up in a nice bundle
I got most of the tub and engine bay masked off today. Still need to do the wheel wells and rockers.
Need to decide if I am just going to mask all the way down to the floor all the way around, or if I'm going to mask the underside and wrap it up in a nice bundle
Attachments


- Joined
- Nov 3, 2003
- Messages
- 49,419
It does mean progress!
But I have to admit I never understood some masking strategies. Is your interior going to be a different color? Or am I just forgetting that it's already painted, or bedliner'ed or something?
And what about wheel wells and windshield frame and engine compartment and cowl area and such? Shouldn't they just get the same paint at the same time as the rest of the body? What's the plan again for the underside of the floor pan?
Or did I brain fart and forget an entire Lizzard Skin application chapter?!%)
Would certainly not be the first time.
I know you're doing it like most do. I'm just wondering on the progression and don't have time or inclination to re-read the last 12 pages!
Great to see it coming along.
Paul
- Joined
- Mar 8, 2007
- Messages
- 81,983
As much as I don't like masking, I almost enjoyed it today as it means I am getting very very close to PAINT!!!
I got most of the tub and engine bay masked off today. Still need to do the wheel wells and rockers.
Need to decide if I am just going to mask all the way down to the floor all the way around, or if I'm going to mask the underside and wrap it up in a nice bundle
any progress is good progress man...
Hey Paul, no worries, this thing has changed directions so many times it's hard to keep straight.
1. Engine Bay and cowl are already painted body color....engine is in and running.
2. Inner fenders, aprons and core support are Raptor Lined.
3. Windshield is already painted satin black (same with door window frames)
4. Inside of tub is already Raptor lined and dynamatted.
5. Inside of rear wheel wells and entire underside of tub is also already raptor lined.
It does mean progress!
But I have to admit I never understood some masking strategies. Is your interior going to be a different color? Or am I just forgetting that it's already painted, or bedliner'ed or something?
And what about wheel wells and windshield frame and engine compartment and cowl area and such? Shouldn't they just get the same paint at the same time as the rest of the body? What's the plan again for the underside of the floor pan?
Or did I brain fart and forget an entire Lizzard Skin application chapter?!%)
Would certainly not be the first time.
I know you're doing it like most do. I'm just wondering on the progression and don't have time or inclination to re-read the last 12 pages!
Great to see it coming along.
Paul
This was a great weekend!!! My buddy and fellow CB member Marv came over and painted my bronco today and it looks great.
I thought it was ready for paint a few weeks ago and had it all wet sanded, but then Marv and his dad came over and decided the bronco needed some more work...and then Marvs dad who is a phenomenal body and paint guy himself...spent 3 full days with me re priming, doing some filling and re-sanding everything again.
Ten We re wetsanded it again with 400 and 600. it came out awsome.
These are the same guys who flew down to do the bodywork on Bferrari's amazing build. I am so grateful for their help. It leveled up the quality of my build way beyond what I was capable of myself.
We were able to shoot everything except the grill, in one day. Grill is a bit more complex with the 2 colors and both a gloss and a satin clear, so we're gonna finish it when we are both fresh.
We started with the tub and the hood.
The garage paintbooth worked out really good.
Color is Porsche Chalk Gray.
Windshield, cowl, window frames and all accent pieces are satin black
Attachments
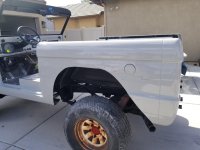


After we rolled the tub and good outside to bake in the sun, we painted everything else at once.
Our paint process, was :
1. Clean with a special soapy cleaner (dunno what it was called0
2. Clean again with a Chemical called M6.
3. Tack with tack rag
4. Tack again with another tack rag
5. Spray on sealer, and let flash
6. Sand any nibs or bad spots. Tack again and re seal
7. Tack with fresh tack rag
8. spray Base coat.
9. Sand any nibs or bad spots. Tack again and spray next coat
10. Tack again, sand if needed and apply 3rd coat of base.
11. Tack twice with 2 tack rags
12. Spray clear with final heavy coat
Lot of steps, but it came out awesome.
We will also be doing a full wet sand on the clear with 1500, 2000 and 3000 before compounding and buffing.
Heres a few pics of the other parts.
Attachments


- Joined
- Nov 3, 2003
- Messages
- 49,419
Fantastic! What a great crew!
And a great color too of course. The black highlights are going to look sweet. I like that color with green as the second color too, but it goes with so many different colors it makes like easy. Or hard depending on how hard it is to choose colors!
Keep it up. Looking forward to seeing the next steps.
Paul
- Joined
- Mar 8, 2007
- Messages
- 81,983
Very nice....
After we rolled the tub and good outside to bake in the sun, we painted everything else at once.
Our paint process, was :
1. Clean with a special soapy cleaner (dunno what it was called0
2. Clean again with a Chemical called M6.
3. Tack with tack rag
4. Tack again with another tack rag
5. Spray on sealer, and let flash
6. Sand any nibs or bad spots. Tack again and re seal
7. Tack with fresh tack rag
8. spray Base coat.
9. Sand any nibs or bad spots. Tack again and spray next coat
10. Tack again, sand if needed and apply 3rd coat of base.
11. Tack twice with 2 tack rags
12. Spray clear with final heavy coat
Lot of steps, but it came out awesome.
We will also be doing a full wet sand on the clear with 1500, 2000 and 3000 before compounding and buffing.
Heres a few pics of the other parts.
jmhend
Bronco Guru
- Joined
- Dec 25, 2007
- Messages
- 2,742
This was a good weekend. Finally got to hear her run. First time in a long time and she sounds great.
Also got to drive her on and off the trailer...ok and around the block for "testing" purposes.
Here's two videos of her running:
Now she's back in the garage for final body work touch ups before we get her into paint (hopefully soon)
She's starting to come together though and now we need to come up with a name for her.
Tell us more about the seats please. How did you mount the passenger seat?
Looks and sounds good, and I caught a glimpse of that interior!
Yes, what are the front seats? And did you help with mounting brackets for those as well?
Tell us more about the seats please. How did you mount the passenger seat?
Yes, what are the front seats? And did you help with mounting brackets for those as well?
The front and rear seats are from a jeep TJ that I have reupholstered and added seat heaters/coolers to.
The front seat tracks mount flat to the tub. On the passenger side we welded in a Wild Horse Steel storage cubby that makes the passenger side floor the same as the driver side.
The rear seat we fabbed up a custom mount based on the jeep mount. (Fellow CB member Cortez did the hard work of figuring out how to fab it, and then he just gave me the instructions to duplicate)
The rear seat is wider than a stock bronco rear seat, which I wanted, but it was a super tight fit between the wheel wells, so we removed 1.5" from each inner wheel well to give the seat more room after raptor liner, dynamat, jute and carpet went in.
There are pictures of all this farther back in my build thread if you wanna see it all.
Similar threads
- Replies
- 20
- Views
- 3K
- Replies
- 22
- Views
- 846