


Community
Message Forum
Photo Gallery
Event Calendar
Book Reviews
Bronco Wallpaper
Bronco FAQ
Link Back to CB!
Photo Gallery
Event Calendar
Book Reviews
Bronco Wallpaper
Bronco FAQ
Link Back to CB!

Buy / Sell


Bronco Tech
3 Arm Wiper Setup
Fix Motor Mount
Roll Cage Braces
Throttle Body 65mm
Wheel Alignment
Heat Riser Replacement
Vent Window Repair
Center Console Mount
Straighten Bumper
Ford 6R80 6 spd
More Tech...
Fix Motor Mount
Roll Cage Braces
Throttle Body 65mm
Wheel Alignment
Heat Riser Replacement
Vent Window Repair
Center Console Mount
Straighten Bumper
Ford 6R80 6 spd
More Tech...

Install the app
-
Welcome to ClassicBroncos! - You are currently viewing the forums as a GUEST. To take advantage of all the site features, please take a moment to register. It's fast, simple and absolutely free. So please join our community today!If you have problems registering or can't log into your account, please contact Admin.
You are using an out of date browser. It may not display this or other websites correctly.
You should upgrade or use an alternative browser.
You should upgrade or use an alternative browser.
The what did I get myself into 1971 Restomod - BUILD THREAD
- Thread starter Audifan
- Start date
71 CA Bronco
Sr. Member
- Joined
- Nov 25, 2015
- Messages
- 764
Nice work. Won't be long now.
Still working on it bit by bit.
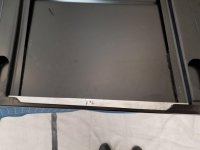
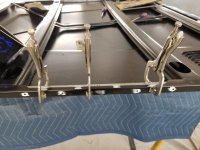
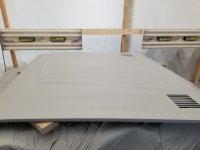
When we started on the new hood, I remembered reading about EB hoods tending to crack and bend near where the hood shox are mounted and after doing a bit of research, I decided to reinforce that area.
Found a couple of guys who had done something similar and figured out my own option.
I used 3/4" square tubing...thin as I could find (maybe 3/16 can't quite remember) and cut it to fit between and UNDER the two braces.
I had to dig a little of the foam glue out to allow the braces to slide in.
Also I had to put a slight bend in the tubing to get it to match the curve of the hood.
Then we spot welded it in place.
Worked out really good and the tubing fit perfectly.
Attachments


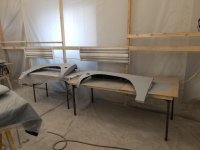
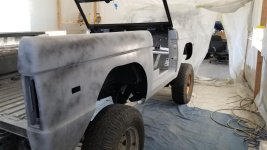
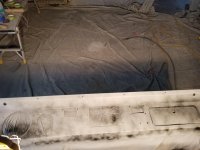
Last 2 weekends have been nothing but sanding, priming, followed by more sanding and more priming, followed by yet more sanding and priming.
But at the end of it, we got both doors, window frames, hood, fenders, and tailgate into Guide coat where they will stay till we finish the rest of the tub.
Having to do it in batches as I don't have enough room in the paint booth to do it all at once.
When we built the temporary paint booth in part of the garage I thought it was HUGE...LOL... now I feel like it can't fit shit. Same with the garage, technically its a 6 car, but can barely fit one right now. (for sure a first world problem") )
)
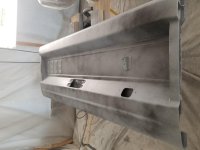
Next up is priming the rest of the tub and putting the front end back together so we can bondo up the sides of the grill to get it to match the fender.
But at the end of it, we got both doors, window frames, hood, fenders, and tailgate into Guide coat where they will stay till we finish the rest of the tub.
Having to do it in batches as I don't have enough room in the paint booth to do it all at once.
When we built the temporary paint booth in part of the garage I thought it was HUGE...LOL... now I feel like it can't fit shit. Same with the garage, technically its a 6 car, but can barely fit one right now. (for sure a first world problem
)Next up is priming the rest of the tub and putting the front end back together so we can bondo up the sides of the grill to get it to match the fender.
Attachments


- Joined
- Mar 8, 2007
- Messages
- 81,983
Lot of work, but end product will be worth it
Last 2 weekends have been nothing but sanding, priming, followed by more sanding and more priming, followed by yet more sanding and priming.
But at the end of it, we got both doors, window frames, hood, fenders, and tailgate into Guide coat where they will stay till we finish the rest of the tub.
Having to do it in batches as I don't have enough room in the paint booth to do it all at once.
When we built the temporary paint booth in part of the garage I thought it was HUGE...LOL... now I feel like it can't fit shit. Same with the garage, technically its a 6 car, but can barely fit one right now. (for sure a first world problem
Next up is priming the rest of the tub and putting the front end back together so we can bondo up the sides of the grill to get it to match the fender.
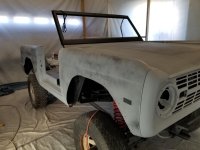
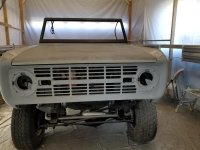
Been awhile since I posted an update. Life has been busy and have only had time to work on the bronco a few hours at a time on weekends, but we are starting to see progress again.
As of now the bronco is in full guide coat, with the exception of the grill which needs a bit more work.
Everything is fitting great at this point...however every time we take her apart she seems to want to go back together slightly different lol.
We've decided that we are going to move forward with wiring and getting the bronco running again before doing final sand or paint.
We've been 3 steps back for every 1 step forward on this rebuild, so even if it makes the final painting a bit more effort, not having to worry about dinging up the paint while trying to get her wired and running will be worth it.
Also got the dash fitting nicely and am starting to figure out what I want it to look like now.
Not a lot of progress, but progress just the same. Super excited to hear her running again.
Attachments

- Joined
- Mar 8, 2007
- Messages
- 81,983
Been awhile since I posted an update. Life has been busy and have only had time to work on the bronco a few hours at a time on weekends, but we are starting to see progress again.
As of now the bronco is in full guide coat, with the exception of the grill which needs a bit more work.
Everything is fitting great at this point...however every time we take her apart she seems to want to go back together slightly different lol.
We've decided that we are going to move forward with wiring and getting the bronco running again before doing final sand or paint.
We've been 3 steps back for every 1 step forward on this rebuild, so even if it makes the final painting a bit more effort, not having to worry about dinging up the paint while trying to get her wired and running will be worth it.
Also got the dash fitting nicely and am starting to figure out what I want it to look like now.
Not a lot of progress, but progress just the same. Super excited to hear her running again.
bout time..
completely understand, life gets in a lot of ways
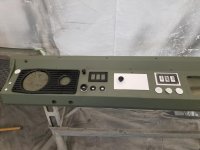
Playing around with Dash Layout and so far this is my new favorite.
Working left to right:
1. OLED transmission temp guage (bigger white dot next to speedo)
2. Aux Fan Switch
3. Amp Steps Switch
4. Digital Dakota Speedo
5. Billet speedo & column bezel
6. Brake warning Light set up for Ebrake
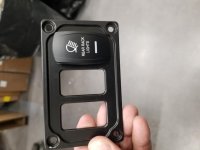
7. Billet Bezel with 3 rocker switches
8. Ignition
9. Lights
10 Wipers
11. Pioneer in dash screen (ignore the knob sitting on the paper)
12. Billet Bezel with 3 rocker switches
13. Heater Controls (3 white circles next to glovebox)
Working left to right:
1. OLED transmission temp guage (bigger white dot next to speedo)
2. Aux Fan Switch
3. Amp Steps Switch
4. Digital Dakota Speedo
5. Billet speedo & column bezel
6. Brake warning Light set up for Ebrake
7. Billet Bezel with 3 rocker switches
8. Ignition
9. Lights
10 Wipers
11. Pioneer in dash screen (ignore the knob sitting on the paper)
12. Billet Bezel with 3 rocker switches
13. Heater Controls (3 white circles next to glovebox)
Attachments
However, it turns out the painter/bodyman I hired who had the bronco for 6 months turned out to be a complete douchebag.
He raped the bronco.
He has zero desire to fix or make right and said he'll just declare bankruptcy if I take him to court.
Screw that. Dont let him get away easy only to do the same crap to somebody else. A little research may turn out that he's done the same thing to other people. If you can turn up other names and info it may lead to criminal charges. Hard to file bankruptcy on prison time.
I agree.. I like that dash layout. Where did you source the billet bezels for the rocker switches?
I agree.. I like that dash layout. Where did you source the billet bezels for the rocker switches?
I found them on amazon. haven't actually installed them yet, but they look pretty good.
71 CA Bronco
Sr. Member
- Joined
- Nov 25, 2015
- Messages
- 764
Double check the clearance behind the pioneer stereo. If its a double din type you may need to lower it. It took me a while to find one that would fit behind the dash. Its tight back there. Looking good. Love to see the progress.
Double check the clearance behind the pioneer stereo. If its a double din type you may need to lower it. It took me a while to find one that would fit behind the dash. Its tight back there. Looking good. Love to see the progress.
Thats what I've been told. Heard lots of horror stories. I went with a pioneer that allows for the screen and receiver to be mounted separately. So only the screen mounts in the dash...about an inch thick. then connects with cable to the receiver which if all goes to plan will be in the console or under the passenger seat.
Keep plugging away, progress is good...driving it will be the big payoff!
Can't wait.
About the only thing that did not go wrong on this rebuild, was fabbing the mounts for the rear j**p seat that you gave me all the specs for. That worked like a charm.
- Joined
- Apr 19, 2014
- Messages
- 2,471
Today we framed up our temporary paint booth and started hanging the plastic.
I'm diggin' on the paint booth, coming up soon (well, fairly soon) for me as well.
71 CA Bronco
Sr. Member
- Joined
- Nov 25, 2015
- Messages
- 764
Thats what I've been told. Heard lots of horror stories. I went with a pioneer that allows for the screen and receiver to be mounted separately. So only the screen mounts in the dash...about an inch thick. then connects with cable to the receiver which if all goes to plan will be in the console or under the passenger seat.
Great idea. I have yet to see that set up. Looking forward to seeing it installed.
Great idea. I have yet to see that set up. Looking forward to seeing it installed.
you and me both. we just have to figure out how to actually mount the screen in the dash...it looks straightforward...but nothing ever is with a EB.
Here is a link to the system: https://www.crutchfield.com/S-oRkVG5KL5ha/p_130DMC2550/Pioneer-DMH-C2550NEX.html#&gid=1&pid=2
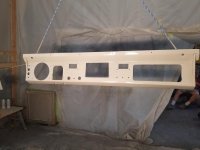
Finally made some noticeable progress.
Ordered the wiring harness last week and it should be here this week. It will come ready to go with wiring for all my various accessories and will have all fuses in one nice big fuse box.
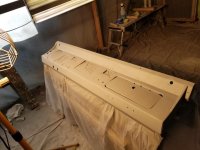
We also got the dash layout finalized and cutout. Then the last few days we've worked on skimcoating, priming, sanding, priming, sanding, priming, sanding then finally sealing and painting the dash.
Color looks a bit yellow/orange due to the lights, but the chalk grey looks awesome in person and I can't wait to get all the black bits installed on the dash to see how it contrasts.
Ordered the wiring harness last week and it should be here this week. It will come ready to go with wiring for all my various accessories and will have all fuses in one nice big fuse box.
We also got the dash layout finalized and cutout. Then the last few days we've worked on skimcoating, priming, sanding, priming, sanding, priming, sanding then finally sealing and painting the dash.
Color looks a bit yellow/orange due to the lights, but the chalk grey looks awesome in person and I can't wait to get all the black bits installed on the dash to see how it contrasts.
Attachments

Similar threads
- Replies
- 20
- Views
- 3K
- Replies
- 22
- Views
- 801