• Welcome to ClassicBroncos! - You are currently viewing the forums as a GUEST. To take advantage of all the site features, please take a moment to register. It's fast, simple and absolutely free. So please join our community today!
    If you have problems registering or can't log into your account, please contact Admin.

Dakota vs Speedhut gauges?

Hazegray

Sr. Member
Joined
Aug 10, 2004
Messages
795
I'm at the point on my build/rebuild and I'm leaning towards replacing the original dash gauge. The Dakota VHX is nice, but I can get the two gauge package from Speedhut for less $ https://www.speedhut.com/gauges/

Anyone have a comparison between the two? Recommendations are highly sought after :)
 

gr8scott

Contributor
Bronco Guru
Joined
Jul 1, 2011
Messages
1,890

Attachments

  • SidebbSide.jpg
    SidebbSide.jpg
    263.1 KB · Views: 157
OP
OP
H

Hazegray

Sr. Member
Joined
Aug 10, 2004
Messages
795
The cost to fully refurbish is right around the same price, but I want to go with something more modern.
 

Broncobowsher

Total hack
Joined
Jun 4, 2002
Messages
37,063
IF you are looking for modern replacement, Con2r also makes a Bronco gauge cluster. But if you are shopping on what is the cheapest way to get gauges, probably not what you want.
 

rguest3

Bronco Guru
Joined
Dec 13, 2012
Messages
3,780
I know nothing about them, but the Speedhut Dual gauge option looks pretty good. Not a bad price either.
 

Green_Bastard

Full Member
Joined
Jan 4, 2014
Messages
261
I went with the Speedhut gauges for my build. They look nice and the quality appears to be very good, not to mention customization options.
e9a1642f2b04d1c4fa1cad9d5bea1eaf.jpg


Sent from my iPhone using Tapatalk
 

rguest3

Bronco Guru
Joined
Dec 13, 2012
Messages
3,780
GB - Do you feel those gauges are big enough for a Multi Gauge?

The Original Bronco Gauge Pod is about 6 1/2" in Diameter. The Speed Hut are 4".

I looked into their website and do like these gauges. Lots of options too.
 
OP
OP
H

Hazegray

Sr. Member
Joined
Aug 10, 2004
Messages
795
That's one thing I was worried about is the 4" diameter. I have my dash out, but would require filling in existing hole, resizing and having to relocate dash controls on the right side of the steering column to place 2nd gauge. I might have to rethink this :(
 

Green_Bastard

Full Member
Joined
Jan 4, 2014
Messages
261
GB - Do you feel those gauges are big enough for a Multi Gauge?

The Original Bronco Gauge Pod is about 6 1/2" in Diameter. The Speed Hut are 4".

I looked into their website and do like these gauges. Lots of options too.


I was a little worried when ordering them but after mocking up the dash and sitting in front of it, I feel like they’re plenty big enough.

f4662d640674722f396cf4aea3e6b450.jpg


Sent from my iPhone using Tapatalk
 

rguest3

Bronco Guru
Joined
Dec 13, 2012
Messages
3,780
Great. Looks like it worked out for you.

I like the added Bronco script.
 

blubuckaroo

Grease Monkey
Joined
Jun 11, 2007
Messages
11,796
Loc.
Ridgefield WA
Wow! Good job.
That's way better than trying to look around the steering wheel. That's where Ford should have put the gages.
 

DirtDonk

Contributor
Bronco Guru
Joined
Nov 3, 2003
Messages
51,616
My Speedhut

Wow! Good job.
That's way better than trying to look around the steering wheel. That's where Ford should have put the gages.

Agree. And why I've been collecting (and then getting rid of) different gauges over the years. And why even though I'm a Dakota Digital distributor and love their product, I have not pulled the trigger yet on any specific setup. I love the clusters that fit the original hole, but still want something different for myself.
I've been spoiled with other cars that have through-the-wheel full gauges, and think the Bronco should have some too.

Hey pbw, where's the build thread on that cluster? I looked but don't see where you have documented it fully. Did you do the panel, or is that something that your son might have worked on like the race truck?
Is the panel attached to the cross-bar, or to the dash? I think lots of us would love to see the details.

Thanks

Paul
 

txtruk15

Sr. Member
Joined
Apr 1, 2017
Messages
757
Loc.
Highland Village, TX
My Speedhut

Agree. And why I've been collecting (and then getting rid of) different gauges over the years. And why even though I'm a Dakota Digital distributor and love their product, I have not pulled the trigger yet on any specific setup. I love the clusters that fit the original hole, but still want something different for myself.
I've been spoiled with other cars that have through-the-wheel full gauges, and think the Bronco should have some too.

Hey pbw, where's the build thread on that cluster? I looked but don't see where you have documented it fully. Did you do the panel, or is that something that your son might have worked on like the race truck?
Is the panel attached to the cross-bar, or to the dash? I think lots of us would love to see the details.

Thanks

Paul

I'm thinking about putting in separate gauges, really like the setup you have. Would love to understand more on how you build yours as well.
 

JB Fab

Sponsor/Vendor
Bronco Guru
Joined
Mar 21, 2004
Messages
1,515
I think the 4" is just a bit small for the dash, it takes some getting used to... But I love the speedhut gauges!
 

Attachments

  • IMG_1021 (1).jpg
    IMG_1021 (1).jpg
    123.7 KB · Views: 132

txtruk15

Sr. Member
Joined
Apr 1, 2017
Messages
757
Loc.
Highland Village, TX
I think the 4" is just a bit small for the dash, it takes some getting used to... But I love the speedhut gauges!

wow......wow...need to see more dash shots - what do all of those switches do? someday my dash wants to grow up and be like that - some mad fab skills not to mention electronic wizardry...
 

pbwcr

Sr. Member
Joined
Jul 11, 2007
Messages
652
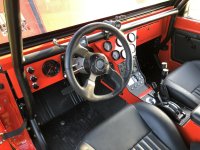
Details on my gauge pod build

This mod was a relatively tiny part of the whole build and here are the details
I have built two serious rigs, a stretched 96 Bronco prerunner and my 72. The 96 had plenty of fab help, but I did the inside, gauges, radios and GPS. One day I decided to do the gauges over on the 96 and that was the time I was dealing with the dash on the 72 so I decided to do both at the same time.
The 96 got Autometer (Sport Comp II) and because they fit with individual instruments. At that time I had finished my LJ Jeep build (ha what a joke - it is never finished) and was at the Jeep safari and came across Speedhut display and got a coupon for discount. Went home and studied the Speed hut offerings and became sold on their products.
So I built both the 96 and 72 at the same time. Both companies sell high end smart gauges, totally programable for high, low led warnings and ability to control such things as fans via a relay. Quick review: The Autometer wiring is considered old school Speedhut has the latest connectors and was much easier to install. Speedhut has the best control and programming.
The 96 was a simple flat panel with holes I drilled myself. See the pic of the result.

Next the 72 build of my gauge pod and my new dash.
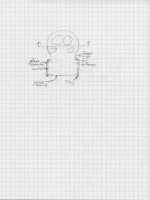
I started with a layout with dimensions of the face of the pod. Speedhut dimensions and spacing I liked. Took the drawing to my buddy, the fab guy and he used his CNC plasma table to cut the face plate. Cut Al metal strip to surround faceplate an did the fitment to the steering wheel.

Next - I used 3/8” soft Al tubing that I split with my Dremel to wrap around the AL metal strip. Attached the tubing with epoxy. The gauge surface and metal strip were TIG tack welded together. Now I have the desired shape.

See one of the mounting brackets that attach to the cross bar of the cage, Welded to the gauge plate.
Next – I wrapped the metal surface with lots of filler for thickness on top of the metal sheet. Then vacuum bagged to get the necessary smooth surface. Peal ply and sheet plastic was used all taped together.
When done I sanded to remove the coarseness created by the peal ply.

I used rattle can bed liner for a slight texture surface to reduce glare. Note at this point the shape to fit the steering column was not complete.

Final With soft “U” strip that lets the pod to be supported to the steering column.
Last item was the knob for backlight between the two 4” gauges.

FYI The dash mod
Final shown

Also shown are the pieces being painted. The process was to cut the opening that supports the glovebox door then weld that to a flat plate that eventually was attached to the large opening I cut in the stock dash. The final result is I can take the assembly off to access wiring behind. The glove box had major mod because I had to make a relief for a defroster tube.That was done with glass and epoxy and was a pain to get it to fit correctly. The stock fuse box has been relocated to behind the new panel.
More access is provided on the drivers side speaker removal where most of the wiring resides.

 

Attachments

  • P3131337.JPG
    P3131337.JPG
    79.3 KB · Views: 70
  • PA080713.JPG
    PA080713.JPG
    80.1 KB · Views: 78
  • IMG_20201129_0002.jpg
    IMG_20201129_0002.jpg
    73.7 KB · Views: 63
  • P5140891.JPG
    P5140891.JPG
    79.4 KB · Views: 72
  • P8010976.JPG
    P8010976.JPG
    80.5 KB · Views: 68
  • P5160905.JPG
    P5160905.JPG
    78.7 KB · Views: 75
  • P8010978.JPG
    P8010978.JPG
    78.4 KB · Views: 85
  • P9251060.JPG
    P9251060.JPG
    79.9 KB · Views: 74
  • P9191052.JPG
    P9191052.JPG
    79.9 KB · Views: 68
  • IMG_0802.jpg
    IMG_0802.jpg
    232.3 KB · Views: 81
Top