


Community
Message Forum
Photo Gallery
Event Calendar
Book Reviews
Bronco Wallpaper
Bronco FAQ
Link Back to CB!
Photo Gallery
Event Calendar
Book Reviews
Bronco Wallpaper
Bronco FAQ
Link Back to CB!
Buy / Sell


Bronco Tech
3 Arm Wiper Setup
Fix Motor Mount
Roll Cage Braces
Throttle Body 65mm
Wheel Alignment
Heat Riser Replacement
Vent Window Repair
Center Console Mount
Straighten Bumper
Ford 6R80 6 spd
More Tech...
Fix Motor Mount
Roll Cage Braces
Throttle Body 65mm
Wheel Alignment
Heat Riser Replacement
Vent Window Repair
Center Console Mount
Straighten Bumper
Ford 6R80 6 spd
More Tech...

Install the app
-
Welcome to ClassicBroncos! - You are currently viewing the forums as a GUEST. To take advantage of all the site features, please take a moment to register. It's fast, simple and absolutely free. So please join our community today!If you have problems registering or can't log into your account, please contact Admin.
You are using an out of date browser. It may not display this or other websites correctly.
You should upgrade or use an alternative browser.
You should upgrade or use an alternative browser.
74 EB Sandrunner under development
- Thread starter sstlaure
- Start date
77bronco_ed
Bronco Guru
- Joined
- Jul 3, 2004
- Messages
- 1,784
Similarly, I have a large fan that I position to blow the dust away out of the garage while cutting/grinding.
with a fiber wheel? cuts like butter
with a fiber wheel? cuts like butter
OP
OP
sstlaure
Bronco Slacker
- Joined
- Jun 7, 2004
- Messages
- 1,881
Yeah...a fiber wheel that was already fairly worn down so that it would do a tight radius. I marked up the bodyside last night with more material removal (still visible along the back edge and a little along the top. I got sick this weekend so I didn't get anything else done on it.
OP
OP
sstlaure
Bronco Slacker
- Joined
- Jun 7, 2004
- Messages
- 1,881
How to build this tube core support
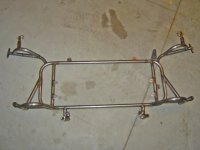
Had some requests about my core support set-up and how I made it. I figured I'd just add a detailed post. Hopefully it gets pulled up via Search.
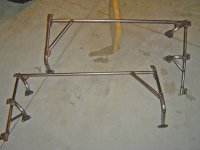
I made this whole thing by just bending up a ton of 180 degree bends (probably 6 or 8) and leaving ~10" on each leg of the bends. I then sectioned out the amount of the curve that I needed to make everything fit (or aim at each other) then welded in straight pieces to connect the curves. The bender was at my friend's house 25 miles away and I couldn't afford the road time back/forth. This is all 1" DOM 0.095 wall.
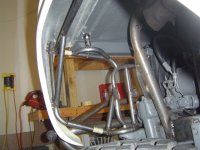
Main core support hoop
First, I started by making the rectangular portion of the core support that would hold the radiator. (4) 90 degree sections of curve and 4 straight sections. Be aware of where your headlights/turn signals will be sticking behind the grille.
Core support feet
I made (2) small 180 degree hoops (left extra length on the legs so I could get one end to contact the above main hoop), then added 1/4" plate on top as the feet that sit at the stop front body mount positions. (visible in this pic). The outer side of each small hoop was hanging in space, so I added an angular brace.
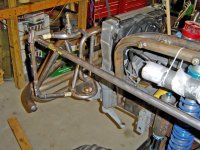
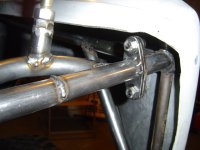
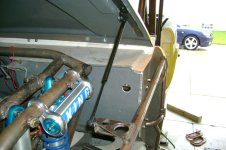
Fender/Grille attachment
I then bolted my fenders to the body and the grille to the fenders and set the gap between the bottom of the grille and the top of the bumper (used a couple pieces of 1X4 to set the gap across the front) I assume you wouldn't be doing the a-surface dzus fasteners on your hotrod project, so my fender mounts wouldn't work, It would be fairly easy for you to change it up a little and just run tabs from the front fender struts out to the bolts between the grille/fender. If you did it this way, this is how I'd put it together.
Make tabs that would go just behind the grille/fender bolts and would be bolted in by the same. Run a vertical piece of tubing down the inside of that mating surface by welding it to the tabs. Then run spreader bars from that verticle tube back down to the Main Core support hoop. You can see in the pic below this is basically what I did, only I mounted the fenders right on the main surface using dzus rather than using the bolts between fender/grille. With the fenders bolted at the body and now securely bolted to the core support, you can pull the pieces of wood supporting the grille and the front clip should be supported.
Had some requests about my core support set-up and how I made it. I figured I'd just add a detailed post. Hopefully it gets pulled up via Search.
I made this whole thing by just bending up a ton of 180 degree bends (probably 6 or 8) and leaving ~10" on each leg of the bends. I then sectioned out the amount of the curve that I needed to make everything fit (or aim at each other) then welded in straight pieces to connect the curves. The bender was at my friend's house 25 miles away and I couldn't afford the road time back/forth. This is all 1" DOM 0.095 wall.
Main core support hoop
First, I started by making the rectangular portion of the core support that would hold the radiator. (4) 90 degree sections of curve and 4 straight sections. Be aware of where your headlights/turn signals will be sticking behind the grille.
Core support feet
I made (2) small 180 degree hoops (left extra length on the legs so I could get one end to contact the above main hoop), then added 1/4" plate on top as the feet that sit at the stop front body mount positions. (visible in this pic). The outer side of each small hoop was hanging in space, so I added an angular brace.
Fender/Grille attachment
I then bolted my fenders to the body and the grille to the fenders and set the gap between the bottom of the grille and the top of the bumper (used a couple pieces of 1X4 to set the gap across the front) I assume you wouldn't be doing the a-surface dzus fasteners on your hotrod project, so my fender mounts wouldn't work, It would be fairly easy for you to change it up a little and just run tabs from the front fender struts out to the bolts between the grille/fender. If you did it this way, this is how I'd put it together.
Make tabs that would go just behind the grille/fender bolts and would be bolted in by the same. Run a vertical piece of tubing down the inside of that mating surface by welding it to the tabs. Then run spreader bars from that verticle tube back down to the Main Core support hoop. You can see in the pic below this is basically what I did, only I mounted the fenders right on the main surface using dzus rather than using the bolts between fender/grille. With the fenders bolted at the body and now securely bolted to the core support, you can pull the pieces of wood supporting the grille and the front clip should be supported.
Attachments
OP
OP
sstlaure
Bronco Slacker
- Joined
- Jun 7, 2004
- Messages
- 1,881
Part II - How to build this core support
Hood pins/hood support
I installed the hood pins on my hood where I wanted them, then took a small piece of tubing and welded a nut to it (maybe 3-4" long at this point - leave extra length). This created the locking surface for the lock-nut that sets the hood pin height. I then took another section of hoop and made both ends of the hoops hit the top spreader bar running from the fender to the core support main hoop, with the middle of the hoop running directly under where the hood pins come down. (you can line it up by pulling the hood pins and looking down through the hole. I supported the hood with 2x4's to set the proper gap between the hood and the grille while I was welding this in.
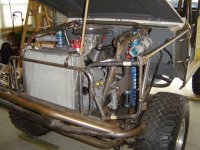
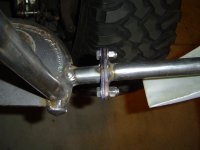
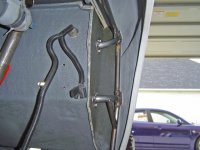
Core support fore/aft struts.
You want to brace the core support from moving fore/aft, but your mounts wouldn't need to be as complex as mine if you're just bolting into the body in the stock location rather than dzus. Make some plates that mount on the side faces of the body under the rear most part of the fender. I did both inside and outside, then just weld in a long tube from the mounts at the front of the fender back to the plate at the body. You could use part of a bend to move the tubing under your fender like I did. I then added a few angled braces to avoid having any stressed 90 degree angles anywhere - I'll be shaking the snot out of this thing.
Separating into pieces
The whole main structure should be together at this point, and you could remove the grille, but leave the fenders bolted in, this will give you access to the front of the core support. Hang your radiator off the main hoop, add tabs/mounts for overflow bottle, etc (depending on where you're mounting them.)
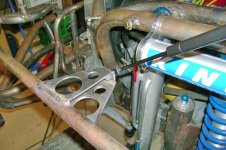
To make the core support and fender pieces separate, I made pairs of tabs that bolted together with 2 bolts (I used stainless). I then (cutting 1 fender strut at a time) sectioned out 1/4" from the fender strut length and inserted a pair of the 1/8" thick premade tabs. You can see where I marked the cuts in the pics in the hood pin section, then what the after was with the tabs installed at both locations below. Rotate the tabs in whatever direction hides them best.
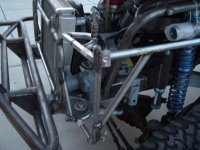
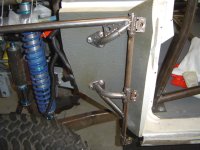
Hood struts
I did hood struts rather than have a prop rod. I used the regular Bronco kit from JBG, but made my own lower mounts. With the whole core support made and incorporating the hood mounts, I could have my hood on with my fenders out for easy access. One side of the mount is 1/8" the other 1/4". You really need the 1/4" to give it enough structure to not bend. (learned that the hard way, this is mount try #2)
Hood pins/hood support
I installed the hood pins on my hood where I wanted them, then took a small piece of tubing and welded a nut to it (maybe 3-4" long at this point - leave extra length). This created the locking surface for the lock-nut that sets the hood pin height. I then took another section of hoop and made both ends of the hoops hit the top spreader bar running from the fender to the core support main hoop, with the middle of the hoop running directly under where the hood pins come down. (you can line it up by pulling the hood pins and looking down through the hole. I supported the hood with 2x4's to set the proper gap between the hood and the grille while I was welding this in.
Core support fore/aft struts.
You want to brace the core support from moving fore/aft, but your mounts wouldn't need to be as complex as mine if you're just bolting into the body in the stock location rather than dzus. Make some plates that mount on the side faces of the body under the rear most part of the fender. I did both inside and outside, then just weld in a long tube from the mounts at the front of the fender back to the plate at the body. You could use part of a bend to move the tubing under your fender like I did. I then added a few angled braces to avoid having any stressed 90 degree angles anywhere - I'll be shaking the snot out of this thing.
Separating into pieces
The whole main structure should be together at this point, and you could remove the grille, but leave the fenders bolted in, this will give you access to the front of the core support. Hang your radiator off the main hoop, add tabs/mounts for overflow bottle, etc (depending on where you're mounting them.)
To make the core support and fender pieces separate, I made pairs of tabs that bolted together with 2 bolts (I used stainless). I then (cutting 1 fender strut at a time) sectioned out 1/4" from the fender strut length and inserted a pair of the 1/8" thick premade tabs. You can see where I marked the cuts in the pics in the hood pin section, then what the after was with the tabs installed at both locations below. Rotate the tabs in whatever direction hides them best.
Hood struts
I did hood struts rather than have a prop rod. I used the regular Bronco kit from JBG, but made my own lower mounts. With the whole core support made and incorporating the hood mounts, I could have my hood on with my fenders out for easy access. One side of the mount is 1/8" the other 1/4". You really need the 1/4" to give it enough structure to not bend. (learned that the hard way, this is mount try #2)
Attachments
-
 071307 Fender mounts.JPG125.5 KB · Views: 168
 -
 071307 Fender mount drvr upper flange.JPG120.6 KB · Views: 175
 -
 071307 Fender mount drvr lower flange.JPG118.8 KB · Views: 178
 -
 063007 drvr front fender mount rear strut.JPG156.4 KB · Views: 228
 -
 063007 drvr front fender mount through wheelwell rear strut.JPG154.6 KB · Views: 189
 -
 063007 drvr front fender mount through wheelwell.JPG150.2 KB · Views: 205
 -
 081907 Hood shock lower mount.jpg177.9 KB · Views: 193
 -
 081907 Hood shocks.jpg142 KB · Views: 183
surveyor5
Full Member
sstlaure,
Do you notice a difference in the oil pressure reading it at the back of the block vs. from the stock location?
Thanks, Mike
Do you notice a difference in the oil pressure reading it at the back of the block vs. from the stock location?
Thanks, Mike
br0nc0xrapt0r
Loves pickles
- Joined
- Sep 28, 2007
- Messages
- 5,437
Will you finish this thing already! I want to see what it does.
Michaelv's69
Jr. Member
- Joined
- Oct 15, 2008
- Messages
- 74
Nope...both read 0 - I haven't had it running yet.
I planned on using the stock oil pressure sender location.
Are you asking about me moving the sump to the rear of the pan? I haven't done it yet, but I don't forsee any issues.
Scott, Your project is nothing less than awesome. Your fabrication skills are stellar and you are one of the people I now consider an inspriational leader in the Early Bronco world we all live in. Keep on it, we are all behind you and if my truck was not already done, I for one, would have used a few of your ideas on my own! Guys, Scott should be an inspiration to all of you, especially the ones working on projects now! Keep up the great work and I can not wait to see it done. As another poster said, come on out to the west coast and run in glamis or Pismo Beach, you will love it!
Michael V
OP
OP
sstlaure
Bronco Slacker
- Joined
- Jun 7, 2004
- Messages
- 1,881
Thanks for the compliments.
I've been to Pismo before....it was awesome camping right on the beach. Rode rental quads - It was a blast. The dunes there seemed much steeper than what we get here in MI.
It's definitely in the plans once this is done to come out to Glamis with this truck, my buddy's green 68 and my other friend's 48" tired monster truck.
Just gotta finish.....I think I've got a line on what I need to button up the 03 SC Conversion on this Mod motor, so once I've got that in I can finish the front sway-bar and steering (really the last big fab job left.) I'm hoping that I can have it ready for paint come the end of summer. Here's what I've got to do for that to happen:
If work cooperates - I should be able to knock this out this summer. I was in Chicago most of last summer launching the new Taurus - so I didn't get much done. We'll see if the launch of the new Explorer treats me any better. As a Quality Engineer I'm pretty much stationed on-site at the supplier from about 6 months before J1 to launch to ensure a smooth launch.
I've been to Pismo before....it was awesome camping right on the beach. Rode rental quads - It was a blast. The dunes there seemed much steeper than what we get here in MI.
It's definitely in the plans once this is done to come out to Glamis with this truck, my buddy's green 68 and my other friend's 48" tired monster truck.
Just gotta finish.....I think I've got a line on what I need to button up the 03 SC Conversion on this Mod motor, so once I've got that in I can finish the front sway-bar and steering (really the last big fab job left.) I'm hoping that I can have it ready for paint come the end of summer. Here's what I've got to do for that to happen:
- Finish motor assembly
- Install both door inserts (using similar method to how I attached the body panels)
- Fab front sway bar mounts
- Fab rear anti-wrap link
- Fab tubular doors
- Fab rear taillight assemblies (either going cage or bumper mount LED)
- Fab shifter mounts on cage
- Fab new fuel pump mount
- Add skid plate under gas tank
- Add weld in bikini-top loops to b/c-pillars
If work cooperates - I should be able to knock this out this summer. I was in Chicago most of last summer launching the new Taurus - so I didn't get much done.
We'll see if the launch of the new Explorer treats me any better. As a Quality Engineer I'm pretty much stationed on-site at the supplier from about 6 months before J1 to launch to ensure a smooth launch.I can't wait to see this done either, but you guys are doing a great job to bring the last great American auto maker back from the brink!!!
Keep up the good work there! I think the Taurus looks fantastic.
FWIW, I thought my truck was going to be end of summer but within the last few months of chipping away at stuff, a small light emerged at the end of the tunnel and is slowly growing bigger. Besides building these things is a nice ride we should enjoy, it will be a while before I have another build in me.
Dennis
OP
OP
sstlaure
Bronco Slacker
- Joined
- Jun 7, 2004
- Messages
- 1,881
I can't wait to see this done either, but you guys are doing a great job to bring the last great American auto maker back from the brink!!!
Keep up the good work there! I think the Taurus looks fantastic.
FWIW, I thought my truck was going to be end of summer but within the last few months of chipping away at stuff, a small light emerged at the end of the tunnel and is slowly growing bigger. Besides building these things is a nice ride we should enjoy, it will be a while before I have another build in me.
Dennis
I've been watching your thread as well - I'm jealous. You're WAY closer to realizing that first drive than I am....it will come eventually.
I've been working quality at Ford for 10 years now and these are by far the best vehicles we've ever designed/built. It feels good to see public perception to start tracking with reality.
br0nc0xrapt0r
Loves pickles
- Joined
- Sep 28, 2007
- Messages
- 5,437
Btt......;D
jmhend
Bronco Guru
- Joined
- Dec 25, 2007
- Messages
- 2,739
I have a fiberglass body and I also have the fiberglass inner's but the tube support looks great. Also, thought about using the dzus fastner's to attach the inner fenders. I was told to bolt them but not really wanting to do that.. Great build by the way
Similar threads
- Replies
- 26
- Views
- 7K
- Replies
- 0
- Views
- 107
- Replies
- 3
- Views
- 366