• Welcome to ClassicBroncos! - You are currently viewing the forums as a GUEST. To take advantage of all the site features, please take a moment to register. It's fast, simple and absolutely free. So please join our community today!
    If you have problems registering or can't log into your account, please contact Admin.

Barn Find Restomod Build

OP
OP
AZ73

AZ73

Contributor
Bronco Guru
Joined
Mar 28, 2012
Messages
3,546
Is that BC's exhaust system? I have same powetrtain and looking for an exhaust set up this week. Nice build!

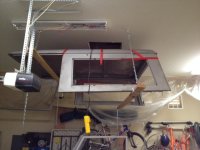
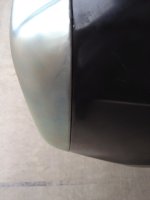
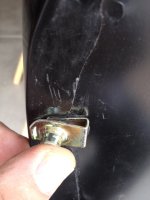
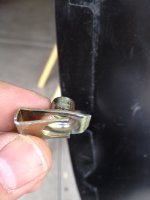
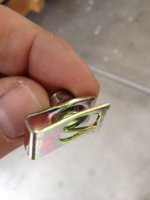
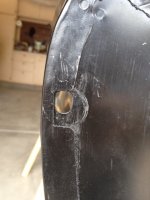
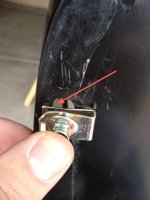
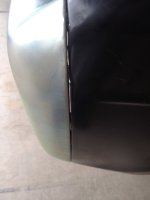
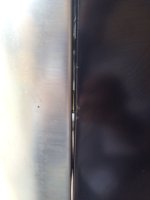
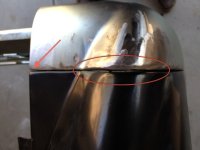
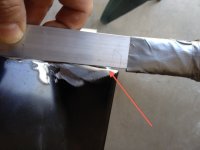
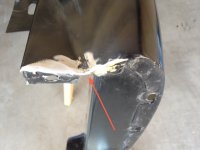
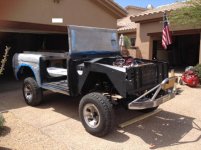
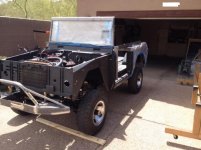
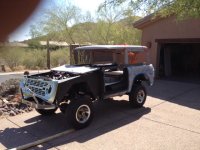
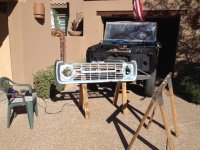
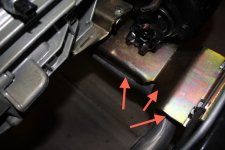
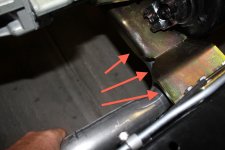
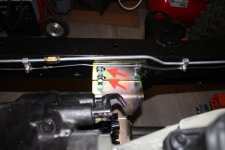
Yes, it's BC's 2 into 1 for their shorty headers. I'm having a slight problem because it's about 1.5 inches too short in length so the front downward lip on the cross member for the NV3550 is dead center of the crossover pipe causing it to hang down too much (first pix). Another inch longer and it would be passed the lip and tuck right up under (second pix). I'm calling Chuck tomorrow to find out if this is correct. If it is, I'll try and adjust the crossmember more forward although it's pretty much at the limits already (pix 3). If that doesn't work, I'll just use it to go to a muffler shop and have a new Driver's side made with the 90 degree bend about 1.5 inches closer to the rear - someday.
 

Attachments

  • rsz_img_6056.jpg
    rsz_img_6056.jpg
    131 KB · Views: 706
  • rsz_img_6057.jpg
    rsz_img_6057.jpg
    127.6 KB · Views: 659
  • rsz_img_6059.jpg
    rsz_img_6059.jpg
    113 KB · Views: 645
Last edited:

bk005

Sr. Member
Joined
Nov 20, 2011
Messages
366
Loc.
San Antonio
Thanks for the info and pictures, my Xmember is adjusted out just like yours. I think Im going to go by BC and pick up the headers and ask about the 2 into 1 also.
 
OP
OP
AZ73

AZ73

Contributor
Bronco Guru
Joined
Mar 28, 2012
Messages
3,546
Any update on this one?

Not much. Got busy during the holidays and had some other commitments which I just completed last week. Earlier this week I installed a hoist in the attic in preparation of flipping the body 90 degrees on it's side so I can prime and paint the bottom. I'll use the same jig I built to lift the body off the frame, but with the ceiling hoist since the engine hoist can't get it high enough. I'll use the ceiling hoist and engine hoist to rotate it. The ceiling hoist will end up being used to hoist the top off and on when it's done. Did a test run with the top (see picture). Also installing some additional lighting so I can see better while I'm working on it.

Ordered some additional parts like the BC dash, autometer gauges, etc.

http://classicbroncos.com/forums/showpost.php?p=2483332&postcount=26

Will reassemble the body for a final fit, then prime an block sand starting next week.

I was planning last year to get it done in time for the AZ Stampede, but I don't think it's going to make it.
 

Attachments

  • photo.JPG
    photo.JPG
    110.1 KB · Views: 417

Dan's73

Bronco Guru
Joined
Oct 17, 2006
Messages
1,117
I haven't been active on the site for a while but am getting back into it now....I think we're nearly neighbors and I, too, have a '73 Bronco Ranger, also Hot Ginger Poly. I like to think of her as a modestly upgraded survivor. Love what you've got going on with your build!
 
OP
OP
AZ73

AZ73

Contributor
Bronco Guru
Joined
Mar 28, 2012
Messages
3,546
I haven't been active on the site for a while but am getting back into it now....I think we're nearly neighbors and I, too, have a '73 Bronco Ranger, also Hot Ginger Poly. I like to think of her as a modestly upgraded survivor. Love what you've got going on with your build!

Thanks! Swing by any time. 136th and Via Linda area.
 
OP
OP
AZ73

AZ73

Contributor
Bronco Guru
Joined
Mar 28, 2012
Messages
3,546
Finally some time to work on the Bronco. Test fitting everything before primer and block sanding. There was a problem with the new fenders and grill. The nut-clips kept the grill from snugging up against the fender leaving a nasty gap where you can see the nut-clips. (Pix 1-2) After disassembly I noticed the notch in the fenders for the nut-clips wasn't large enough for them. (pix 3-5) I cut off 1/2 the back side of the nut-clips, and bent the remaining tabs down with a vice grip so they would grip the grill and fit in the space on the fender. After reinstalling the nut-clips and synching the bolts down, the Grill/Fender gap disappears. (pix 6-8)
 

Attachments

  • photo 1.jpg
    photo 1.jpg
    59.7 KB · Views: 388
  • photo 14.jpg
    photo 14.jpg
    92.3 KB · Views: 391
  • photo 13.jpg
    photo 13.jpg
    80 KB · Views: 372
  • photo 15.jpg
    photo 15.jpg
    75.8 KB · Views: 374
  • photo 11.jpg
    photo 11.jpg
    111.9 KB · Views: 390
  • photo 12.JPG
    photo 12.JPG
    73.1 KB · Views: 398
  • photo2.jpg
    photo2.jpg
    61 KB · Views: 365
  • photo.jpg
    photo.jpg
    72.2 KB · Views: 380
Last edited:
OP
OP
AZ73

AZ73

Contributor
Bronco Guru
Joined
Mar 28, 2012
Messages
3,546
Slow going. Always interrupted. The new fenders and grill need small but painful work. The DS fender was split/torn at the arrow in #1. I had to weld the split. In addition it's not flush. The edge that's closest to the hood was bent down for the bolt tab at an angle. See #2,#3 The Grill wasn't square at the hood/fender junction on either side and I has to weld a bead on and grind it to shape #3,#4. The PS grill, right at the fender "hump" was bent incorrectly and produced an 1/8" gap. I ran a weld bead along it and ground it to shape, but it's still got a 1/16" gap #4 I'll try to finish it all up this weekend. The hardest part is bolting it together and taking it apart after each modification. I thought buying new fenders, and the "Factory" stamped grill would just all line up. Not.
 

Attachments

  • photo 2.JPG
    photo 2.JPG
    68.6 KB · Views: 396
  • photo 4.JPG
    photo 4.JPG
    100.1 KB · Views: 385
  • photo 3.JPG
    photo 3.JPG
    68.3 KB · Views: 373
  • photo 1.JPG
    photo 1.JPG
    70.2 KB · Views: 383
OP
OP
AZ73

AZ73

Contributor
Bronco Guru
Joined
Mar 28, 2012
Messages
3,546
Memorial Weekend so I got to spend a day on the Bronco. Loaded the body onto the frame on the 2.5 inch lift to check for fit, mark trans tunnel to cut for shifters, and line up the body before priming. Then moved it to the smaller, semi-air conditioned garage for the summer. All my front welding lined up nicely to the body mounts. Radiator looks good. A little worried about the carb height but that's a problem for another day. Very pleased with the fit. Happy Memorial Day and thanks to all our vets!
 

Attachments

  • photo 2.jpg
    photo 2.jpg
    49 KB · Views: 418
  • photo 3.jpg
    photo 3.jpg
    45.3 KB · Views: 380
  • photo 4.JPG
    photo 4.JPG
    151.9 KB · Views: 403
  • photo 5.JPG
    photo 5.JPG
    113.8 KB · Views: 362

Mean 69

Newbie
Joined
Jan 29, 2014
Messages
21
Can't thank you enough for the detailed write-up, I have been thinking about how to tackle many of the items that you already found solutions for - mainly lifting the body off in my driveway without having to buy a bunch of new tools, etc. Magic, thanks so much, this will save me a ton of time.

Great build, great for you!!!
Mark

(and thanks to those who appreciate Vet's on this special holiday, as one I thank you. And to all of those who also served, thank you and your families for your service).
 
OP
OP
AZ73

AZ73

Contributor
Bronco Guru
Joined
Mar 28, 2012
Messages
3,546
Looks straight from here! ;D

Thanks, but um, you've set a new standard. it'll NEVER be as nice as yours but that's not an excuse to not try. Looking good! Don't know how I missed your updates over the last month.
 

Baja71

Bronco Guru
Joined
Oct 16, 2004
Messages
2,908
Thanks, but um, you've set a new standard. it'll NEVER be as nice as yours but that's not an excuse to not try. Looking good! Don't know how I missed your updates over the last month.

Sure it will, you're well on your way. And what you're doing is way over my skill set.
 
OP
OP
AZ73

AZ73

Contributor
Bronco Guru
Joined
Mar 28, 2012
Messages
3,546
Fall has arrived and with it temps I can work in. Lesson: don't take too much time between when you left off and you start up because you forget things. I had welded a bead on the DS fender last spring to make up a gap between the grill and fender created when the new fender was manufactured. I pulled the bronco out today and proceeded to grind the fender bead down, lining it up with the fender instead of the grill. Result: now I have the same gap I had last spring. At least I did the PS right and I'm getting back into it.
 

Attachments

  • grill 1.JPG
    grill 1.JPG
    163.8 KB · Views: 362
  • grill 2.JPG
    grill 2.JPG
    129.9 KB · Views: 416

old 71

Full Member
Joined
May 11, 2013
Messages
161
AZ73
Your build is looking great . We spoke on the phone a few months back and you helped me out with a few questions I had about my build ( thanks again ).
I feel your pain when it comes to new panel fitment . I'm just far enough behind you to see how you tackle some of the obstacles that arise and take note on all of them .
Thank you for your time and detailed documentation of your build .
Glad to see you back at her again .

Dale
 
Top