• Welcome to ClassicBroncos! - You are currently viewing the forums as a GUEST. To take advantage of all the site features, please take a moment to register. It's fast, simple and absolutely free. So please join our community today!
    If you have problems registering or can't log into your account, please contact Admin.

Chopped, slammed, bagged, tubbed, lowered floors, 418 w/blower, 6r80, 1/2 cab, Bronco Hot Rod

OP
OP
nvrstuk

nvrstuk

Contributor
Just a Bronco driver for over 50 yrs!
Joined
Jul 31, 2001
Messages
8,614
I need to pull the pan today and see if I can gain an inch or more to slide the engine fwd. Meaning I need to also address the leading edge of the rear sump to crossmember interference.

Like everything else, I'll get the engine as low and as close as I can to avoiding firewall clearance and proceed.

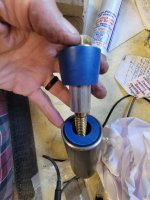
I received my Delrin bushing for the frt of the torque arm. It allows frt to rear movement and without binding allows the angle of the arm to change as the rear axle moves vertically.

Here's a not so good pic
 

Attachments

  • 20220804_161832.jpg
    20220804_161832.jpg
    176.2 KB · Views: 13
Last edited:

Yeller

Contributor
Bronco Guru
Joined
Mar 27, 2012
Messages
5,885
Loc.
Rogers County Oklahoma
Do you have a tool similar to this: https://www.amazon.com/dp/B07NZXLJGP/?tag=cbama-20 ? It has made thin sheet fabricating a LOT easier. I used it almost exclusively for cutting the panels and baffles for the KA oil pan. I've since acquired one of those HF 3 in 1 sheet metal tools used and I don't use it nearly as often. Probably use the press brake function the most, and then only just often enough to make it hard to justify offing it.
Keep threating to buy one of these and shrinker/stretcher... I cut everything with a plasma unless its small enough to cut with hand shears. For our needs the shrinker/stretcher would be very useful. My shop buddy needs a planishing hammer and english wheel for his specialty projects, we bought a 60" brake and a really nice powered bead roller.
 

ntsqd

heratic car camper
Joined
Jan 30, 2005
Messages
3,229
Loc.
Upper SoKA
My friend Ruben would approve of the hand forging method. He taught me that it's easier to hit something gently with a 5 lbs hammer than it is to hit something hard with a 12 oz hammer.

I cut a lot of brackets out using that shear. It's limit is about 10ga., thicker than that takes other means. For the really curvy stuff I've got one of these, courtesy of my bride a couple Xnmas' ago: https://www.harborfreight.com/throatless-shear-38413.html Both also work really well in cutting the rubber lined braided SS hose. The teflon lined, not so much as they flatten it and crease the liner.

I'm not usually making stuff that needs a shrinker or stretcher, but I bet if I had them that my projects would start requiring their use. :)
Don't get me started on needing a cnc pattern cutter........
 
OP
OP
nvrstuk

nvrstuk

Contributor
Just a Bronco driver for over 50 yrs!
Joined
Jul 31, 2001
Messages
8,614
Waaaay cool tools...

I spent 5 full 8+ days hand forging shelf brackets for our kitchen 2 1/2" live edge Doug fir shelves. Emptied 2 - 80cuft bottles of O2 heating bending and hammering the 1/2" x 2" flat bar into shape.

Log walls are not flat and any dimple throws out achieving both perpendicular lines and level w/o a lot of 2 1/2 # persuasion. :)
Just an idea of my tools! lol
 

ntsqd

heratic car camper
Joined
Jan 30, 2005
Messages
3,229
Loc.
Upper SoKA
Hand hewn against a log wall would look very appropriate, very blacksmith-like.

I had no idea that these went for so much! https://www.summitracing.com/parts/pyp-3024 There's got to a junker laying around somewhere that's suitable for mock-up. Heck, for that price you could buy a core, strip it, and have the block cleaned. It doesn't need to be a hyd roller 351W core. I've now been involved in 2 Nova drag racer builds that were built around a bare iron BBC block.
 

1970 Palmer

Full Member
Joined
Mar 2, 2020
Messages
455
Lancaster is the brand you want for your shrinker/stretchers. They were the real original USA made tool copied by the many off shore sellers. I have already purchased the offshore versions because my thinking was how many times will it get used, so it's a good idea to save some money. I broke the tool on my first project, and use guessed it, NO PARTS ARE AVAILABLE! I returned the tools for a refund and upgraded to the Lancaster tools. I have used them flawlessly for the past 15 years. I use them both on steel and on aluminum. They have a one inch deep working distance. I have been very impressed with the quality, and never needed to replace any parts. They really open lots of avenues for your metal working projects.

John
 
OP
OP
nvrstuk

nvrstuk

Contributor
Just a Bronco driver for over 50 yrs!
Joined
Jul 31, 2001
Messages
8,614
I know right!!!??

I have access to LS plastic blocks but nobody I know has one. I even posted up on several sites that I'd rent it which seemed reasonable.

Oh well...

I got some pretty accurate measurements today for block location on the frame.
 
OP
OP
nvrstuk

nvrstuk

Contributor
Just a Bronco driver for over 50 yrs!
Joined
Jul 31, 2001
Messages
8,614
Called Mike Maier Inc again today. Verified some good news. I talked to them a couple weeks back about using some of their specifically designed parts they use on their 9" rear axles. They make some pretty cool stuff that is tried and tested. Anyway, they said they'd save me a couple weeks or months work by letting me buy some of their parts to adapt my axle.
 
Last edited:
OP
OP
nvrstuk

nvrstuk

Contributor
Just a Bronco driver for over 50 yrs!
Joined
Jul 31, 2001
Messages
8,614
The one area so far that I seem to have lots of room for mod's is motor mount design.

I have talked to two Bronco guys the past couple years that have swapped away from bushings mounted inside tubing (commonly sold as HD engine mounts) and gone back to stock motor mounts to reduce vibrations... they both said it made a big difference.

Anybody else here feel the same way?

Be very easy for me to come off the frame similar to stock configuration and bolt stock mounts on. They work for 700+ ft lbs of torque with 40"s on mine and even tho my cam has the entire body on my Bronco lifting up and down to the rythm of the cam loping along, (the suspension lifts up and down as it idles at stoplights)... really, it would be nice to have a smoother running engine with mounts that help make it smooooother?

I can't see any reason NOT to use stock mounts with the rivet to keep the halfs from separating in case the rubber ever does split? Brand preference?

Thanks
 

El Kabong

Contributor
Driving stuff Henry built
Joined
Oct 8, 2009
Messages
1,487
I had a built 260 & 4 speed in a 64 falcon that was always tearing the rubber on the motor mounts. My shadetree fix was to drill thru the mounts & add 1/2 grade 8 bolts with lock nuts. I tightened the bolts just enough to touch, so the rubber could still move around, but the bolt acted like a torque limiter. It kept that engine from ripping any more mounts. The hard part was drilling thru the rubber.

It's been a long time. I think I used only 1 bolt per mount & don't remember where I drilled it. But I was able to figure out a place where it didn't interfere. I added the bolt to both mounts, but iIrc only the left mount was tearing.
 

ntsqd

heratic car camper
Joined
Jan 30, 2005
Messages
3,229
Loc.
Upper SoKA
It comes down to the durometer of the rubber or urethane used. I have to suspect that those who complained about the NVH of the bushing in tube design had used the easily available urethane bushings. Which tend to have a higher durometer then the stock rubber bushings. Saying that the design is bad when the problem really was a poor choice in components. Having had both the OEM rubber bushings and the Old Man Emu replacement urethane bushings for my old FJ60 in hand I can tell you that there is no way that I'd ever use the OME bushings for an engine mount. May as well solid mount the engine.

Softer is better at isolating NVH than hard is. Which is why I was so specific about using OEM rubber for this design, and for suggesting using the front bushings rather than the rear bushings as I suspect/hope that the fronts have a larger OD so as to have more rubber thickness to them. If they are large enough you could even drill a set of holes thru the bushings radially arrayed around the center bolt hole to further soften them up and make them more compliant and isolating.

How's the fire going?
 
OP
OP
nvrstuk

nvrstuk

Contributor
Just a Bronco driver for over 50 yrs!
Joined
Jul 31, 2001
Messages
8,614
Fire is moving away from our area. No wind yesterday and the frt line changed so our friends & neighbors across the hay fields are fine. Thanks for asking. :)


Makes perfect sense on the bushings. I need to find a site that has some options on the durometer rating of the Poly or find a source for rubber bushings.

What I like about the round tubing style mounts are the chance of the ru ber/poly separating and causing an issue is nil.

Then buy 3 of them.
 

lars

Contributor
Been here awhile
Joined
Jun 29, 2001
Messages
3,041
Loc.
NorCal flatlands
Anchor brand motor mounts are what you want. Unlike other Chinesium mounts, there is actually a reasonable chance that they’ll fit. And to be fair, they may not be made in China. They used to be US made. Others that I bought from local parts stores literally wouldn’t bolt to my engine block. This was last year when I was installing my 408. In any case the Anchor mounts fit and they have the rivet. Summit carries them, among others. I wouldn’t buy from Amazon for fear of getting counterfeit parts.
 
Last edited:
OP
OP
nvrstuk

nvrstuk

Contributor
Just a Bronco driver for over 50 yrs!
Joined
Jul 31, 2001
Messages
8,614
Can't be any good at 10 bucks each lol

Thks!

I pay $8.50 for a Gr8 5/8" bolt with a nut now since Fastenal moved out of town during covid
 

1970 Palmer

Full Member
Joined
Mar 2, 2020
Messages
455
I vote for using (quality) "stock style" mounts to control the vibration.

Like El Kabong said above, I've had the same problems drag racing a 289 in an early Falcon. We ran an adjustable length steel cable from the front of the left cylinder head to the inside of the left front frame to absorb the engine launch torque. This proved to be a successful fix for us over 50 years ago. For a while we tried solid mounts and it just broke the mounting ears off of our aluminum T10 transmission case.
 

Yeller

Contributor
Bronco Guru
Joined
Mar 27, 2012
Messages
5,885
Loc.
Rogers County Oklahoma
Transmissions must always be “soft” mounted in a triangle to the motor mounts, chassis flex will kill the trans case every time.

Back when 203/205 doublers were the rage on the small 4 bolt tail housing of a turbo 350 and 700r4 I watched everyone break the back off of their transmissions. They kept building bigger and more rigid mounts and breaking more transmission cases, those same guys kept scoffing at my 1/2 of the factory puck mount, factory used 2 and I only installed 1. Never broke a case or had a leak, stuff needs to be able to move separate or the chassis, otherwise massive carnage will happen.
 

ntsqd

heratic car camper
Joined
Jan 30, 2005
Messages
3,229
Loc.
Upper SoKA
I used to argue with the K5 guys on CK5 who insisted on adding a 4th mount, and then couldn't understand why they were breaking things mount related.

Adding an aluminum bar "torque arm" to my hot rod Pinto that I had shortly out of HS saved the mounts, but transmitted so much NVH into the car that I removed it and went with the bolt thru the mount. Which I also don't really like, but it worked and while it still transmitted NVH it wasn't as bad at that strap was.
 
OP
OP
nvrstuk

nvrstuk

Contributor
Just a Bronco driver for over 50 yrs!
Joined
Jul 31, 2001
Messages
8,614
I'll go with the Anchor mounts with a similar rubber mount (probably an OE mount) so it will be as close to the same durometer rating (or however they rate rubber).

We used chain a lot (cable with turnbuckle would be neater) but we were 17 back in HS and just wanted it to run and it worked well with all our 454's and 455's we were jamming in everything.

102 octane was 26 cents/gal. :)
 
Top