• Welcome to ClassicBroncos! - You are currently viewing the forums as a GUEST. To take advantage of all the site features, please take a moment to register. It's fast, simple and absolutely free. So please join our community today!
    If you have problems registering or can't log into your account, please contact Admin.

Electrical Gremlin

Killer Frogs

Jr. Member
Joined
Nov 5, 2007
Messages
317
Loc.
Amarillo, TX
I have a 73 Bronco, it was built in October of 72 so it has some 72 tendencies. Electrical problem began when the radio would cut in and out. Radio is a Kenwood wired to the stock wire. Would cut out for 2-5 minutes than come back.

The other problem it was having was the hi-beams would stay on when the headlight knob was pulled. I replaced the dash light switch and the floor dimmer switch and this did not make a difference. When I would pull the switch one click, normally the parking lights, the hi-beams would come on. Pulling it all the way out was the same result. When I hit the floor switch, the lights would go on and off very quickly. Then the problem went away as if it was never a problem, but it created a new problem, battery drain.

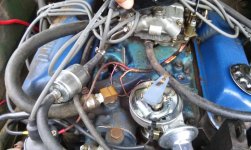
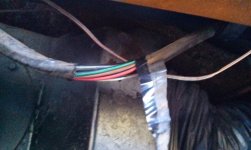
So now when I turn off the Bronco it drains the battery. The battery can hold a charge for about 6 hours, but overnight it would be dead. I have been removing the negative terminal to save the charge. I had a mechanic solve a different engine problem and he did a little looking at the electrical problem and said the drain/short was coming from the black fused wire that goes from the starter solenoid to the dash, see pic.

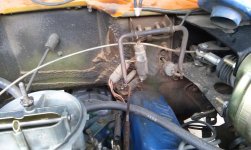
I traced the wire into the dash all the way to the speedometer, see pic, and there is current going from the black wire at the solenoid to the wire at the dash. At the speedometer it has a plug in the wire. Not sure if it is needed, but there is a yellow wire near the speedometer that is not connected to anything, see pic.

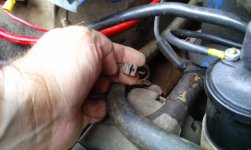
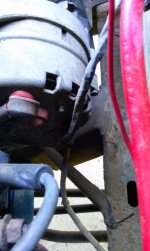
Not sure if it relevant but I have the high torque mini starter from the Graveyard, so it has two wires coming off the starter to the solenoid. The PO has one wire that looks like it was on the alternator that is not connected along with one wire that is not on the solenoid, pictured. It has worked fine without these wires. The engine is not original, it is from a 68 Falcon.

Any ideas on my problem? What does the black wire from the solenoid go to? Thanks for the help, I know this is a lot of detail, but I think it is relevant. I'm at a loss and I appreciate any help.
 

Attachments

  • CAM00872.jpg
    CAM00872.jpg
    85.3 KB · Views: 87
  • CAM00874.jpg
    CAM00874.jpg
    94.5 KB · Views: 90
  • CAM00875.jpg
    CAM00875.jpg
    65.1 KB · Views: 95
  • CAM00877.jpg
    CAM00877.jpg
    99.7 KB · Views: 100
  • CAM00871.jpg
    CAM00871.jpg
    97.1 KB · Views: 104

DirtDonk

Contributor
Bronco Guru
Joined
Nov 3, 2003
Messages
49,452
The larger gauge Black wire is your main power source for literally everything on the truck.
It's got a fusible link as you might be able to see molded into that ring terminal's insulator.

The small wire connected to the small terminal on the right looks to be your Red w/blue wire that comes from the key to energize the starter relay/solenoid (it's just a relay, but most still call it a solenoid out of habit) and is usually on the left terminal.
Can you see any letters adjacent to those two posts? If so, one should be "S" (for "switch") and the other "I" (for "ignition").
If it works the way you have it, then I suppose you can leave it. But I wanted to mention the fact that it's almost always on the same side of the relay as the battery cable.

The Yellow wire looks familiar. Given it's location under your dash, does it perhaps have a white stripe? If so it's the auxiliary fuel tank sender to the dash switch. If you don't have dual tanks, maybe Ford put the wire in all trucks and just left it hanging if not used?
There's also a large Yellow wire that feed power to the ignition switch, but the one in your pic doesn't have the right connector and doesn't seem to be in the correct location either.

The push-connector next to the gauges is extremely important. Keep it clean and tight, but only eliminate it if it's in bad shape. You only really use it when removing the gauges, but without it you'll be cutting the wire instead.
If you can picture this, the Black wire at the starter relay, and the Black wire at the gauges (notice they're the same size?) and the Black wire with yellow stripe on the back of the alternator ARE DIFFERENT ENDS OF THE SAME WIRE and pass power back and forth around the truck. When the engine is off, all power comes from the battery along that wire. When the engine is running, the alternator output runs along that wire to power everything and to charge the battery.
That's why if you were to test for power at the alternator end of the wire when it's disconnected, you'd still find full battery voltage there because the other end is still connected to the battery.

Helps to visualize what's going on in your electrical system when you realize that's the same wire. From one end or the other, all power comes through that wire and feeds all other components including the fuse panel.

Paul
 

DirtDonk

Contributor
Bronco Guru
Joined
Nov 3, 2003
Messages
49,452
I didn't check too far back, but did you and your super-late build '72/'73 truck join in the fun over at Viperwolf1's thread about the odd differences during those last months of the changeover to the new model year? Called "Mind your P's and Q's" to denote the VIN designations of those models.
http://classicbroncos.com/forums/showthread.php?t=221155
Yours should fall right into step, and perhaps be one of the last.

Sorry if you already posted up your info, but if not, head on over and check it out.

Paul
 

DirtDonk

Contributor
Bronco Guru
Joined
Nov 3, 2003
Messages
49,452
Thanks!
And welcome to CB.com too eshall. When you get a chance, post up a howdy thread and tell us what you've got, or if you're still looking for a Bronco, what you're hoping to end up with. And if you've got one now, post up some pics sometime.
We like pics. If you don't have any, I'm going to have to keep yelling at Killer Frogs to show more pics of his spaghetti wiring! ;D

Paul
 
OP
OP
Killer Frogs

Killer Frogs

Jr. Member
Joined
Nov 5, 2007
Messages
317
Loc.
Amarillo, TX
Monday was a busy day. I'll have to get some more pix this evening and check a few things. It does not have an aux fuel tank, so that makes sense that the yellow wire does not connect to anything. The push-connector on the speedometer is in good shape. The wires under the dash are pretty good, no real spaghetti under the dash, but more under the hood. There is one white wire with shrink wrap near the speedometer that looked a little melted, but I think the shrink wrap was not shrunk properly. The wire looks good. You can see the wire in the pic of the yellow wire, pic #5. There is a little rust around the fuse box and I'll have to look tonight to see, but there is one of the fuses that does not show current with a test light.

I do have the H4 headlight conversion with two relays. It did work fine when installed. The headlight problem emerged about 4 months after I installed the H4. If did basically unhook the H4 when the headlight problem started and didn't change anything.

I'll check the wires at the alternator tonight, might have some melt there. It has a manual choke, so any electric choke wire would not be used.

Your explanation of the large black wire is great and make total sense. I should be able to get some more pics and clarity of wire colors tonight.

Thank you Paul.

Stuart
 

73azbronco

Contributor
Bronco Guru
Joined
Nov 11, 2007
Messages
8,231
Sounds like faulty wiring to radio, lose, not connected properly.

Your headlight issue is probably a bad switch on dash, or crossed wires to the floor dimmer switch.
 
OP
OP
Killer Frogs

Killer Frogs

Jr. Member
Joined
Nov 5, 2007
Messages
317
Loc.
Amarillo, TX
A few new developments. I wasn't sure the battery was holding a charge, so took the Optima to Autozone and after a days charge it is dead. So I have a new battery! I also put in a new starter relay, that never was connected with a charged battery. I know I had some things backwards, such as the wire on the terminal on the I not the S, it is now on the S post.

There is no sign of melted wires near the alternator. I'm certain the problem with the headlights was/is not the switch, I replaced it twice. The wires going to the foot switch look to be in good shape. I am going to order a new Voltage Regulator on the back of the speedometer. I went ahead and took the speedometer off and I'm cleaning it up adding LED lights and new stickers. Anyway to check this to make sure it is bad?

I will find somewhere else to hook up the radio and put a fuse in the wire. I'm open for suggestions on where to connect it for constant power and ignition power.

Finally, more Pictures! There are some unused wires under the hood#1 pic is near the drivers side fender near firewall and #2 is two wires on the passenger side near the firewall. Pic #3 is the wire near the alternator that is not used. The wire is either white or tan. Pic #4 is the back of the alternator, the taped together wires go to the starter relay and are connected in pic #6. Pic #5 is the wire near the starter relay that is not used. Pic #8 is the fuse box. The small fuse not in a row is the one that is not hot. Pic #7 is the wires under the dash board where I pulled back the electrical tape. The stray wire is speaker wire. No signs of melt or spaghetti under the dash.

Thanks,
Stuart
 

Attachments

  • CAM00903.jpg
    CAM00903.jpg
    81.6 KB · Views: 56
  • CAM00904.jpg
    CAM00904.jpg
    70.5 KB · Views: 54
  • CAM00901.jpg
    CAM00901.jpg
    96 KB · Views: 53
  • CAM00902.jpg
    CAM00902.jpg
    75 KB · Views: 59
  • CAM00900.jpg
    CAM00900.jpg
    79.2 KB · Views: 57
  • CAM00899.jpg
    CAM00899.jpg
    81.8 KB · Views: 57
  • CAM00898.jpg
    CAM00898.jpg
    86.4 KB · Views: 54
  • CAM00897.jpg
    CAM00897.jpg
    74.8 KB · Views: 63

DirtDonk

Contributor
Bronco Guru
Joined
Nov 3, 2003
Messages
49,452
...Anyway to check this to make sure it is bad?

With 12v connected to the input side, you should see an even, consistent and rhythmic pulsing output. It's kind of hard to see it in action with a modern digital volt-meter, but with an old analog meter you can watch the needle bounce up and down and kind of gauge the average by eye. Tends to be about 6 or 7 volts if I remember. Someone will know though.
Not sure if there's a resistance reading you can gain from an ohm-meter, but someone may know that too.


I will find somewhere else to hook up the radio and put a fuse in the wire. I'm open for suggestions on where to connect it for constant power and ignition power.

Where is it currently again? I'll have to go back and re-read, but if it's not a killer big stereo system you should be able to use the stock wire. If that's just not working out, the center post on the back of the ignition switch is actually a very easy place to connect a wire. It's on with the key in RUN and ACC.


#1 pic is near the drivers side fender near firewall
#2 is two wires on the passenger side near the firewall.
Common connectors, but for the moment I can't think of what they are. The wire color is always the final clue, but unless you have something else near them, it's hard to figure out what they do. The one by the driver's corner is very likely for the old manual trans backup light circuit, but only a guess.
The two behind the engine are often for carb solenoids and stuff like that.

Pic #3 is the wire near the alternator that is not used. The wire is either white or tan.
Still thinking it's an old Stator wire that I think we talked about and is unused on your truck because of the transition year. However, the fact that it looks like it was cut-n-pasted at least once ?:? might mean it originally had a purpose. That type of end connector was often used on engine related stuff like carb chokes and smog related solenoids.
Check for voltage the next time the engine is running. Let us know what you find.

Pic #4 is the back of the alternator, the taped together wires go to the starter relay and are connected in pic #6.
Glad to hear there were no melted wires. Things are looking pretty normal there. The large Black one is your charge wire and probably bypasses the starter relay but there is one there that just looks like it's the same wire. Wire should go into the cabin first, feed everything and then back out to the starter relay. Long wire.

Pic #5 is the wire near the starter relay that is not used.
This is your Brown "I" wire and can/should be pushed on the other small post on the starter relay. What it does is two things. First it makes sure that your low-voltage ignition system gets a little extra jolt during START only. But it is also a backup in case the key switch ever fails to power the ignition through the normal resistor wire.

Pic #8 is the fuse box. The small fuse not in a row is the one that is not hot.
Yours looks in pretty good overall shape. I do see what looks like extra rust on the upper right small one though. Would be a good idea, if you haven't already, to pull them all (but especially that one) out, brush them and their contacts cleaner and put them back in. This at least makes sure that your fuses don't become quite as much of a point of resistance as they can be after all these years.

Any fuses that are not hot should be checked again with the key in both ACC and then RUN to see if that changes things. At least two types in our panels. Always hot, and only hot with the key. I think those keyed circuits are all hot in both ACC and RUN, but not sure.
If still no power to either side of the fuse, something's wrong upstream.

Pic #7 is the wires under the dash board where I pulled back the electrical tape. The stray wire is speaker wire. No signs of melt or spaghetti under the dash.

Sounds good. Note that big Black wire in that part of the harness. That's the same wire you mess with at the battery and alternator. It runs throughout the truck and powers literally everything. Including having the duty of charging the battery when the engine is running.
Very important wire!

Paul
 
OP
OP
Killer Frogs

Killer Frogs

Jr. Member
Joined
Nov 5, 2007
Messages
317
Loc.
Amarillo, TX
Still draining

So I did some rewiring over the weekend and thought I had everything fixed. Headlights are good and high beams are working! The radio shorting out was still a problem. My sons noticed on the test drive that it shorted out when I shifted gears. So I rewired the constant hot to the cigarette lighter and the ignition wire to the radio. It stopped shorting out and I thought I had my problems solved, but no.

When I tried to start things up this morning the battery was dead :cry: 
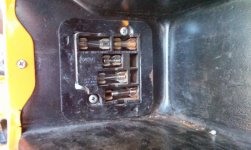
A new Optima battery. So the question is what draining the battery? I have a voltmeter but don't know how to use it. This is pic of my meter. So I'm recharging the battery today and ready to discover the drain. What should I set it on and plug the wires into to see what is draining when off. What is ok to be pulling amps and how many is ok?

Thanks!
 

Attachments

  • CAM00922.jpg
    CAM00922.jpg
    73.5 KB · Views: 38

DirtDonk

Contributor
Bronco Guru
Joined
Nov 3, 2003
Messages
49,452
For starters, the meter should be set to the left into the DCV (direct current volts) and pointed at the number at or just above what you're testing. In this case, the "20" (for 20 volts maximum) to get the most accuracy with your 12v system.
For comparison, to test home electrical stuff, you'd put it to the ACV (alternating current volts), and 200 for 110/120 stuff, and 500 for 220/240 stuff.

The wires connect to the left two sockets for our tests.
The Black "COM" stands for "common" which is one way of denoting the ground, or earth. Our systems utilize a negative ground as oppose to a positive ground, which you might see on an older British car for example.
The Red "VΩ" which indicates "volt" and "ohm" with the omega symbol.

(edit: you asked about checking the drain. To do that, leave the Black test lead in the COM port and put the Red one in the "10A" socket. Turn the dial to "DCA" for direct current amps in the center tick mark that has the /10a marking.)

And that's our lesson for today... :cool:

Paul
 

DirtDonk

Contributor
Bronco Guru
Joined
Nov 3, 2003
Messages
49,452
Oh, you wanted to know what to test too? ;D
I will say that you're a bold one, having done some re-wiring and not known all the ins-n-outs of a volt-meter!

Until you know what's up, keep disconnecting the battery (usually the negative cable only) so you don't keep draining the battery. The Optimas will usually take a bit of abuse, but you don't want to take chances with something that expensive yet.

Whatever you have connected to constant power, not turned off with the key, is suspect. Set the meter to 10a like I mentioned above (in my edit) and connect it between the battery and negative terminal hanging to the side. Only touch it for a moment to get a reading. If it's below 10 amps you can touch it for longer periods (there's a rating for every meter, but I don't know what yours is. If you have instructions, check for that. If it's apparently more than 10 amps, then you have to quickly remove the meter so it doesn't blow the internal fuse.

Start disconnecting things until you see the readings drop. With a drain big enough to drain the battery overnight I would start by disconnecting the alternator's main charge wire. Then the voltage regulator's wires. See what that gets you and let us know.

And can you post up more pics from under the hood please? Just to give us an overview in case we see something obvious.

Good luck.

Paul
 
OP
OP
Killer Frogs

Killer Frogs

Jr. Member
Joined
Nov 5, 2007
Messages
317
Loc.
Amarillo, TX
The voltage-regulator was the drain. I replaced it when the headlight problems first appeared. I am never buying any electrical parts from AutoZone! I put the old one back in and the battery kept its charge!

Found out the brown wire not plugged into the starter relay in the "I" terminal was not plugged in for a reason. When it is plugged in when I turn off the key the engine keeps running. Everything else turned off; radio, lights, etc. just not the engine.

So new problem, is I drove the Bronco to work making 2 stops, let it sit at work and it wouldn't start. I got some guys to help give me a push to pop the clutch and drove home. When I got home the starter was fine and tried it again this morning and it started right up. Here is a sort video of what it was doing when it was not working. http://youtu.be/wjxjEH0MuwU

I have also posted a few more pics of the wiring.

Thank you again!
 

Attachments

  • CAM00934.jpg
    CAM00934.jpg
    67.1 KB · Views: 49
  • CAM00929.jpg
    CAM00929.jpg
    87.9 KB · Views: 50
  • CAM00926.jpg
    CAM00926.jpg
    100.3 KB · Views: 31
  • CAM00925.jpg
    CAM00925.jpg
    97 KB · Views: 44
Last edited:

DirtDonk

Contributor
Bronco Guru
Joined
Nov 3, 2003
Messages
49,452
Looking at the pics again, it appears that all of your starter and battery cables are new-ish and also look to be of good heavy gauge. Can't see the battery cables very well, but at least one end of the positive side (the black one) looks like a reasonably new one too.
That's no guarantee of course, as you've already found out. And the relay looks to be brand new too (maybe you said you replaced that already) and it's obviously already done in. Just goes ta show, ya know?

The starter relay is actually one of the most commonly piss-poor new parts on the market. For some reason the old addage that "they just don't make them like they used to" was never more true than of this particular part. Might even have been the very definition!

The originals lasted literally decades, while for many years a defective replacement part was hardly ever heard of. But for the last 10 years or so, I can't even remember all the times I've heard people here say they got a bad one right out of the box. I bet it's approaching a 50% defect rate on that one part!

So this is one of those times when it's recommended to get them out of the junkyard on a reasonably good looking rig. Even the newer "pancake" style you might find in an Explorer right up to about 2000 or 2001 or so is compatible. Just the wires are oriented differently, but they all work.
And you have a better percentage getting a good one that when buying brand new.

In my book, that makes it well worth the time, the drive, any price of admission and the cost of the part that it takes to get a factory one from a junkyard.

Paul
 
Joined
Jan 27, 2007
Messages
1
Good post. I've been chasing daemons for days on my 71. And I finally learned what the brown wire is for. Mine has never been hooked up. I'll have to check on that, could be why it sounds like my starter is working so hard when I start it. But for now I'm trying to figure out why my lights surge and my ammeter pegs when I rev the engine. I'm waiting for a new cluster regulator to get here from bronco hut, they want around $70.00 for one here in Alaska.... I'm finding I'm way better off learning to do this myself, with help from forums like this. Thanks! Hope I can get this straightened out?!! Wish me luck!
 

DirtDonk

Contributor
Bronco Guru
Joined
Nov 3, 2003
Messages
49,452
Since the ammeter is not effected at all by the cluster regulator, that part at least is completely unrelated.
If your ammeter pegs to the positive when you rev the engine then your main voltage regulator is likely bad, or some other circuit is compromised. But unless you see something obvious like rusty connections all over the place, the regulator is the most likely culprit.
Should be able to find that locally too of course, but hard to say what the cost difference is. Don't let it go too long though, or you could be buying a new battery soon from damage caused by overcharging.

And those are expensive anywhere!

Paul
 
Top