• Welcome to ClassicBroncos! - You are currently viewing the forums as a GUEST. To take advantage of all the site features, please take a moment to register. It's fast, simple and absolutely free. So please join our community today!
    If you have problems registering or can't log into your account, please contact Admin.

Finally starting my ‘66 U14 restoration

OP
OP
KFS35

KFS35

Jr. Member
Joined
Aug 17, 2017
Messages
128
Loc.
Belleville, MI
The bed sides are welded on. Everything seemed to stay pretty straight through the process. Need to get the tubs and remaining bed pieces welded in, then I’ll start working my way forward.
 

Attachments

  • FA2C9405-FCE6-42E9-A292-CC2DEEE35FD2.jpg
    FA2C9405-FCE6-42E9-A292-CC2DEEE35FD2.jpg
    100.7 KB · Views: 81
OP
OP
KFS35

KFS35

Jr. Member
Joined
Aug 17, 2017
Messages
128
Loc.
Belleville, MI
Moving along! Looks great, what mig welder did you end up getting ?

Everlast Power-i-Mig 200E. It seems to be a pretty good unit so far. My tig is an Everlast too, I’ve been pretty happy with it overall, and had good support from the company.

It’s certainly not blue, but it’s also not priced like a blue one either.
 
OP
OP
KFS35

KFS35

Jr. Member
Joined
Aug 17, 2017
Messages
128
Loc.
Belleville, MI
Yesterday I got the tubs, and the floor pieces around the right side, and about half of the ones on the left welded in.

Didn’t take any pics.

Nothing today through the end of the weekend, work actually had the audacity to want me to come in for a few days.:mad:;D
 
OP
OP
KFS35

KFS35

Jr. Member
Joined
Aug 17, 2017
Messages
128
Loc.
Belleville, MI
I’ve spent a bit more time on the Bronco over the last couple of weeks.

I got the rest of the bed pieces and filler neck housing welded in. I clamped the inner fenders and core support on, mainly to see how it looks. I have the door posts in position and ready to tack.

Today I took the window frames, glass and regulators out of the doors, so I can hang them to align everything before I weld the door posts solid. The doors are rustier than I remember, but they’re repairable. The skins are ok, but the bottom of both frames are rusted out. It’ll take some time, but I can patch them.

Ones I get the door posts welded on, I’ll fit the fenders and grille to the inners and core support, and get it welded.
 

Attachments

  • F3A46B1B-EF30-4E12-ADD4-663C2DFD4F9C.jpg
    F3A46B1B-EF30-4E12-ADD4-663C2DFD4F9C.jpg
    104.3 KB · Views: 68
  • F78836CA-8294-4E29-9BF7-1EE4590A285F.jpg
    F78836CA-8294-4E29-9BF7-1EE4590A285F.jpg
    106.1 KB · Views: 74
  • 04069058-B769-4D64-8D06-040E0A56D64D.jpg
    04069058-B769-4D64-8D06-040E0A56D64D.jpg
    100.8 KB · Views: 67
OP
OP
KFS35

KFS35

Jr. Member
Joined
Aug 17, 2017
Messages
128
Loc.
Belleville, MI
I’ve been making slow progress.

The door posts are on, and I’m working my way forward. I cut the radiator mount out of the old core support and welded on to the new one. Today I test fit the front tubs and worked on the inner fenders.
 

Attachments

  • C4F2AB4D-9CEE-4128-BA53-3BC672C42B35.jpg
    C4F2AB4D-9CEE-4128-BA53-3BC672C42B35.jpg
    87.4 KB · Views: 66
  • E758ACE5-FFD4-4BEF-9147-81358583DDBC.jpg
    E758ACE5-FFD4-4BEF-9147-81358583DDBC.jpg
    95.1 KB · Views: 67
  • 9CACC6DC-B17D-4E4F-ADE7-78FBFD70D135.jpg
    9CACC6DC-B17D-4E4F-ADE7-78FBFD70D135.jpg
    99.9 KB · Views: 67
  • C8964078-2C3B-4095-97A7-5F24AFA45EBC.jpg
    C8964078-2C3B-4095-97A7-5F24AFA45EBC.jpg
    104.5 KB · Views: 64
  • A7A99D47-B708-4800-9DF5-008AE67DD76C.jpg
    A7A99D47-B708-4800-9DF5-008AE67DD76C.jpg
    95.3 KB · Views: 62
  • FF9FCFDE-D336-42FF-8499-685A316C1A07.jpg
    FF9FCFDE-D336-42FF-8499-685A316C1A07.jpg
    118.5 KB · Views: 67
  • 319A2BAA-4556-4944-965C-9011C2A3B325.jpg
    319A2BAA-4556-4944-965C-9011C2A3B325.jpg
    95.6 KB · Views: 63
  • B767AA64-AE47-4C8D-AA33-3BF2703AF083.jpg
    B767AA64-AE47-4C8D-AA33-3BF2703AF083.jpg
    112.6 KB · Views: 70
OP
OP
KFS35

KFS35

Jr. Member
Joined
Aug 17, 2017
Messages
128
Loc.
Belleville, MI
Looking GREAT!!!!!!


Thanks!

Today I got the core support welded to the inner fenders and the tubs fitted. The new left tub is not the same as my original, but I pounded on it with a hammer for a while and got the clearance I needed.

Looks like I got a tub for a 73-76 instead of 66-72. Oh well.
 
Last edited:
OP
OP
KFS35

KFS35

Jr. Member
Joined
Aug 17, 2017
Messages
128
Loc.
Belleville, MI
I welded the front wheel tubs in today. Next up are the rocker panels, and that will be the end of the major fab work on the tub.

Today’s pics
 

Attachments

  • 6BF861E9-EFFF-432A-BFA5-B332028C7A28.jpg
    6BF861E9-EFFF-432A-BFA5-B332028C7A28.jpg
    82.5 KB · Views: 56
  • 54CC2CAF-2538-4297-92B4-2CFC8D2A4B89.jpg
    54CC2CAF-2538-4297-92B4-2CFC8D2A4B89.jpg
    94.7 KB · Views: 53
OP
OP
KFS35

KFS35

Jr. Member
Joined
Aug 17, 2017
Messages
128
Loc.
Belleville, MI
I spent a little time in the shop this afternoon.

I was able to get the bulkhead out of the old tub, then moved it and the rest of the old body parts back outside and out of the way, lots more room in the shop now. Took a couple of pics of the underside, not much left of it.

I noticed some writing on the old core support and fenders a while ago, and finally remembered to take pictures. Looks like “SP UNIT” on the fenders. I was thinking maybe the last 3 digits of the VIN on the support, but that’s not it.

Any significance to this?
 

Attachments

  • 6E88A656-C8EF-481C-82B8-61F08A17E20E.jpg
    6E88A656-C8EF-481C-82B8-61F08A17E20E.jpg
    76.7 KB · Views: 78
  • 1D752A4F-A441-4456-869F-EEE6299B18FA.jpg
    1D752A4F-A441-4456-869F-EEE6299B18FA.jpg
    64.3 KB · Views: 74
  • 2B64A0FA-5DF8-411B-AFC7-FC851F56B075.jpg
    2B64A0FA-5DF8-411B-AFC7-FC851F56B075.jpg
    74.6 KB · Views: 69
  • FAF81BD6-C066-4E0B-A2FB-804B62F8F58E.jpg
    FAF81BD6-C066-4E0B-A2FB-804B62F8F58E.jpg
    113.6 KB · Views: 83
  • 4F63977C-723C-4159-9134-490F409E4A22.jpg
    4F63977C-723C-4159-9134-490F409E4A22.jpg
    115.3 KB · Views: 69
OP
OP
KFS35

KFS35

Jr. Member
Joined
Aug 17, 2017
Messages
128
Loc.
Belleville, MI
Since the last update, I’ve gotten both rocker panels welded on. I repaired the cab bulkhead and started on the grille and hood.

I took the locking and latching hardware out of the doors, and inspected them more closely. Found some rust through the passenger side skin, and a bunch of rust on the drivers side where the skin folds over the shell. I decided to replace them instead of trying to repair them. I did decide to repair the grille instead of replacing it, though. It wasn’t as bad as I initially though. Have a little more welding remaining on it. Yesterday I repaired the cracks in the hood, and today I was cleaning the those welds up and was also hitting some surface rust with a wire wheel. Turns out in one spot it was slightly more than surface rust. Dammit.

Oh well, it won’t be too hard to fix those holes.
 

Attachments

  • 89A5865D-B198-4549-AF28-31A4B59D2430.jpg
    89A5865D-B198-4549-AF28-31A4B59D2430.jpg
    117.8 KB · Views: 51
OP
OP
KFS35

KFS35

Jr. Member
Joined
Aug 17, 2017
Messages
128
Loc.
Belleville, MI
Hit submit early too, apparently.
 

Attachments

  • 8C49E6A1-999E-463E-849A-FB90784B129E.jpg
    8C49E6A1-999E-463E-849A-FB90784B129E.jpg
    85.6 KB · Views: 63
  • D01F4CBE-86A5-486F-AB97-6D7BC268F321.jpg
    D01F4CBE-86A5-486F-AB97-6D7BC268F321.jpg
    111.3 KB · Views: 57

sprdv1

Contributor
REBEL
Joined
Mar 8, 2007
Messages
81,822
how much time you getting to work on it? likely more than others if you're in MI huh...
 
OP
OP
KFS35

KFS35

Jr. Member
Joined
Aug 17, 2017
Messages
128
Loc.
Belleville, MI
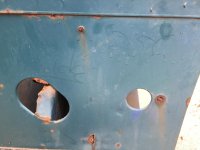
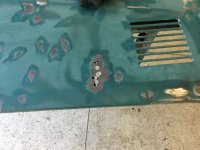
Since the last update, I have patched the rust holes in the cab bulkhead, grille and hood. I took the hardware out of the tailgate, and hit a few suspicious spots with a wire wheel, and sure enough, more holes. I’m getting sick of rust.

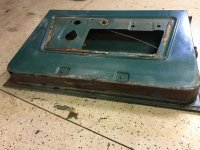
I needed up cutting a couple of sections out of the tailgate and welding in patches. Not super happy wit ph how it turned out, but it’s at the point of diminishing returns and it’s good enough for who it’s for. Every time I try to make it look better, I end up blowing holes through the metal, so I got it good enough, and will just cover it with some body filler when I get to that point.

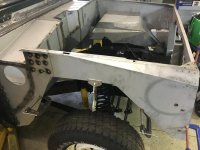
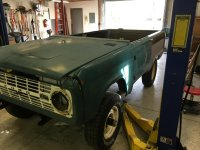
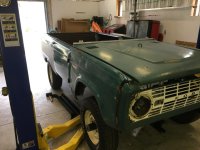
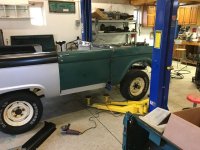
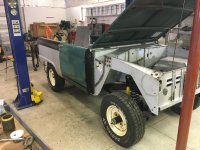
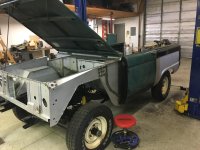
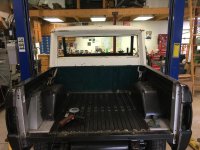
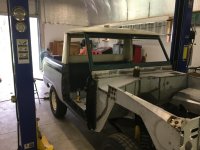
Today I got the cab bulkhead fitting good, stripped the windshield frame down, took the glass out of the cab, and then test fit the windshield and cab on the body. I was quite happy that it all fit!

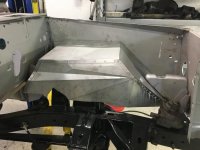
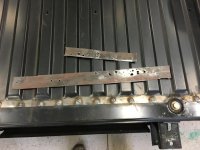
I also cut the rear bumper off my parts truck, it was nice and straight. The one that had been on mine was bent pretty good. Once I got it off the donor truck I saw why it was so straight. Someone had welded a pretty good sized steel channel down the middle for reinforcement. They did a nice job, but it was all full of rust, so I ended up straightening my bent one. Also straightened the front bumper. I’m running low on O2 for my oxy-acetylene torch, so I was trying to use it up before getting a new bottle. I may do a little more on the rear bumper, but it’s pretty good now.

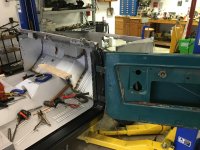
First pic is the pieces I cut out of the tailgate.
 

Attachments

  • 014FF623-E77E-4BF8-AE0E-A58B6C661BCD.jpg
    014FF623-E77E-4BF8-AE0E-A58B6C661BCD.jpg
    87.7 KB · Views: 52
  • 84B7A30B-F49C-4B3B-B10B-63231EF03C46.jpg
    84B7A30B-F49C-4B3B-B10B-63231EF03C46.jpg
    106.4 KB · Views: 50
  • 4B8CF3A3-D8DD-4A43-90A4-1E4A4DC74227.jpg
    4B8CF3A3-D8DD-4A43-90A4-1E4A4DC74227.jpg
    91.2 KB · Views: 50
  • 018BEB84-4311-4C62-AF17-813D9470CADF.jpg
    018BEB84-4311-4C62-AF17-813D9470CADF.jpg
    92.9 KB · Views: 50
OP
OP
KFS35

KFS35

Jr. Member
Joined
Aug 17, 2017
Messages
128
Loc.
Belleville, MI
Rear bumper after first round of straightening.
 

Attachments

  • A2EFA124-CAD9-498A-BEBD-420EEC23AC26.jpg
    A2EFA124-CAD9-498A-BEBD-420EEC23AC26.jpg
    83.8 KB · Views: 47
Last edited:
Top