


Community
Buy / Sell


Bronco Tech
3 Arm Wiper Setup
Fix Motor Mount
Roll Cage Braces
Throttle Body 65mm
Wheel Alignment
Heat Riser Replacement
Vent Window Repair
Center Console Mount
Straighten Bumper
Ford 6R80 6 spd
More Tech...
Fix Motor Mount
Roll Cage Braces
Throttle Body 65mm
Wheel Alignment
Heat Riser Replacement
Vent Window Repair
Center Console Mount
Straighten Bumper
Ford 6R80 6 spd
More Tech...

-
Welcome to ClassicBroncos! - You are currently viewing the forums as a GUEST. To take advantage of all the site features, please take a moment to register. It's fast, simple and absolutely free. So please join our community today!If you have problems registering or can't log into your account, please contact Admin.
You are using an out of date browser. It may not display this or other websites correctly.
You should upgrade or use an alternative browser.
You should upgrade or use an alternative browser.
Finally starting my ‘66 U14 restoration
- Thread starter KFS35
- Start date
77Bronco636
Sr. Member
- Joined
- May 9, 2006
- Messages
- 851
Body is really shaping up!!! And the rear bumper looks great!!!!
- Joined
- Mar 8, 2007
- Messages
- 81,983
Plenty of time. As much as I want for the last two weeks.
I’m still employed, thankfully, which is better than many.
Same here, very thankful.....
Keep up the good work
OP
OP
KFS35
New Member
Good job! Keep at it. And yes, sometimes the enemy of good enough is “better”!
Sent from my iPhone using Tapatalk Pro
Definitely!
It’s not just good, it’s good enough.;D
OP
OP
KFS35
New Member
Body is really shaping up!!! And the rear bumper looks great!!!!
Thanks. It’s coming together pretty good.
Spent some more time on the bumper today, and got it straight enough.
OP
OP
KFS35
New Member
OP
OP
KFS35
New Member
Today I wire wheeled the rust spots on the windshield frame and cab. No holes through anywhere, I was quite happy to see that.
After that I wire wheeled both bumpers, and then spent some more time straightening the rear. Got it good enough.
Once that was done I set the dash panel in to see how it fit. Looks good to me!
Wish some idiot (me) hadn’t hacked a hole in it for a radio. Oh well.
After that I wire wheeled both bumpers, and then spent some more time straightening the rear. Got it good enough.
Once that was done I set the dash panel in to see how it fit. Looks good to me!
Wish some idiot (me) hadn’t hacked a hole in it for a radio. Oh well.
Attachments

OP
OP
KFS35
New Member
I’ve been slowly making progress on the Bronco over the last couple of months.
Since the last update, I finished cleaning up all of my welds and primed and undercoated the bottom of the tub. I’ve now got it on a rolling stand, ready to prime.
The wheels and body parts I’m reusing are at the e-coater. The engine is back in the chassis. Hopefully for good this time.;D
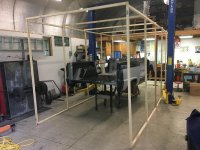
I just finished building a paint booth. I need to pick up a couple more lights for it, but it’s basically ready to go. Hopefully by the end of July, I’ll be done with paint.
Since the last update, I finished cleaning up all of my welds and primed and undercoated the bottom of the tub. I’ve now got it on a rolling stand, ready to prime.
The wheels and body parts I’m reusing are at the e-coater. The engine is back in the chassis. Hopefully for good this time.;D
I just finished building a paint booth. I need to pick up a couple more lights for it, but it’s basically ready to go. Hopefully by the end of July, I’ll be done with paint.
Attachments
- Joined
- Jan 28, 2012
- Messages
- 1,561
That's looking fantastic! keep up the good work.
OP
OP
KFS35
New Member
OP
OP
KFS35
New Member
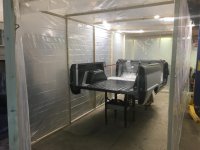
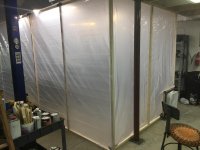
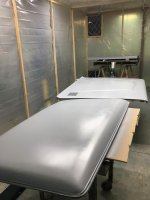
The paint booth is a partial success. It’s got plenty of light, and it contained the overspray well. It does need more airflow. The visibility decreased significantly while spraying primer. I think the fan is providing enough airflow in, so I’m going to double the size of the exhaust filters. If that isn’t enough, I can always add another fan.
But, the tub is primed! And I’m pleased about that. Just in time to go back to work for a few days.
I’d rather keep at the Bronco, but I suppose I have to pay for it somehow.
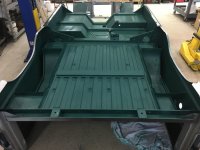
Next step is to put a little body filler in a few spots, and then shoot some color. I’m really excited to see some green on the tub. But I think it looks good being a uniform color now at least.")
But, the tub is primed! And I’m pleased about that. Just in time to go back to work for a few days.
I’d rather keep at the Bronco, but I suppose I have to pay for it somehow.
Next step is to put a little body filler in a few spots, and then shoot some color. I’m really excited to see some green on the tub. But I think it looks good being a uniform color now at least.
Attachments
OP
OP
KFS35
New Member
OP
OP
KFS35
New Member
I’m going to call yesterday’s progress three steps forward, and one back.
I got the tub reinstalled on the chassis, and the bracing cut out of the door openings. But I also put some scrapes in the paint while doing so. I also noticed some orange peel on the quarter panels So I sanded them down, and will re-shoot them if the humidity ever goes down.
I got the tub reinstalled on the chassis, and the bracing cut out of the door openings. But I also put some scrapes in the paint while doing so. I also noticed some orange peel on the quarter panels So I sanded them down, and will re-shoot them if the humidity ever goes down.
Attachments
77Bronco636
Sr. Member
- Joined
- May 9, 2006
- Messages
- 851
You’ll be on the road in know time!! Looking really nice!!!!!!
OP
OP
KFS35
New Member
You’ll be on the road in know time!! Looking really nice!!!!!!
Thank you!
OP
OP
KFS35
New Member
Since the last update, I repainted the quarter panels. They look a lot better this time.
A couple of weeks ago, I picked my parts from the e-coater. There was some body work I needed to do on a few of the pieces. I finally was able to wrap that up, and today I primed them. I also cleaned up a few more parts, and I hope to get them primed tomorrow.
A couple of weeks ago, I picked my parts from the e-coater. There was some body work I needed to do on a few of the pieces. I finally was able to wrap that up, and today I primed them. I also cleaned up a few more parts, and I hope to get them primed tomorrow.
Attachments
OP
OP
KFS35
New Member
Today I shot white on the grille, top, bumpers and wheels.
I had gotten Wimbledon White, based on what I have read online, but it sure doesn’t look like that’s what it was.
Going off memory, all of my white parts were much brighter white than Wimbledon. The Wimbledon looks like what I’ve seen on some later EBs, but not mine.
I’m thinking maybe the correct color is Pure White.
I’ll try to get a good pic, not sure if there is enough light left tonight.
Last edited:
Similar threads
- Replies
- 65
- Views
- 11K
- Replies
- 26
- Views
- 4K
- Replies
- 31
- Views
- 4K