• Welcome to ClassicBroncos! - You are currently viewing the forums as a GUEST. To take advantage of all the site features, please take a moment to register. It's fast, simple and absolutely free. So please join our community today!
    If you have problems registering or can't log into your account, please contact Admin.

Finally starting my ‘66 U14 restoration

OP
OP
KFS35

KFS35

Jr. Member
Joined
Aug 17, 2017
Messages
128
Loc.
Belleville, MI
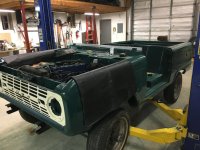
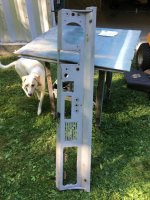
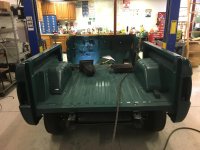
Well, the Wimbledon looks a lot better in natural light than it did under the leds in the paint booth.

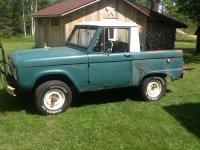
The one wheel I didn’t get stripped looks like it may have had Wimbledon on it, but the pictures I have sure look like the top was brighter.
 

Attachments

  • 855C472F-BD6C-412D-8275-A1E44534E487.jpg
    855C472F-BD6C-412D-8275-A1E44534E487.jpg
    204.9 KB · Views: 34
  • E34FC437-B71F-4284-9DE8-516CC0BA7B48.jpeg
    E34FC437-B71F-4284-9DE8-516CC0BA7B48.jpeg
    279.1 KB · Views: 36
  • 2F5A9ED3-8634-43FA-ADD3-3198A7FE7E9E.jpg
    2F5A9ED3-8634-43FA-ADD3-3198A7FE7E9E.jpg
    105.1 KB · Views: 38
  • BA37E4C1-E66B-496F-B2A8-F2B0DAF1BE85.jpg
    BA37E4C1-E66B-496F-B2A8-F2B0DAF1BE85.jpg
    59.6 KB · Views: 31
OP
OP
KFS35

KFS35

Jr. Member
Joined
Aug 17, 2017
Messages
128
Loc.
Belleville, MI
Before and after on the grille.

Kind of hard to tell because of the light, but looks pretty close to me.

I think maybe I’ll keep Wimbledon on everything but the top, and try Pure White on it.
 

Attachments

  • EED597DB-EBFE-40F7-916D-783FA10B6BA2.jpg
    EED597DB-EBFE-40F7-916D-783FA10B6BA2.jpg
    99.9 KB · Views: 28
  • 74EEE307-4714-4273-A463-D1E3EDF0E0DB.jpg
    74EEE307-4714-4273-A463-D1E3EDF0E0DB.jpg
    204.9 KB · Views: 32
OP
OP
KFS35

KFS35

Jr. Member
Joined
Aug 17, 2017
Messages
128
Loc.
Belleville, MI
I was feeling lazy today, so I didn’t do too much to the Bronc.

I prepped the interior door panels for prime and paint. While I was cleaning them up, the manufacturer mark on the steel showed up.

Then I stripped down the dash panel. I want to repair the cut crossbar in the speaker grill, then I’ll sand it down, prime and paint it.

I did stick the bumpers on to see how they look. I’m happy with it!
 

Attachments

  • 72A5A0C9-7218-41FB-8941-71B5F7028CCE.jpg
    72A5A0C9-7218-41FB-8941-71B5F7028CCE.jpg
    88.8 KB · Views: 37
  • 88C8838E-1AE2-4962-BEA2-76847B92F780.jpg
    88C8838E-1AE2-4962-BEA2-76847B92F780.jpg
    157.9 KB · Views: 37
  • 72857984-E039-4D5B-BB77-AEA2832BF08A.jpg
    72857984-E039-4D5B-BB77-AEA2832BF08A.jpg
    238.8 KB · Views: 40
  • CF3704EB-A940-4260-8D13-0C97B7AE92CC.jpg
    CF3704EB-A940-4260-8D13-0C97B7AE92CC.jpg
    83.8 KB · Views: 36
  • 6CF2D06B-0F44-4773-BBFF-0242D9DE7682.jpg
    6CF2D06B-0F44-4773-BBFF-0242D9DE7682.jpg
    90.3 KB · Views: 32

sprdv1

Contributor
REBEL
Joined
Mar 8, 2007
Messages
81,779
We all have them lazy days.. coming along nicely

I was feeling lazy today, so I didn’t do too much to the Bronc.

I prepped the interior door panels for prime and paint. While I was cleaning them up, the manufacturer mark on the steel showed up.

Then I stripped down the dash panel. I want to repair the cut crossbar in the speaker grill, then I’ll sand it down, prime and paint it.

I did stick the bumpers on to see how they look. I’m happy with it!
 
OP
OP
KFS35

KFS35

Jr. Member
Joined
Aug 17, 2017
Messages
128
Loc.
Belleville, MI
I made the repairs to the instrument panel a few days ago, primed them, and got color on all of the interior parts today. Happy with how it turned out.
 

Attachments

  • B5BA1F94-A208-4C71-99BE-7E27E0F3E87E.jpg
    B5BA1F94-A208-4C71-99BE-7E27E0F3E87E.jpg
    84.8 KB · Views: 26
OP
OP
KFS35

KFS35

Jr. Member
Joined
Aug 17, 2017
Messages
128
Loc.
Belleville, MI
Since the last update:

I picked up the door shells and fenders last week. I bought some closeout pieces that had slight damage at a significant discount. I was able to repair them fairly easily. Not perfect, but good enough for me. Once that was done I primed and painted them.

Then, I was finally able to take down the paint booth. It is soooo much nicer having room to work again.

The last couple of days have been spent painting the pedals, steering column, and making sure everything fits. I had to drill a few mounting holes, and put a couple in for the main harness connectors.

I’m back to being excited to work on it, had been getting kind of burned out on the body and paint.

Still a long ways to go, but I’m planning on being back on the road in the spring.
 

Attachments

  • 30CF616E-8042-430A-9E3E-CE7B62C055A5.jpg
    30CF616E-8042-430A-9E3E-CE7B62C055A5.jpg
    107.4 KB · Views: 54
  • EF394357-84EB-4BDB-AC09-1154A6B2F778.jpg
    EF394357-84EB-4BDB-AC09-1154A6B2F778.jpg
    92.1 KB · Views: 47

sprdv1

Contributor
REBEL
Joined
Mar 8, 2007
Messages
81,779
Nice.. Good luck. Do something every day, little bit at a time

or as you have free time anyway :)
 
OP
OP
KFS35

KFS35

Jr. Member
Joined
Aug 17, 2017
Messages
128
Loc.
Belleville, MI
Its been quite a while since I’ve updated, didn’t realize it has been this long.

It’s been a period of minimal progress over the last few months, but since the last update I have done a few things here and there.

The front clip is on, the dash is permanently mounted, and I’ve been hooking up the harness and getting various pieces installed.

A few days ago, I tried to hook up the parking brake, and it’s seemed like the left rear cable was too short. After some head scratching and comparing the new with the old, I realized the bracket had been welded on backwards. That made the mounting paint about two inches further forward than it should have been. That part of the body came welded together, so whatever factory it’s made in had welded it on wrong. I wonder how many others have had the same issue, So today, I cut the bracket off, flipped it around and welded it back on.
 

Attachments

  • E8231954-7A1E-46E7-9068-3879B22FFADF.jpg
    E8231954-7A1E-46E7-9068-3879B22FFADF.jpg
    139.8 KB · Views: 43
  • 47E429ED-32DB-4468-8E26-0577C9737C54.jpg
    47E429ED-32DB-4468-8E26-0577C9737C54.jpg
    117 KB · Views: 40
  • EBAB668B-D0A8-4AA7-A0FD-EC0D0C7475E9.jpg
    EBAB668B-D0A8-4AA7-A0FD-EC0D0C7475E9.jpg
    109.4 KB · Views: 44
  • 5477B6DD-1074-41EF-800C-6A09925447C7.jpg
    5477B6DD-1074-41EF-800C-6A09925447C7.jpg
    91 KB · Views: 48

sprdv1

Contributor
REBEL
Joined
Mar 8, 2007
Messages
81,779
How you liking them Milwaukee power tools..?

Its been quite a while since I’ve updated, didn’t realize it has been this long.

It’s been a period of minimal progress over the last few months, but since the last update I have done a few things here and there.

The front clip is on, the dash is permanently mounted, and I’ve been hooking up the harness and getting various pieces installed.

A few days ago, I tried to hook up the parking brake, and it’s seemed like the left rear cable was too short. After some head scratching and comparing the new with the old, I realized the bracket had been welded on backwards. That made the mounting paint about two inches further forward than it should have been. That part of the body came welded together, so whatever factory it’s made in had welded it on wrong. I wonder how many others have had the same issue, So today, I cut the bracket off, flipped it around and welded it back on.
 

chris-nc

Contributor
Bronco Apprentice
Joined
Sep 1, 2020
Messages
52
That's coming together nicely. Since my own project is also a '66 U14, I love seeing build threads like this from other folks. I look forward to watching the progress.
 
Joined
Oct 1, 2010
Messages
44
What coating did you use underneath? Scrolled through the thread didn’t see it. BTW looking nice!


Sent from my iPhone using Tapatalk
 
OP
OP
KFS35

KFS35

Jr. Member
Joined
Aug 17, 2017
Messages
128
Loc.
Belleville, MI
What coating did you use underneath? Scrolled through the thread didn’t see it. BTW looking nice!


Sent from my iPhone using Tapatalk


Thanks!

Raptorliner. I used it on the bottom of the tub, and in the bed.

It’s tough stuff, it took quite a bit of effort to get it off to weld the bracket back on.
 
Top