


Community
Message Forum
Photo Gallery
Event Calendar
Book Reviews
Bronco Wallpaper
Bronco FAQ
Link Back to CB!
Photo Gallery
Event Calendar
Book Reviews
Bronco Wallpaper
Bronco FAQ
Link Back to CB!
Buy / Sell


Bronco Tech
3 Arm Wiper Setup
Fix Motor Mount
Roll Cage Braces
Throttle Body 65mm
Wheel Alignment
Heat Riser Replacement
Vent Window Repair
Center Console Mount
Straighten Bumper
Ford 6R80 6 spd
More Tech...
Fix Motor Mount
Roll Cage Braces
Throttle Body 65mm
Wheel Alignment
Heat Riser Replacement
Vent Window Repair
Center Console Mount
Straighten Bumper
Ford 6R80 6 spd
More Tech...

Install the app
-
Welcome to ClassicBroncos! - You are currently viewing the forums as a GUEST. To take advantage of all the site features, please take a moment to register. It's fast, simple and absolutely free. So please join our community today!If you have problems registering or can't log into your account, please contact Admin.
You are using an out of date browser. It may not display this or other websites correctly.
You should upgrade or use an alternative browser.
You should upgrade or use an alternative browser.
First time Timing Chain cover seal replacement
- Thread starter CA650
- Start date
thanks that’s good advice. I was more focused on cleaning the surrounding surface of the block to remove stuck on old seal material and dirt.
I have some parts due to come in this week that should let me make a lot of progress.
new balancer, pulley wheel and timing chain cover, I did order that timken rear crank seal some newer radiator hose material and i am debating if i should swap the alternator just because it looks tired but seems to operate fine.
I had my timing cover off about a year ago to fix leaks. Only thing I can add to this discussion is that I won't try to do this again without removing the oil pan.
It was really a bear compressing the gasket between the lower part of the timing cover and the pan, while trying not to wreck the seal, getting bolts started... I even had a crow bar involved. Was amazed when it didn't leak after the job was done.
My 302 didn't have any dowel pins to help line things up. Maybe they did on your year.
One thing I did do that I believe helped fix the leaks was to go over every mating surface (water pump, timing cover, etc.) with a large flat file to get rid of humps and valleys. Sounds like you're replacing some of that stuff, but I'd still check for flatness.
thx
dropping the oil pan a little is not a problem. i’ll get it to fit
today I was cleaning off the thermostat housing, got some new bolts and seal for that and i’ll paint it.
wild horses sent me a new balancer and crank pulley and now i’ve read the rest of the forum to learn that I had an overdrive pulley and the WH one is 1:1 so when i’m done i’m probably back to even on cooling since i’ve improved the fan surface area but then lost some velocity and i’m maybe down some on power steering and alternator. wondering if my belts are going to fit back on with this new pulley it’s probably 3/4 in smaller.
paul do you guys sell the overdrive pulley size? I didn’t check before I ordered it.
I have developed a bad habit of just pulling the trigger on parts thinking it’ll all be the same or that I know what i’m doing.
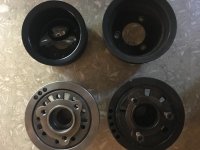
new balancer and pulley are on the left and the old ones on the right (this forum seems to rotate my pictures on upload)
Paul btw the hash marks on this new balancer are really really faint. am I actually going to be using those for anything? I think i’m just pushing this balancer back on screwing the now smaller pulley into it and driving away
dropping the oil pan a little is not a problem. i’ll get it to fit
today I was cleaning off the thermostat housing, got some new bolts and seal for that and i’ll paint it.
wild horses sent me a new balancer and crank pulley and now i’ve read the rest of the forum to learn that I had an overdrive pulley and the WH one is 1:1 so when i’m done i’m probably back to even on cooling since i’ve improved the fan surface area but then lost some velocity and i’m maybe down some on power steering and alternator. wondering if my belts are going to fit back on with this new pulley it’s probably 3/4 in smaller.
paul do you guys sell the overdrive pulley size? I didn’t check before I ordered it.
I have developed a bad habit of just pulling the trigger on parts thinking it’ll all be the same or that I know what i’m doing.
new balancer and pulley are on the left and the old ones on the right (this forum seems to rotate my pictures on upload)
Paul btw the hash marks on this new balancer are really really faint. am I actually going to be using those for anything? I think i’m just pushing this balancer back on screwing the now smaller pulley into it and driving away
Attachments
- Joined
- Jul 1, 2011
- Messages
- 1,847
the hash marks on this new balancer are really really faint. am I actually going to be using those for anything?
Those are the timing marks. The timing light will see them.
- Joined
- Nov 3, 2003
- Messages
- 47,916
wild horses sent me a new balancer and crank pulley
I had an overdrive pulley and the WH one is 1:1
Did you get a new water pump pulley too, or are you keeping the old one?
If old, what diameter is the water pump pulley? It's only 1:1 if the other pulley is the same size. If it was different along with the crank pulley, we'll have to re-calculate to see what you have.
wondering if my belts are going to fit back on with this new pulley it’s probably 3/4 in smaller.
Not very likely. You might have enough adjustment, but likely as not you'll need different belts. Only way to know is to wait and see, and install the old ones.
paul do you guys sell the overdrive pulley size?
No, never found the need. We patterned ours after the stock Bronco size that was on at least most Broncos. During the later years it's possible that there were different sizes used, but I've never seen a listing of what came on every EB over every year.
Paul btw the hash marks on this new balancer are really really faint. am I actually going to be using those for anything?
By hash marks, do you mean the graduated timing marks? I certainly hope you're going to use them! At least some time.
Granted you did not take your distributor out, so your ignition timing has not changed. But at some point in every Bronco owner's life they need to check the timing.
Best bet is to paint the damper right now so it does not rust in a week (keeping the shank clean of course) and then scribing/scratching the paint out of the grooves where the timing marks are.
But only on the one set that lines up with your pointer at TDC. Some dampers have two or three sets of marks. You only use one per engine application.
Even though scratching off the paint will highlight the grooves pretty well, most of us will also highlight a couple of key lines with a white or silver high-lighter type pen.
Usually at the Zero and then at the 10° BTDC marks. If you have your pet setting for timing, then you would mark that one for sure. For example if you always set your timing at 14° BTDC then you would mark that one.
Put some oil on the seal and probably some oil on the shank of the damper too, so that it slides into the seal without catching a lip.
Not always necessary, but it's also a well known best-practice.
Paul
How much of an overdrive was your setup before?
Paul
IDK it’s 3/4 inches in diameter larger than the one WH sells
i’ll measure the water pump pulley tomorrow and check that vs whatever the internet says is stock
- Joined
- Nov 3, 2003
- Messages
- 47,916
Interesting. Were they very close to touching one another in the middle? The ones we make are 5.75" for both. Sounds like yours were larger for both pulleys, with the crank being slightly larger than the water pump for that overdrive you were talking about.
Is there anything to make you think the engine is swapped in from something else? Or do you think just the pulleys were changed?
Can you see the casting numbers behind the starter at this point? If not you might want to search for all the numbers and appropriate data on the engine just to be sure.
At least it's not a 351, judging by the pics, but your original timing cover had a dip-stick fitting cast into it, which means it might have come from a passenger car or 2wd truck originally.
I don't have my original '71 anymore to verify, and with so many original part numbers from Ford for the timing covers, it's hard to track them all down to find out if ours had the dipstick hole and it was just plugged up, or if it was not cast into some.
Anybody remember how that went? Do all Ford timing covers have the dipstick hole?
Thanks
Paul
thanks paul
I ordered a stock size
matching water pump pulley just to go back to something know
no the pulleys were not close to touching
everything ran well before.
re: the engine - I did check the engine number once before and it seemed correct - i’ll post it here when I have. chance to look it up. i’ve swapped the starter in the past and so I did have a chance to check.
still waiting on a timing chain cover. the new covers also have holes that you need to plug for dipsticks paul. so i don’t know what’s normal for an original timing chain cover or if I have an original or not.
regardless i’m prepping the old one and will fix the stripped thread
bolts if necessary or my welder will fill them and i’ll re-thread them
correctly if for some reason I don’t like the look of the replacement cover. my
welder is AWESOME easy fixes
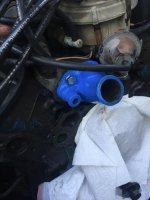
I put the thermostat housing back in with a new seal and some
stainless bolts just to feel like I was making progress while waiting
Paul you asked about my engine code:
it’s D2OE-6015-AB
which I believe means It was manufactured in 1972
and was O for industrial so I assume this is the right motor for a 74 Bronco I guess.
regardless i’m prepping the old one and will fix the stripped thread
bolts if necessary or my welder will fill them and i’ll re-thread them
correctly if for some reason I don’t like the look of the replacement cover. my
welder is AWESOME easy fixes
I put the thermostat housing back in with a new seal and some
stainless bolts just to feel like I was making progress while waiting
Paul you asked about my engine code:
it’s D2OE-6015-AB
which I believe means It was manufactured in 1972
and was O for industrial so I assume this is the right motor for a 74 Bronco I guess.
Attachments
Here you go.........
lol this forum is full service
- Joined
- Nov 3, 2003
- Messages
- 47,916
the new covers also have holes that you need to plug for dipsticks paul. so i don’t know what’s normal for an original timing chain cover or if I have an original or not.
Hard to say for sure anymore. They've necked down the selection so much over the last twenty years that a very few part numbers have to take the place of many.
Over time I think the total number of discrete designs numbered in the low thirties. About twenty years ago or so, even Dorman listed 11 different part number (or maybe it was more?) but now there are fewer than ever.
But that does not mean they didn't all come with the holes cast in, and just plugged for applications with rear-sump pans. I never paid that much attention back then.
Guess we'll have to do a poll on those that know they have original Bronco engines to see if they all have holes, or not.
Paul you asked about my engine code:
it’s D2OE-6015-AB which I believe means It was manufactured in 1972
and was O for industrial so I assume this is the right motor for a 74 Bronco I guess.
Probably correct. But the "D2OE" designation is not the year it was made, or necessarily even made for. It's an engineering number (still useful for identification, but not the ultimate in information) and denotes the year in which it was designed/released.
So while it might first have appeared for the '72 or '73 model year vehicles, it could have run with that same engineering number for two, three, or several years after. The numbers behind the starter and elsewhere are the casting date codes which will give you the idea of when it was originally made and installed. Typically there is a one, or two month delay between casting and installing on the assembly line. Maybe rarely, but I think I've heard of up to three months. Two months being typical.
And with Windsor family engines at least, which product line it's listed for "A" or "T" (for trucks) or even "O" for industrial, they would also easily have been installed in passenger cars and anything else that used a 289, 302 or 351Windsor. They did not make separate engines of the same family for different lines.
When you see a "T" in an engineering number it's a pretty good bet that it was used strictly in the truck lines. But if you see an automotive code it could have been used in trucks as well as cars.
You often see Fairlane/Falcon (I think those are two common ones) and other designations on parts used in our trucks and every other type of Ford car.
There were some engines however, in other families, that were found strictly in heavy duty trucks and never in the vehicles we typically talk about.
Paul
how about this.
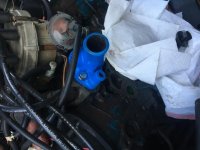
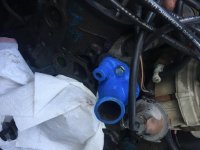
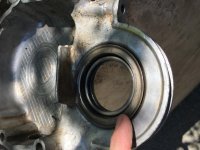
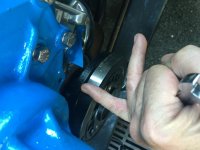
Now that I have looked more closely at the timing chain cover that I just removed from this bronco.. the crank seal looks like it was put in backwards?!?! the lip is facing inside?! my finger is pointing to the seal as it was installed on the timing chain cover I removed.
when I look at the manual and videos on the internet the seals lip is outside which is the opposite of how this was installed on the cover I just removed.
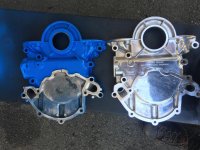
also if you look at the cover I removed (now painted blue in the photos) the hole is much smaller than the new one I just received from TBP which is the shiny one. the Timken seal I purchased - recommended earlier in this thread is a fit for the new cover.. so the cover that was on this bronco had a smaller timing chain cover crank hole
so, i’m going with the new one and i’m installing the seal with the lip facing out.
should i paint this aluminum cover or leave it unfinished silver? looks pretty good as is
Now that I have looked more closely at the timing chain cover that I just removed from this bronco.. the crank seal looks like it was put in backwards?!?! the lip is facing inside?! my finger is pointing to the seal as it was installed on the timing chain cover I removed.
when I look at the manual and videos on the internet the seals lip is outside which is the opposite of how this was installed on the cover I just removed.
also if you look at the cover I removed (now painted blue in the photos) the hole is much smaller than the new one I just received from TBP which is the shiny one. the Timken seal I purchased - recommended earlier in this thread is a fit for the new cover.. so the cover that was on this bronco had a smaller timing chain cover crank hole
so, i’m going with the new one and i’m installing the seal with the lip facing out.
should i paint this aluminum cover or leave it unfinished silver? looks pretty good as is
Attachments
Last edited:
I moved forward with the newer timing chain cover
put the Timken seal in the correct way (I think per youtube)
put the new gaskets in place
bolted the water pump in place
Bolted the timing chain cover in place
No trouble with the oil pan or oil pan gasket
Put the Damper back on
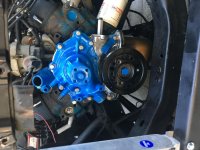
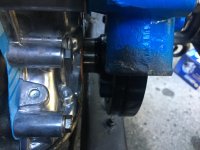
I have a question before I go further.
Do we think I have put the damper on all the way?
here’s a video too
https://youtu.be/fnZbHhL0q-M
I didn’t keep track of how deep the old damper was before I removed it
this new one went on pretty smoothly. it wasn’t loose but it didn’t fight with me either
It felt right and it slid back on its notch through the timing chain cover seal
I put the crank bolt in but didn’t tighten it yet
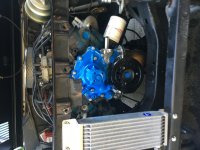
here are a few pictures of my progress and some close up pictures of the position of the damper.. my questions are:
1) is it ALL the way on or should I try to pressure it more?
2) if its not all the way on will tightening that crank bolt pull it in to the right depth?
3) if anyone has a a quick link to the torque specification for the timing chain cover, water pump bolts and that central crank bolt I would appreciate those. If it’s no trouble to send the link.
I will google for them tomorrow before moving ahead. i’m sure this forum
has all of those specification in 100 places and I haven’t searched yet.
easy to do. I had the shop manuals at one point but don’t anymore.
but so far I feel like i’ve made progress
put the Timken seal in the correct way (I think per youtube)
put the new gaskets in place
bolted the water pump in place
Bolted the timing chain cover in place
No trouble with the oil pan or oil pan gasket
Put the Damper back on
I have a question before I go further.
Do we think I have put the damper on all the way?
here’s a video too
https://youtu.be/fnZbHhL0q-M
I didn’t keep track of how deep the old damper was before I removed it
this new one went on pretty smoothly. it wasn’t loose but it didn’t fight with me either
It felt right and it slid back on its notch through the timing chain cover seal
I put the crank bolt in but didn’t tighten it yet
here are a few pictures of my progress and some close up pictures of the position of the damper.. my questions are:
1) is it ALL the way on or should I try to pressure it more?
2) if its not all the way on will tightening that crank bolt pull it in to the right depth?
3) if anyone has a a quick link to the torque specification for the timing chain cover, water pump bolts and that central crank bolt I would appreciate those. If it’s no trouble to send the link.
I will google for them tomorrow before moving ahead. i’m sure this forum
has all of those specification in 100 places and I haven’t searched yet.
easy to do. I had the shop manuals at one point but don’t anymore.
but so far I feel like i’ve made progress
Attachments
Last edited:
Torque the balancer to 70 to 90 foot lbs.
more torque info here:
https://www.diyford.com/ford-small-block-rebuild-torque-specs-sequences-alignment/
more torque info here:
https://www.diyford.com/ford-small-block-rebuild-torque-specs-sequences-alignment/
- Joined
- Jul 1, 2011
- Messages
- 1,847
Yup looks like the PO put that seal in backwards.
I use a aftermarket balancer, so I can't help you there. What you could try though is remove the bolt, lay a solid piece of wood across the balancer
and tap it lightly with a small sledge. Seems like it should go on further than that. I use this tool to install my balancer. Try not to use the bolt
to force it on further, you could damage the threads in the crank.
You should install the fuel pump now, while you have lots of room.
Did you pour some fresh oil over the new chain before the cover went on? If not, no biggie, you're not doing a cam break-in when your done.
Re-posting this Ford Windsor Torque Specs link I posted on page 2.
https://help.summitracing.com/app/answers/detail/a_id/4923/~/ford-windsor-torque-specs
Similar threads
- Replies
- 2
- Views
- 464
- Locked
- Replies
- 0
- Views
- 355