


Community
Message Forum
Photo Gallery
Event Calendar
Book Reviews
Bronco Wallpaper
Bronco FAQ
Link Back to CB!
Photo Gallery
Event Calendar
Book Reviews
Bronco Wallpaper
Bronco FAQ
Link Back to CB!
Buy / Sell


Bronco Tech
3 Arm Wiper Setup
Fix Motor Mount
Roll Cage Braces
Throttle Body 65mm
Wheel Alignment
Heat Riser Replacement
Vent Window Repair
Center Console Mount
Straighten Bumper
Ford 6R80 6 spd
More Tech...
Fix Motor Mount
Roll Cage Braces
Throttle Body 65mm
Wheel Alignment
Heat Riser Replacement
Vent Window Repair
Center Console Mount
Straighten Bumper
Ford 6R80 6 spd
More Tech...

Install the app
-
Welcome to ClassicBroncos! - You are currently viewing the forums as a GUEST. To take advantage of all the site features, please take a moment to register. It's fast, simple and absolutely free. So please join our community today!If you have problems registering or can't log into your account, please contact Admin.
You are using an out of date browser. It may not display this or other websites correctly.
You should upgrade or use an alternative browser.
You should upgrade or use an alternative browser.
First time Timing Chain cover seal replacement
- Thread starter CA650
- Start date
- Joined
- Nov 3, 2003
- Messages
- 47,916
Yes that IS the slinger. Yes, it's normally used, but apparently with your gear set it's required to leave it off.
Just pull it off and keep it handy until you're done with the job to make sure it's correct to leave it off.
But I'm guessing it is, because it says so right in the instructions and would mean that the new crank gear is not compatible.
Paul
Just pull it off and keep it handy until you're done with the job to make sure it's correct to leave it off.
But I'm guessing it is, because it says so right in the instructions and would mean that the new crank gear is not compatible.
Paul
- Joined
- Nov 3, 2003
- Messages
- 47,916
The reason it was recommended to rotate the engine until the marks line up NOW rather than later is that the timing gears are the only components with these marks and lining them up puts the engine at it's one and only TDC (top dead center) position on the compression stroke. And this is the position upon which all other settings of the engine are based.
The ONLY time you can easily verify this position is now, with the timing cover off. Once it's back on it takes more work to be sure it's all lined up.
With the marks lined up you can check anything and everything else that needs checking, because the engine is at it's known TDC position.
So before you remove the gears, go ahead and rotate the crankshaft until they line up. You may have to rotate it twice because obviously the cam gear only turns at half the speed of the crank gear.
Yes, it can still be aligned after you remove the gears by turning the cam and the crank so that any key-ways line up in their proper positions. But it's just much easier to do when you have those handy marks handy.
Paul
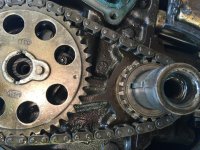
Hi, as mentioned, the wider double roller crank sprocket will be too wide for the slinger. That's ok.
Notice the new crank sprocket has multiple keyways. You must check out the old sprocket on the crank for multiple keyways and verify how it is set up before you take it apart. Take the slinger off and take more pictures of the lower sprocket. If there are multiple keyways you may have to clean it with a wire brush to get a good look at the numbers.
As mentioned, if the dot on the cam sprocket is pointed down, but the dot on the lower sprocket is not pointing up, turn the engine 1 more revolution.
You can check this out without disturbing anything.
Get them pointing at each other and take another picture.
Good luck
here is a shot with the slinger part off
I am just now realizing I don’t own sprocket puller so i’ll probably try to gently pull these off and if if I can’t i’ll have more tools to buy
does seem
like this crank gear has notched for advancing or retarding the timing
I am just now realizing I don’t own sprocket puller so i’ll probably try to gently pull these off and if if I can’t i’ll have more tools to buy
does seem
like this crank gear has notched for advancing or retarding the timing
Attachments
- Joined
- Nov 3, 2003
- Messages
- 47,916
You usually do not need a puller. If it does not come off by hand easily, you can usually get it with two small prybars, or whatever you can wedge behind it.
If it's a slight press fit, a puller might be easier, but it should still come off with some persuasion.
If the new one does not slip on by hand, a few taps with a hammer and a deep socket should get the job done.
Paul
If it's a slight press fit, a puller might be easier, but it should still come off with some persuasion.
If the new one does not slip on by hand, a few taps with a hammer and a deep socket should get the job done.
Paul
thanks paul,
I got them off without using much force.
I made progress and here’s what I did for the record in case anyone encounters this again and gets value from this thread
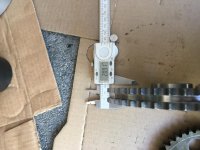
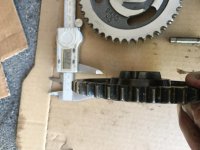
1) I measured the distance from the face of the engine (the spot on the engine where the timing chain cover seal sits) to the top of the one piece eccentric the distance was a little over 46mm so that is how far the top of the eccentric was sitting
2) I pulled off the old chain and sprockets and measured the new ones height next to the old one.. the new one was slightly thinner even though it does have two chains
3) I installed the new one and measured again from the same point and it sits about 3mm shorter than the old one did. the top of the eccentric is about 43mm when measured from the same surface
so the new 7820 timing chain seems to fit with the one piece eccentric
thanks for all the help
Does anyone know the torque specification for that bolt in the center of the fuel pump eccentric???
I DID 35lbs NO LOC TITE. but I still have time to change that
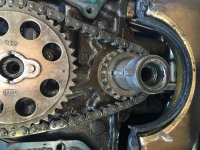
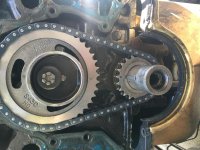
photos are below. I think it’s lined up properly maintaining the orientation between the crank and cam gears
I got them off without using much force.
I made progress and here’s what I did for the record in case anyone encounters this again and gets value from this thread
1) I measured the distance from the face of the engine (the spot on the engine where the timing chain cover seal sits) to the top of the one piece eccentric the distance was a little over 46mm so that is how far the top of the eccentric was sitting
2) I pulled off the old chain and sprockets and measured the new ones height next to the old one.. the new one was slightly thinner even though it does have two chains
3) I installed the new one and measured again from the same point and it sits about 3mm shorter than the old one did. the top of the eccentric is about 43mm when measured from the same surface
so the new 7820 timing chain seems to fit with the one piece eccentric
thanks for all the help
Does anyone know the torque specification for that bolt in the center of the fuel pump eccentric???
I DID 35lbs NO LOC TITE. but I still have time to change that
photos are below. I think it’s lined up properly maintaining the orientation between the crank and cam gears
Attachments
-
 6E64CE70-8D98-4D78-94F5-4157EE5EFE56.jpg121.9 KB · Views: 26
 -
 16B43878-2A04-409F-9A40-CD2B240A7763.jpg131.5 KB · Views: 20
 -
 9E842F17-97C1-4C8E-8FFC-D76ECB28F3C7.jpg138.2 KB · Views: 21
 -
 92D93E6E-1C55-40BF-A351-A95E390D493C.jpg111.9 KB · Views: 21
 -
 1D8DEBC8-43E2-4720-AE21-6D8D1A8DD710.jpg70.7 KB · Views: 19
 -
 7E2AE010-D649-4523-8BF1-B18918DD4E75.jpg111 KB · Views: 23
Last edited:
- Joined
- Jul 1, 2011
- Messages
- 1,847
so the new 7820 timing chain seems to fit with the one piece eccentric
As I said previously, I never had a problem with the same combo.
Does anyone know the torque specification for that bolt in the center of the fuel pump eccentric???
40-45 ft-lbs
photos are below. I think it’s lined up properly maintaining the orientation between the crank and cam gears
Looks good
")
https://help.summitracing.com/app/answers/detail/a_id/4923/~/ford-windsor-torque-specs
Hi, looking good. I use blue locktite on that cam bolt. There should be very little or no slack in the chain now Good luck
As I said previously, I never had a problem with the same combo.
40-45 ft-lbs
Looks good
https://help.summitracing.com/app/answers/detail/a_id/4923/~/ford-windsor-torque-specs
thanks a lot. i’ll use some blue loctite and re-torque it to 45lbs
and i’ll move on to cleaning the cover and other parts to prep for gaskets and paint
does that chain need that red engine lube?
- Joined
- Jul 1, 2011
- Messages
- 1,847
does that chain need that red engine lube?
No, just pour some fresh oil over it before re-installing timing cover.
folks,
I hit a new snag today on my timing chain and seal replacement this am.
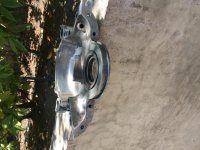
I was cleaning up the water pump and timing chain cover thinking I would paint them before putting everything back together
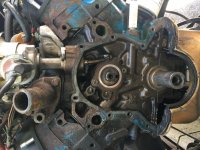
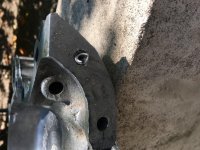
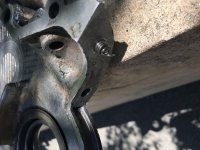
but... look at the bottom of this timing chain cover? There are 4 bolt holes in the bottom of the timing chain cover that come up through the oil pan to make a good seal.
if you remember doing your oil pan you will remember there are two larger bolts near the curved bottom of the chain cover and two smaller bolts to each side.
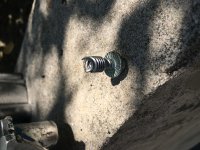
Well both of the small bolt holes in my timing chain cover had some type of metal coil in them. What is that doing there?!?! I thought it was a lose metal shaving and I pulled on it and realized it was in there for a reasons.
Is his normal? my guess is that the previous owner stripped those holes and then put those coils in there to re- thread the holes?
what do you think?
i’ve never seen a coil like that what’s it called?
should I just get a new timing chain cover and are they hard to find?
thanks - pictures below.
UPDATE - I just googled Heli-coil and that’s it. Meaning I think it was a hack for someone who stripped the threads.
i’ll order a new cover. is the original aluminum or steel?
I hit a new snag today on my timing chain and seal replacement this am.
I was cleaning up the water pump and timing chain cover thinking I would paint them before putting everything back together
but... look at the bottom of this timing chain cover? There are 4 bolt holes in the bottom of the timing chain cover that come up through the oil pan to make a good seal.
if you remember doing your oil pan you will remember there are two larger bolts near the curved bottom of the chain cover and two smaller bolts to each side.
Well both of the small bolt holes in my timing chain cover had some type of metal coil in them. What is that doing there?!?! I thought it was a lose metal shaving and I pulled on it and realized it was in there for a reasons.
Is his normal? my guess is that the previous owner stripped those holes and then put those coils in there to re- thread the holes?
what do you think?
i’ve never seen a coil like that what’s it called?
should I just get a new timing chain cover and are they hard to find?
thanks - pictures below.
UPDATE - I just googled Heli-coil and that’s it. Meaning I think it was a hack for someone who stripped the threads.
i’ll order a new cover. is the original aluminum or steel?
Attachments
Last edited:
1970 Palmer
Full Member
- Joined
- Mar 2, 2020
- Messages
- 455
You sure are having some issues with this project.
It's a thread repair that some one installed because they over tightened and stripped the threads. A Heli-coil, or a Timesert are common "acceptable repairs" and it will be better than new.
The 1/4" bolts are tightened in INCH pounds.
It's a thread repair that some one installed because they over tightened and stripped the threads. A Heli-coil, or a Timesert are common "acceptable repairs" and it will be better than new.
The 1/4" bolts are tightened in INCH pounds.
- Joined
- Nov 3, 2003
- Messages
- 47,916
Always aluminum.
Nothing at all wrong with a Heli-Coil or the two or three other brands. Makes the threads stronger than original since aluminum is prone to stripping if you use too much force, or get some corrosion in there from dissimilar metals or coolant leaks.
But obviously it's no good any more, so a new cover it is.
Just follow the torque specs and you should be good.
If the rest of your oil pan bolts are not already loose, I personally would loosen them up to allow your timing cover to fit easier.
Personal preference in my case, as I think it's probably possible to do the job with it tight. Just makes it easier to have them loose in my opinion.
Paul
You sure are having some issues with this project.
It's a thread repair that some one installed because they over tightened and stripped the threads. A Heli-coil, or a Timesert are common "acceptable repairs" and it will be better than new.
The 1/4" bolts are tightened in INCH pounds.
yes i’m having some issues but I bet we get through them
i’ll buy a new cover and move on to whatever is next.
might swap the alternator while i’m in here
1970 Palmer
Full Member
- Joined
- Mar 2, 2020
- Messages
- 455
yes i’m having some issues but I bet we get through them
i’ll buy a new cover and move on to whatever is next.
might swap the alternator while i’m in here
So........are your planning on replacing the pan gasket, or just patching in the front corners? Which ever direction you choose, just make sure you kept the dirt, gunk, and coolant from dropping into the oil pan.

So........are your planning on replacing the pan gasket, or just patching in the front corners? Which ever direction you choose, just make sure you kept the dirt, gunk, and coolant from dropping into the oil pan.
The pan and the pan gasket are new. It’s a one piece gasket. I put them in last month as I was trying to hunt down my leaks.
there were three:
- small leak from the front of the oil pan gasket
- large leak from the oil sending unit extension
- small leak of oil and radiator fluid from the top of the timing chain gasket.
I’ll keep the dirt out and change the oil when it’s done. Thx for the reminder.
1970 Palmer
Full Member
- Joined
- Mar 2, 2020
- Messages
- 455
It's possible that a timing cover can corrode and leak coolant which is why I asked you the question a couple of days ago. BUT it's much more likely to be a misdiagnosed leaking thermostat housing, that drips down into the valley above the timing chain cover. Look closely, use a small mirror under the housing and upper radiator hose.
It's possible that a timing cover can corrode and leak coolant which is why I asked you the question a couple of days ago. BUT it's much more likely to be a misdiagnosed leaking thermostat housing, that drips down into the valley above the timing chain cover. Look closely, use a small mirror under the housing and upper radiator hose.
Thanks - I’ll look at the thermostat housing again closely. I assume there is a seal under there too which I can replace.
Re: your question from a couple days ago sorry I did not address that the timing cover was not badly corroded and fluid passages were pretty clear. I would have re-used it but it was taking me a couple hours just to prep it for paint and stripped screws and the scoring on the back from the cam eccentric made me throw in the towel.
I was going to pull the thermostat housing off tomorrow but I wanted close up the opening to the oil pan with some plastic so I don’t drip and fluid in there first
i’m not ruling out that the thermostat housing might have dripped but i’ve checked that in the past and I get a matching puddle of oil on the drivers side valley at the top of the timing chain too so I assumed it was the timing chain also.
Similar threads
- Replies
- 2
- Views
- 464
- Locked
- Replies
- 0
- Views
- 355