ILikeBond
Sr. Member
- Joined
- Jan 27, 2009
- Messages
- 908
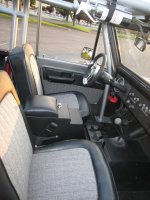
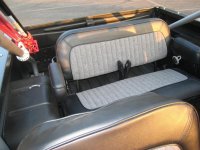
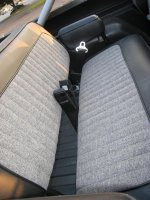
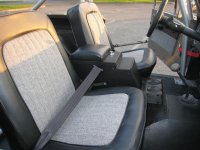
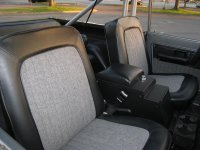
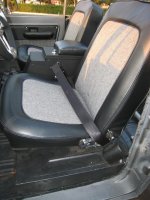
I bought my Bronco 3.5 years ago (nearly killing myself and my wife in the process), did some initial safety and aesthetic mods, have occasionally taken her on a few short trips and even fewer long trips, but for a variety of reasons she's mostly been tucked away safe in my garage... which I hate!  Well, enough is enough, and after biding my time far too long, I'm finally ready to get her in the shape I've been envisioning for too long. Here's what she looked like when I picked her up; on the way home (see 4th pic for the aftermath of my near-death experience losing a wheel while doing ~70 on the highway); and after I did the following:
- new trim (emblems, door handles, mirrors) & bumpers
- 6-point double-hooped roll bar
- retractable lap belts
- bikini top
- power steering
- steering geometry adjustment (e.g., drop pitman arm, drop track bar bracket, steering stabilizer)
- Tuffy console and rear storage locker
- Small fixes (window and lock mechanisms, rear window mechanism)
- Bling (chrome Maglight and high lift jack holders, chrome fire extinguisher (also functional!), chrome steering wheel, "FUEL" gas cap, a few red accents, red "FORD" letters on grill (crooked, unfortunately %)))


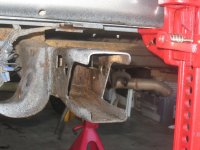
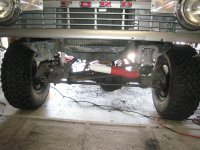
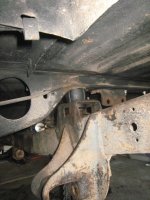
Issues: Bronco is currently a 200c I6 with 3-on-the-tree. Fun for the novelty of it, but she's under powered (especially because the compression on one cylinder is terrible and far less than ideal on two others). Suspension sucks - rear is comprised of some thin old leafs on blocks with ancient-looking shocks, and it POUNDS HARD whenever I go over even a small bump - like teeth-chattering hard. Steering is ok, but lots of body roll, could use more stability. Brakes are acceptable, but I don't fully trust them on significant downhills or when I need to stop very quickly or from speed. No working windshield wipers, no horn, and recently the gauge and turn signals seemed to go out. No radio and a terrible exhaust system, and no insulation makes her uncomfortably loud.
Goal: Build a streetable rig, capable of daily driving, equipped to handle San Diego's endless road dips, holes, bumps, cracks, and its many hills, with speed and comfort, while at the same time building her with sufficient strength and flexibility to handle occasional moderate off-roading (the type a LUBER is capable of). Ideally finish by the time my current lease is up, August 2013.
Plan: Build in phases: (1) Suspension & Steering; (2) Drive Train; (3) Peripherals & Aesthetics. In reality, some components from different phases may be taken out of turn depending on what works or is best to do when doing another thing. Also, body and paint are far from perfect, but that just gives her character and she's not getting a frame-off or show-quality refurbishment, so this is not currently in the plan. Body is totally free from rust, so this, fortunately, is not an issue.
I haven't made all the decisions yet, and surely much will change as I go through it, and it's almost impossible to list every little thing I'm thinking about, but here's what I'm thinking:
Phase 1 - Suspension and Steering
- 3.5" body lift: WildHorses leafs & coils, Shock Jock rear shock mounts, F250 front shock mounts
- Billstein (or possibly Fox) shocks, 1 front and 2 rear on each side
- 1" body lift (WildHorses)
- Peripherals: 7* bushings, 3" front and 4.5" rear bump stops
- New steering linkage (possibly WildHorses's "Clydesdale" setup, though that may be overkill)
- Possibly power-assisted steering (this may be overkill for my application)
- Possibly front and/or rear sway bars to improve roll
Phase 2 - Drive Train
- Clean up and paint engine bay (probably rattle can black)
- Mustang 5.0 V8 EFI swap, may do a 331 or 347 stroker, probably with serpentine setup
- Headers, exhaust
- NV3550
- Rebuild or replace Dana 20
- New drive shafts
- 4.88+ gears (and possible new lockers, front and rear, maybe ARB air lockers)
Stage 3 - Peripherals
- Hydroboost brakes
- New wiring harness
- Radio & speakers (maybe in rear kick panels fabric matched to seats and door inserts)
- Horn
- Front and rear bumpers (with winch and possibly lights on front and spare tire mount on rear)
- All new fuel lines, brake lines, emergency brakes
- All new bushings wherever possible
- 23-gallon fuel tank (possibly auxiliary fuel tank, though this would require drilling the body for a second fueling hole, which I'm not anxious to do)
- Black wheels and possibly other black accents (hood scoop, quarter panel guards, stuff like that)
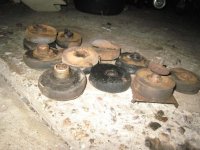
Just so y'all know I'm not lyin', and to keep myself honest, here's what was on my front step when I got home from work today. ;D

And here are a few items I've bought and am waiting to pick up:
1987 Mustang 5.0 block bored 0.30 over, Magnafluxed, hot tanked, honed, decked, line bored, new freeze plugs and new cam bearings. Painted Ford blue with white epoxy in lifter valleys to improve oil drainback

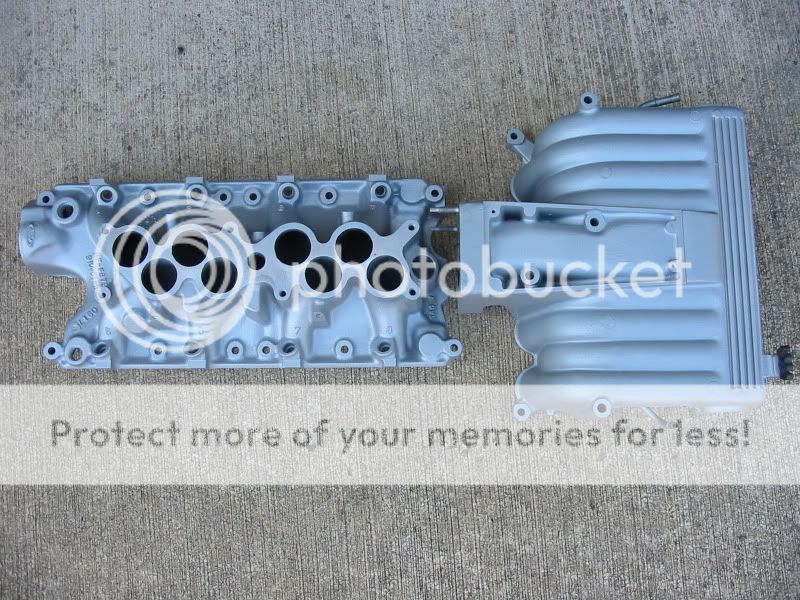
GT40 intake, hot tanked and coated with high temp paint, from Ford Explorer
I may also buy some GT40 Cobra heads (magnafluxed, tanked, valve job, resurfaced, new valve stem seals and new freeze plugs, from an Explorer during that brief period where Ford put the cobra heads in them) from the same source. I know they're not ideal or anything special compared to AFR 185s or TWs or whatever, but I think they'd probably be fine for my application.
I've also picked up an A9L computer, 2 stock 55m MAFs, a complete '95 mustang wiring harness, and have some other EFI parts from a complete 1986 Mustang 5.0 EFI motor that I decided not to use (e.g., fuel rails and injectors).
I look forward to sharing my progress and, more importantly, asking all sorts of stupid questions that I know my Bronco Brethren will graciously and patiently help sort out for me. I also welcome any comments or thoughts on my build plan.
Wish me luck!
Bond / Jack
Well, enough is enough, and after biding my time far too long, I'm finally ready to get her in the shape I've been envisioning for too long. Here's what she looked like when I picked her up; on the way home (see 4th pic for the aftermath of my near-death experience losing a wheel while doing ~70 on the highway); and after I did the following: - new trim (emblems, door handles, mirrors) & bumpers
- 6-point double-hooped roll bar
- retractable lap belts
- bikini top
- power steering
- steering geometry adjustment (e.g., drop pitman arm, drop track bar bracket, steering stabilizer)
- Tuffy console and rear storage locker
- Small fixes (window and lock mechanisms, rear window mechanism)
- Bling (chrome Maglight and high lift jack holders, chrome fire extinguisher (also functional!), chrome steering wheel, "FUEL" gas cap, a few red accents, red "FORD" letters on grill (crooked, unfortunately %)))
Issues: Bronco is currently a 200c I6 with 3-on-the-tree. Fun for the novelty of it, but she's under powered (especially because the compression on one cylinder is terrible and far less than ideal on two others). Suspension sucks - rear is comprised of some thin old leafs on blocks with ancient-looking shocks, and it POUNDS HARD whenever I go over even a small bump - like teeth-chattering hard. Steering is ok, but lots of body roll, could use more stability. Brakes are acceptable, but I don't fully trust them on significant downhills or when I need to stop very quickly or from speed. No working windshield wipers, no horn, and recently the gauge and turn signals seemed to go out. No radio and a terrible exhaust system, and no insulation makes her uncomfortably loud.
Goal: Build a streetable rig, capable of daily driving, equipped to handle San Diego's endless road dips, holes, bumps, cracks, and its many hills, with speed and comfort, while at the same time building her with sufficient strength and flexibility to handle occasional moderate off-roading (the type a LUBER is capable of). Ideally finish by the time my current lease is up, August 2013.
Plan: Build in phases: (1) Suspension & Steering; (2) Drive Train; (3) Peripherals & Aesthetics. In reality, some components from different phases may be taken out of turn depending on what works or is best to do when doing another thing. Also, body and paint are far from perfect, but that just gives her character and she's not getting a frame-off or show-quality refurbishment, so this is not currently in the plan. Body is totally free from rust, so this, fortunately, is not an issue.
I haven't made all the decisions yet, and surely much will change as I go through it, and it's almost impossible to list every little thing I'm thinking about, but here's what I'm thinking:
Phase 1 - Suspension and Steering
- 3.5" body lift: WildHorses leafs & coils, Shock Jock rear shock mounts, F250 front shock mounts
- Billstein (or possibly Fox) shocks, 1 front and 2 rear on each side
- 1" body lift (WildHorses)
- Peripherals: 7* bushings, 3" front and 4.5" rear bump stops
- New steering linkage (possibly WildHorses's "Clydesdale" setup, though that may be overkill)
- Possibly power-assisted steering (this may be overkill for my application)
- Possibly front and/or rear sway bars to improve roll
Phase 2 - Drive Train
- Clean up and paint engine bay (probably rattle can black)
- Mustang 5.0 V8 EFI swap, may do a 331 or 347 stroker, probably with serpentine setup
- Headers, exhaust
- NV3550
- Rebuild or replace Dana 20
- New drive shafts
- 4.88+ gears (and possible new lockers, front and rear, maybe ARB air lockers)
Stage 3 - Peripherals
- Hydroboost brakes
- New wiring harness
- Radio & speakers (maybe in rear kick panels fabric matched to seats and door inserts)
- Horn
- Front and rear bumpers (with winch and possibly lights on front and spare tire mount on rear)
- All new fuel lines, brake lines, emergency brakes
- All new bushings wherever possible
- 23-gallon fuel tank (possibly auxiliary fuel tank, though this would require drilling the body for a second fueling hole, which I'm not anxious to do)
- Black wheels and possibly other black accents (hood scoop, quarter panel guards, stuff like that)
Just so y'all know I'm not lyin', and to keep myself honest, here's what was on my front step when I got home from work today. ;D
And here are a few items I've bought and am waiting to pick up:
1987 Mustang 5.0 block bored 0.30 over, Magnafluxed, hot tanked, honed, decked, line bored, new freeze plugs and new cam bearings. Painted Ford blue with white epoxy in lifter valleys to improve oil drainback
GT40 intake, hot tanked and coated with high temp paint, from Ford Explorer
I may also buy some GT40 Cobra heads (magnafluxed, tanked, valve job, resurfaced, new valve stem seals and new freeze plugs, from an Explorer during that brief period where Ford put the cobra heads in them) from the same source. I know they're not ideal or anything special compared to AFR 185s or TWs or whatever, but I think they'd probably be fine for my application.
I've also picked up an A9L computer, 2 stock 55m MAFs, a complete '95 mustang wiring harness, and have some other EFI parts from a complete 1986 Mustang 5.0 EFI motor that I decided not to use (e.g., fuel rails and injectors).
I look forward to sharing my progress and, more importantly, asking all sorts of stupid questions that I know my Bronco Brethren will graciously and patiently help sort out for me. I also welcome any comments or thoughts on my build plan.
Wish me luck!
Bond / Jack
Last edited: