Millercorey
Full Member
- Joined
- Mar 15, 2017
- Messages
- 232
I know...another horn thread.
-Background-
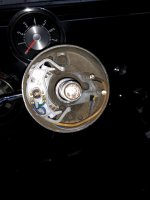
Installed new harness and steering wheel. After, horn worked fine for about a year, and then I went to honk at someone I knew on a walk and heard nothing. Kept pushing it on the drive home and got one faint squeak, but then nothing.
Troubleshooting steps I've done
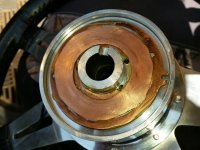
Another important point - I replaced the turn signal switch well after I did the wiring and new steering wheel install. The copper contacts on the old switch were really rough, and they would grind and skip on the copper plate of the new steering wheel. I replaced the whole switch just in case so I had new fresh copper pins.
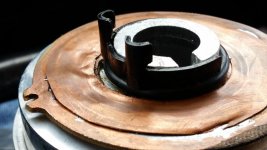
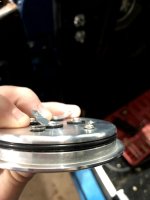
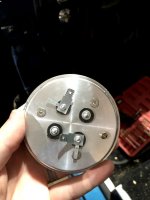
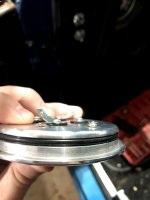
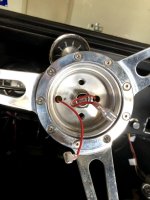
I'm actually not 100% sure how this horn button is actually supposed to work. When the button is depressed, those 3 screws lift up. Is it supposed to touch that tab on the one connector to complete the circuit or something?
So here's my theory, I think I've got a bad ground where that 2nd wire isn't doing it's job, so either the horn button is buggered in some way, or that copper plate is too chewed up and it's not making contact with that copper pin.
Thoughts?
-Background-
- 71 wagon
- New painless wiring harness
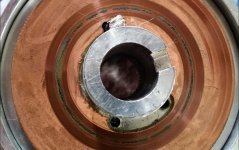
- New Steering Wheel Mark 7 Woody 3 Spoke/Slots 14 Inch with horn button (see picture)
- New Turn Signal Switch 66-73
Installed new harness and steering wheel. After, horn worked fine for about a year, and then I went to honk at someone I knew on a walk and heard nothing. Kept pushing it on the drive home and got one faint squeak, but then nothing.
Troubleshooting steps I've done
- Hooked horn directly to the battery and verified it's working correctly
- Connected both brass posts on turn signal switch and got it to blow
- When I touch the LEFT wire in the picture to the steering column nut, horn blows
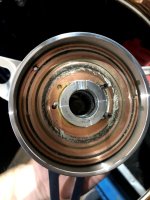
- When I wire up the button and put everything together, I've gotten nothing or a horn blow plus a shock in my hand!
Another important point - I replaced the turn signal switch well after I did the wiring and new steering wheel install. The copper contacts on the old switch were really rough, and they would grind and skip on the copper plate of the new steering wheel. I replaced the whole switch just in case so I had new fresh copper pins.
I'm actually not 100% sure how this horn button is actually supposed to work. When the button is depressed, those 3 screws lift up. Is it supposed to touch that tab on the one connector to complete the circuit or something?
So here's my theory, I think I've got a bad ground where that 2nd wire isn't doing it's job, so either the horn button is buggered in some way, or that copper plate is too chewed up and it's not making contact with that copper pin.
Thoughts?
Attachments
-
 7D251988-3D0D-4852-8226-DAC293EE5311.jpg93.8 KB · Views: 59
 -
 52A13415-CDB0-4C86-891C-B87618EFE634.jpg62.8 KB · Views: 43
 -
 6FF2CB0F-C6E7-4AA4-9772-FE78C21E0A96.jpg53.1 KB · Views: 40
 -
 5FBE9578-E1C2-496C-8CF7-AC12EA0744B1.jpg59.3 KB · Views: 43
 -
 6FCEE3FD-AE35-4AE0-86AC-D3F0BDE6E65D (1).jpg52.9 KB · Views: 37
 -
 B0D4AE00-92B6-4491-B969-F2390586A32A (7).jpg88.1 KB · Views: 42
Last edited: