• Welcome to ClassicBroncos! - You are currently viewing the forums as a GUEST. To take advantage of all the site features, please take a moment to register. It's fast, simple and absolutely free. So please join our community today!
    If you have problems registering or can't log into your account, please contact Admin.

let's see your home made tools

glass76

Jr. Member
Joined
May 13, 2006
Messages
162
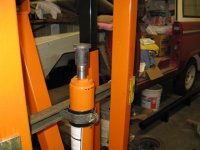
I'll try to get some better pics tomorrow. To protect the end of the ram I welded a pc of 3/8" thick stock on a pipe nipple that was slightly larger inside diameter than the end of the ram. It is just slipped over it.
 

Broncoholic1

Sr. Member
Joined
Sep 12, 2008
Messages
405
``

I built this a while ago, and remembered this thread. Axle holding fixture, attached to my transmission jack. Allows me to attach it to the axle in the vehicle, disconnect from the chassis and remove. All work can be done on the axle, while being able to raise , lower, and spin it around. It's adjustable for different widths, also for front axles.

Looks like a little muscle man:eek:

My wife asked me how could we move her 69 Mustang Convert done quicker. I said we were still working on the rotissorie plans. She asked what I wanted for my birthday.....
Guess what I got for the shop from autotwhirler.

I still cant believe it:eek: :eek: :eek: :eek: :eek: :eek: :eek:

I will have picts of the new unit for our builds next month.

Oh I made a scratch awl for the prussian blue on my heads;D
 

BigO

Full Member
Joined
Jan 25, 2004
Messages
268
I'll try to get some better pics tomorrow. To protect the end of the ram I welded a pc of 3/8" thick stock on a pipe nipple that was slightly larger inside diameter than the end of the ram. It is just slipped over it.

That is really slick! I too am interested in seeing more pics of your hoist/press.
 

glass76

Jr. Member
Joined
May 13, 2006
Messages
162
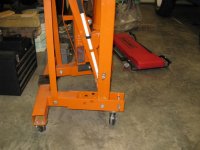
The legs had to be repositioned in the bottom frame so the cylinder would be in the same plane. Then I made a cross piece and fastened it to the inside of the legs above the cylinder (ram). this gives me about 12" of stroke.
 

Attachments

  • IMG_0319.JPG
    IMG_0319.JPG
    94.3 KB · Views: 104
  • IMG_0320.JPG
    IMG_0320.JPG
    98.2 KB · Views: 93
  • IMG_0321.JPG
    IMG_0321.JPG
    106.3 KB · Views: 104
  • IMG_0322.JPG
    IMG_0322.JPG
    113.2 KB · Views: 118

Broncobowsher

Total hack
Joined
Jun 4, 2002
Messages
35,392
I didn't catch the repositioned legs at the base the first time.
Well another thing for my to do list...

Good idea, thanks!
 

73stallion

Bronco Guru
Joined
Mar 5, 2004
Messages
16,786
Loc.
Eugene, OR
wish i could find my hardtop wrench to get a pic of.

i couldn't reach the nuts under the side rails up front, so i cut a 1/2" wrench in half and welded the ends in a foot long piece of tubing. had a wrench about 16" long.
 

Past_Miner

Contributor
Bronco Guru
Joined
Oct 22, 2003
Messages
1,021
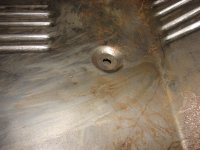
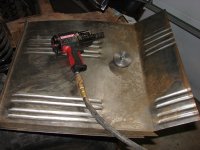
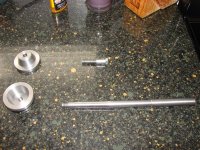
Press die to form that little recess in the front floorboards where the body mount bolt goes.
 

Attachments

  • DSC01276.JPG
    DSC01276.JPG
    211.9 KB · Views: 109
  • DSC01275.JPG
    DSC01275.JPG
    222.4 KB · Views: 118
  • DSC01274.JPG
    DSC01274.JPG
    223.2 KB · Views: 126
  • DSC01249.JPG
    DSC01249.JPG
    275.8 KB · Views: 128

72Quarterhorse

Full Member
Joined
Dec 16, 2007
Messages
320
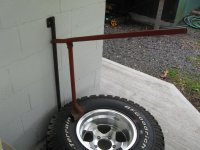
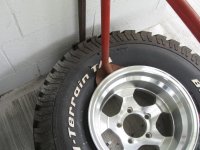
I copied this tire bead breaker from a picture in a JC-Whitney magazine. I used all scrap metal. bed frame,old water pipe and cut out a moon shape from a tire rim.
 

Attachments

  • v-3.jpg
    v-3.jpg
    116.5 KB · Views: 67
  • v-5.jpg
    v-5.jpg
    97 KB · Views: 59

77bronco_ed

Bronco Guru
Joined
Jul 3, 2004
Messages
1,784
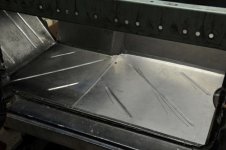
Press die to form that little recess in the front floorboards where the body mount bolt goes.

Ha... Garage method for using hammer for floorpan beads...
Made female die made with die grinder in work bench.
 

Attachments

  • _ED16622-WEB.jpg
    _ED16622-WEB.jpg
    183.3 KB · Views: 66
  • _ED16625_WEB.jpg
    _ED16625_WEB.jpg
    46.5 KB · Views: 66
Top