






Community

Buy / Sell



Bronco Tech
Fuel Tank Access Plate
3 Arm Wiper Setup
Fix Motor Mount
Roll Cage Braces
Throttle Body 65mm
Wheel Alignment
Heat Riser Replacement
Vent Window Repair
Center Console Mount
Straighten Bumper
Ford 6R80 6 spd
More Tech...
3 Arm Wiper Setup
Fix Motor Mount
Roll Cage Braces
Throttle Body 65mm
Wheel Alignment
Heat Riser Replacement
Vent Window Repair
Center Console Mount
Straighten Bumper
Ford 6R80 6 spd
More Tech...

-
Welcome to ClassicBroncos! - You are currently viewing the forums as a GUEST. To take advantage of all the site features, please take a moment to register. It's fast, simple and absolutely free. So please join our community today!If you have problems registering or can't log into your account, please contact Admin.
You are using an out of date browser. It may not display this or other websites correctly.
You should upgrade or use an alternative browser.
You should upgrade or use an alternative browser.
LOWERING my Bronco
- Thread starter greatguy57078
- Start date
OP
OP

- Joined
- Jul 15, 2006
- Messages
- 3,430
They are not Heidt's A arms. I found a set that they sell over in Iowa on the net. The reason I had to cut the standoffs down was due to the bushings and washers on the lower A arms. After measuring, the arm was perfectly centered I just had to make room for the extra material.


behemoth
Bronco Guru
- Joined
- Jul 2, 2003
- Messages
- 1,736
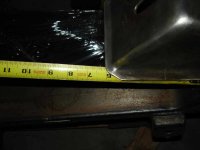
Here are some pics with tape of where my frame horns/engine stands are mounted. The hole center is 11" from the bronco cross member. With the stock engine stands/mounts they are 25 1/2 or 25 9 1/16s from the end of the frame.
Attachments


OP
OP
- Joined
- Jul 15, 2006
- Messages
- 3,430
Good info. I am wondering if they could be more equally centered with a 2WD setup? What are your thoughts?
OP
OP
- Joined
- Jul 15, 2006
- Messages
- 3,430

behemoth
Bronco Guru
- Joined
- Jul 2, 2003
- Messages
- 1,736
I thought about centering them as well, but the tunnel in the bronco is also off centered. So to keep things simple I chose to leave it be.
here are the pics I hope this is what you were looking for.
Bill
here are the pics I hope this is what you were looking for.
Bill
Attachments



OP
OP
- Joined
- Jul 15, 2006
- Messages
- 3,430
Good deal! You have saved me some more work! Thanks Bill (behemoth)!
OP
OP
- Joined
- Jul 15, 2006
- Messages
- 3,430
I thought about centering them as well, but the tunnel in the bronco is also off centered. So to keep things simple I chose to leave it be.
here are the pics I hope this is what you were looking for.
Bill
I had never noticed that the motor or the mounts were that far offset. Dale did mention something about using "32 Ford" mounts when I emailed him. The custom 4.6 mounts that I bought were meant to be used with the stock mount towers in the stock locations. I will keep you posted as we move forward towards setting the 4.6 in the frame rails and mocking it up.
OP
OP
- Joined
- Jul 15, 2006
- Messages
- 3,430
It looks like we will be centering the motor mounts,. If this is the case, we will have to cut out the firewall where it meets with the tunnel cover. The opening into the tunnel will be equal on both sides. I have been informed that you only need to trim out the firewall itself, and that the tunnel is centered already and will not be affected. We will see...
OP
OP
- Joined
- Jul 15, 2006
- Messages
- 3,430
Looking at the picture of the crossmember with the steering rack installed, I see where it is going to be tight where the rack passes under the motor mount. I found something that I am going to try. I'm staying after work tomorrow and CAD it out. What do you think guys?
Attachments


OP
OP
- Joined
- Jul 15, 2006
- Messages
- 3,430
I did a little test fitting tonight. It is a really tight fit between the frame rails with the PS and AC on the bottow of the motor, but there is just enough room. The support brackets on the stock crossmember will definitely have to go. Pretty frustrating trying to get the motor centered so I can take measurements. It is obvious that the headers will be a very tight fit also. At least I got a better idea what it is going to take to make it work. It can be done!
Attachments


Nice! Keep at it, turnin out pretty nice. Good thread
OP
OP
- Joined
- Jul 15, 2006
- Messages
- 3,430
I got creative after work today, and did the deed. I am centering the motor and need to sneak the power rack under the drivers side motor mount tower PIC 1). I used the CAD and drew it up. The dmensions shown are not exact. I will be removing the front side of the OEM mounts (blue marker) with the plasma cutter. I know it's a little fancy, but it will work and be at least as strong (1/4" thick) as the OEM mount. Now I have to trim them up and extend the passengers side out about 7/8" to make them equal. I will finish them tomorrow (if it stops snowing!), and post more pics.
Attachments


OP
OP
- Joined
- Jul 15, 2006
- Messages
- 3,430
We cut the OEM crossmember out today, and made more room for the accessories. We then welded a 2" x 2" tube 14" in front of the Heidt's crossmember. I am going to add a bolt on plate later to protect the accessories and engine compartment. We sat the motor back into the frame, and now we have much more room to manuever. We will have headers and the trans bolted on the first part of next week. Then we can determine how low and how far back the motor will sit.
Attachments


OP
OP
- Joined
- Jul 15, 2006
- Messages
- 3,430
If everything works out we should be able to make some more progress tomorrow. I am playing with the idea of doing a 4 link, but money is short so unless I can find a strong and inexpensive setup I will be sticking with the "slinging the axle" idea. It seems I change my mind from day to day. Ever had that problem???%)
behemoth
Bronco Guru
- Joined
- Jul 2, 2003
- Messages
- 1,736
Nope not at all, I continue to look at the leafs as well. No time to have any more issues.
My plan this weekend was to get the underside of the tub coated/painted.
The frame coated/painted.
Then start on the steering rack.
We shall see, I bet the frame is coated, but nothing else gets done here.
My plan this weekend was to get the underside of the tub coated/painted.
The frame coated/painted.
Then start on the steering rack.
We shall see, I bet the frame is coated, but nothing else gets done here.

br0nc0xrapt0r
Loves pickles
- Joined
- Sep 28, 2007
- Messages
- 5,439
Nope not at all, I continue to look at the leafs as well. No time to have any more issues.
My plan this weekend was to get the underside of the tub coated/painted.
The frame coated/painted.
Then start on the steering rack.
We shall see, I bet the frame is coated, but nothing else gets done here.
if you need help let me know I'll be in Escondido on sat
Similar threads


- Replies
- 23
- Views
- 5K