


Community
Buy / Sell


Bronco Tech
3 Arm Wiper Setup
Fix Motor Mount
Roll Cage Braces
Throttle Body 65mm
Wheel Alignment
Heat Riser Replacement
Vent Window Repair
Center Console Mount
Straighten Bumper
Ford 6R80 6 spd
More Tech...
Fix Motor Mount
Roll Cage Braces
Throttle Body 65mm
Wheel Alignment
Heat Riser Replacement
Vent Window Repair
Center Console Mount
Straighten Bumper
Ford 6R80 6 spd
More Tech...

-
Welcome to ClassicBroncos! - You are currently viewing the forums as a GUEST. To take advantage of all the site features, please take a moment to register. It's fast, simple and absolutely free. So please join our community today!If you have problems registering or can't log into your account, please contact Admin.
You are using an out of date browser. It may not display this or other websites correctly.
You should upgrade or use an alternative browser.
You should upgrade or use an alternative browser.
Mass Confusion Build. After 2 1/2 years It started!!
- Thread starter 71massbronco
- Start date
OP
OP
71massbronco
Bronco Guru
- Joined
- Mar 13, 2011
- Messages
- 1,321
That nut/thread breaking off just gives you a reason to upgrade ;D
That's a triple edged sword. Get new parts....
 , more work, more money.... Having to explain to wife what a shock mount is....
OP
OP
71massbronco
Bronco Guru
- Joined
- Mar 13, 2011
- Messages
- 1,321
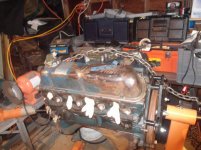
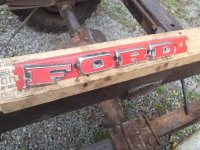
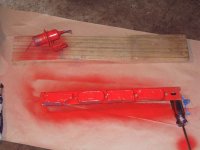
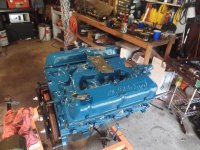
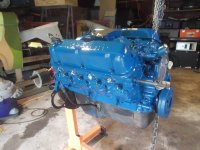
It's been a while but got some cosmetics done on the project this week. It seems that I spend more time degreasing and derusting the bronco then I do on actually building it. I went ahead and seperated the transmission and engine (interesting task by yourself) Only a little puddle of lube on the floor from the missing odometer cap. Mounted it the one ton engine on the stand i picked up at HF on sale! I plugged the holes, shot on degreaser, and let is set overnight. Came back out and gave it the once over with pressure washer to get off the thick stuff. Did ok, but I had to dig at the crevices of grease left behind. After I thought I got it all, (and I didn't) I prepped it with Ospho. Was going to not paint the valve covers, because I bought new chromies, but did it anyway to make it look nice for the pics. ;D Picked up some Ford blue and some black for the frame. I spent the weekend taking more of the engine apart, I also painted some of the steel parts a really nice red I had laying around the garage. It was just a coincidence that it was the exact red I was looking at for the new FORD letters I received from fellow CB member Natemob. (thanks buddy) Was very happy with the outcome of the rattle can paintjob.
Attachments

OP
OP
71massbronco
Bronco Guru
- Joined
- Mar 13, 2011
- Messages
- 1,321
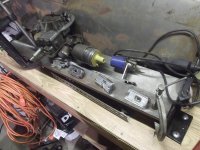
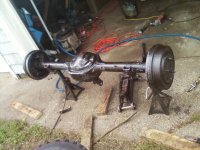
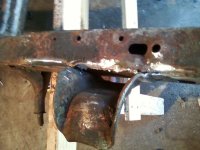
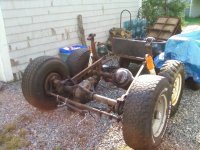
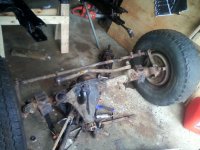
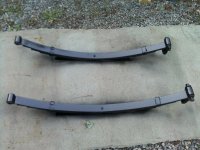
Was in the garage all weekend, stripping the frame down. I got front axle off with stubborn radius arms. Getting the bolts out wasn't a problem but the bushings washers marriend themselves to the frame making a sticky seperation. Was taking off leafsprings and looks like one of the sleeves in the drivers sided had been crushed at some point. (How this happens, I have no idea.) Fortunately I did the passengers side first with relative ease, so I knew how easy it should come out. I banged, pounded, lubed, wacked, pried and impact wrenched this thing out. I have some great pics, but can't find my adapter to load them into the computer. Also found a seperation in the rear of the frame that had to get closed back up and welded together. It was right at the passengers side rear leafspring mount.
Taking the axle U bolts off the leafsprings I broke off two of the nuts. Now I know why they call it a breaker bar. Me strong as bull. Luckily I already have replacements standing by.
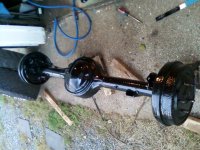
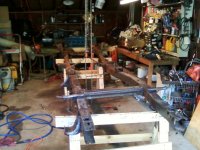
After getting all the parts seperated, I got out the wire brush grinder and went to town. Really made a mess of the garage getting the oil, dirt and 40 year old undercoating off. After the once over with the grinder gave it a coat of Ospho, let it bond on, then got a coat of black rust x on the sides and bottom of the frame. Also got some on the rear axle. I have to flip the frame and get the top done and a little touch up on the axle.
Finally feel like I am making some progress.
(Pics coming as soon as I find that damn adapter!)
Taking the axle U bolts off the leafsprings I broke off two of the nuts. Now I know why they call it a breaker bar. Me strong as bull. Luckily I already have replacements standing by.
After getting all the parts seperated, I got out the wire brush grinder and went to town. Really made a mess of the garage getting the oil, dirt and 40 year old undercoating off. After the once over with the grinder gave it a coat of Ospho, let it bond on, then got a coat of black rust x on the sides and bottom of the frame. Also got some on the rear axle. I have to flip the frame and get the top done and a little touch up on the axle.
Finally feel like I am making some progress.
(Pics coming as soon as I find that damn adapter!)
OP
OP
71massbronco
Bronco Guru
- Joined
- Mar 13, 2011
- Messages
- 1,321
Found the adapter, it's picture time.
Attachments
-
 0918111834.jpg127.9 KB · Views: 178
 -
 0918111457.jpg116.3 KB · Views: 175
 -
 0917111531.jpg80.1 KB · Views: 179
 -
 0917111458.jpg101.4 KB · Views: 181
 -
 0914111558a.jpg188.3 KB · Views: 169
 -
 0914111558.jpg111.3 KB · Views: 173
 -
 0914111555a.jpg108.2 KB · Views: 178
 -
 0914111555.jpg119.1 KB · Views: 172
 -
 0918111834a.jpg96.7 KB · Views: 187
OP
OP
71massbronco
Bronco Guru
- Joined
- Mar 13, 2011
- Messages
- 1,321
Breaking Bad.
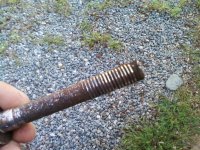
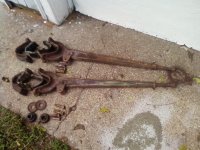
Yesterday I took off the radius arms and C bushings. (or what was left of the 40 year old gush sandwiched in between the radius arms.) As usual, it sucked.Threaded ends of the bolts looked like rust-sicles.Luckily the hex sides were still intact. So I had broke out the breaker bar and broke out in a sweat hoping not to break the bolts.(Oh, not too mention also that I am $broke$) Had to to extend the breaker bar with a four foot tube to get more torque. I was afraid I was going to twist the bolt heads off, instead I think I might of stripped out the radius arm threads. Ok, now I am convinced that I can tear anything apart without having to break out the sawzall. It truly was terribly difficult. I have full respect for those of you who take off these @#%@ things with the axle still attached.
Also removed the drag link/steering wheel box/steering stabilizer. Had to devise a way to pop out the draglink so I grabbed two c clamps and a 1x1 square tubing and wrenched them down until I popped out.
Pushed on one of the bump stops to get up and it came right off. Pretty funny, but you had to be there.
On with the show....
Yesterday I took off the radius arms and C bushings. (or what was left of the 40 year old gush sandwiched in between the radius arms.) As usual, it sucked.Threaded ends of the bolts looked like rust-sicles.Luckily the hex sides were still intact. So I had broke out the breaker bar and broke out in a sweat hoping not to break the bolts.(Oh, not too mention also that I am $broke$) Had to to extend the breaker bar with a four foot tube to get more torque. I was afraid I was going to twist the bolt heads off, instead I think I might of stripped out the radius arm threads.
Ok, now I am convinced that I can tear anything apart without having to break out the sawzall. It truly was terribly difficult. I have full respect for those of you who take off these @#%@ things with the axle still attached. Also removed the drag link/steering wheel box/steering stabilizer. Had to devise a way to pop out the draglink so I grabbed two c clamps and a 1x1 square tubing and wrenched them down until I popped out.
Pushed on one of the bump stops to get up and it came right off. Pretty funny, but you had to be there.
On with the show....
Attachments
OP
OP
71massbronco
Bronco Guru
- Joined
- Mar 13, 2011
- Messages
- 1,321
I have come to the conclusion that I have knocked off more rust and dirt off the Mass Casualty then the combined body weight of my four sons.
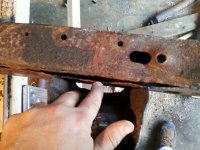
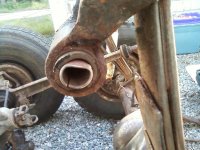
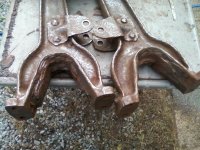
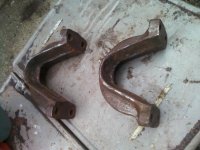
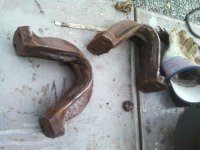
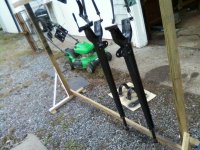
When I got the radius arms off the front axle, I notice a hard compressed shale like material in the mounts where the C bushings were. Thought maybe it was some left over rubber, but it was way too hard for that. I don't know what they used originally in the bushings, maybe it was a plate of some kind, simply don't know. All I know was it couldn't be wire wheeled out. So I broke out the (wait for it....) air hammer put the spike on it to knock the petrified mystery material to kingdom come. Before and after pics. Couldn't take the after pics of the arms because wife took the camera with her.
When I got the radius arms off the front axle, I notice a hard compressed shale like material in the mounts where the C bushings were. Thought maybe it was some left over rubber, but it was way too hard for that. I don't know what they used originally in the bushings, maybe it was a plate of some kind, simply don't know. All I know was it couldn't be wire wheeled out. So I broke out the (wait for it....) air hammer put the spike on it to knock the petrified mystery material to kingdom come. Before and after pics. Couldn't take the after pics of the arms because wife took the camera with her.
Attachments
OP
OP
71massbronco
Bronco Guru
- Joined
- Mar 13, 2011
- Messages
- 1,321
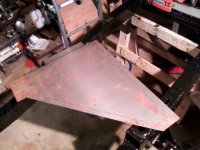
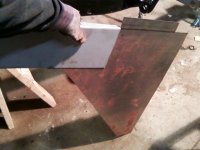
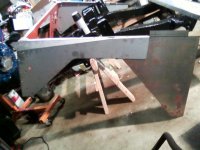
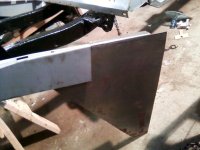
Tonight I took another crack at cutting out some kick panels out of the 18 gauge following the forums kick panel tech article. Went well until I put the panel in the brake. Made a fantastic perfect 90 degree bend...the wrong way.%) After some rebending and shaping, I put it back and bent it the proper direction.
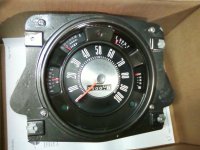
Also this weekend, I got the speedo cleaned up and painted.
Also this weekend, I got the speedo cleaned up and painted.
Attachments
BRONCO_POWER
Jr. Member
I was going to replace the FORD letters, but now I'm going spray paint them like you. Never thought about painting them.
OP
OP
71massbronco
Bronco Guru
- Joined
- Mar 13, 2011
- Messages
- 1,321
I was going to replace the FORD letters, but now I'm going spray paint them like you. Never thought about painting them.
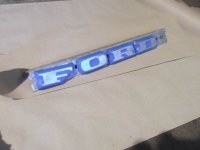
Was very easy, and if there is any chipping, it's an easy touch up. Also looks good from afar.
I had to have the FORD letters, they add so much dimension and a stable look to the grill.
Just make sure when you tape off, the edges are down firm so there is no leakage. Also you may want to take the tape off while the paint is still tacky. It may chip when pulling off the tape if you let it dry it all the way.
OP
OP
71massbronco
Bronco Guru
- Joined
- Mar 13, 2011
- Messages
- 1,321
Now we're gettin' somewhere! Broke out the paint gun. YEEEE HAAHH!
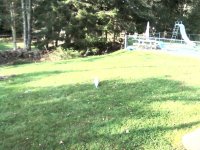
Last picture is of 9 or 10 wild turkeys that passed through my yard. Dont know if you can see them or not but they are there. Little white spec in the middle is our cat on the prowl. That would have been an interesting fight.
Last picture is of 9 or 10 wild turkeys that passed through my yard. Dont know if you can see them or not but they are there. Little white spec in the middle is our cat on the prowl. That would have been an interesting fight.
Attachments
i am abselutly loving this build, i had that bronco for years with big hopes, to see this get done to it two thumbs up to you lotsa work ive done two broncos on my spare time that was going to be my third it kinda brings a tear to my eye i have been a certified bronco nut for most my life i now certify you as a bronco nut keep up the good work
OP
OP
71massbronco
Bronco Guru
- Joined
- Mar 13, 2011
- Messages
- 1,321
i am abselutly loving this build, i had that bronco for years with big hopes, to see this get done to it two thumbs up to you lotsa work ive done two broncos on my spare time that was going to be my third it kinda brings a tear to my eye i have been a certified bronco nut for most my life i now certify you as a bronco nut keep up the good work
Hey Russ, thanks for checking in on your baby...uhh my baby. Good to hear from you. After pulling it off the frame, I was going to give you a call to see if you had the other frame still. But I hunkered down and did the repairs. I am having a blast. And yes I am addicted. Stay tuned, it's getting there!
OP
OP
71massbronco
Bronco Guru
- Joined
- Mar 13, 2011
- Messages
- 1,321
GET CRACKING.....fall cruise coming soon!
That's hilarious that you used that phrase. That's what I always tell my boys only my term is "get crack-a-lacking!"
I was shooting for that cruise but lack of funds and time are my enemy. Also it's right after my birthday so it's extra painful I won't have it finished.
I also need to pay you a visit for a certain hood too!
Last edited:
OP
OP
71massbronco
Bronco Guru
- Joined
- Mar 13, 2011
- Messages
- 1,321
I just re read the whole thread. Your doing some nice work Keep at it!
Thanks Stutsmo.
When I was a kid, I was an avid model builder. My only problem was my lack of patience. I would build the model in one evening putting some pieces on other pieces before the glue would dry making my quality contrl.suffer. This isn't much different. Just the scale has changed from 1/20 to 1/1! So this is an exercise of patience for quality. It's not going to come out perfect or show quality but I can proudly say I did ALL the work. Planning on keeping around for awhile!
OP
OP
71massbronco
Bronco Guru
- Joined
- Mar 13, 2011
- Messages
- 1,321
this is nice my clothes arent dirty, my yard isnt a mess, and im not going broke,and the camo is getting al fixed up this has got to be by far the best build ive seen to date imho lol ps dont forget i still have a 76 dana 44 w/discs that that thing was going to get
Similar threads
City: Tomah
Price: $500
- Replies
- 0
- Views
- 48
City: Stockton
Price: $3500
- Replies
- 3
- Views
- 1K
- Replies
- 29
- Views
- 2K
- Replies
- 13
- Views
- 2K