• Welcome to ClassicBroncos! - You are currently viewing the forums as a GUEST. To take advantage of all the site features, please take a moment to register. It's fast, simple and absolutely free. So please join our community today!
    If you have problems registering or can't log into your account, please contact Admin.

Nothing Special – ’71 daily driver – trail rig build thread

OP
OP
Nothing Special

Nothing Special

Sr. Member
Joined
Nov 25, 2016
Messages
805
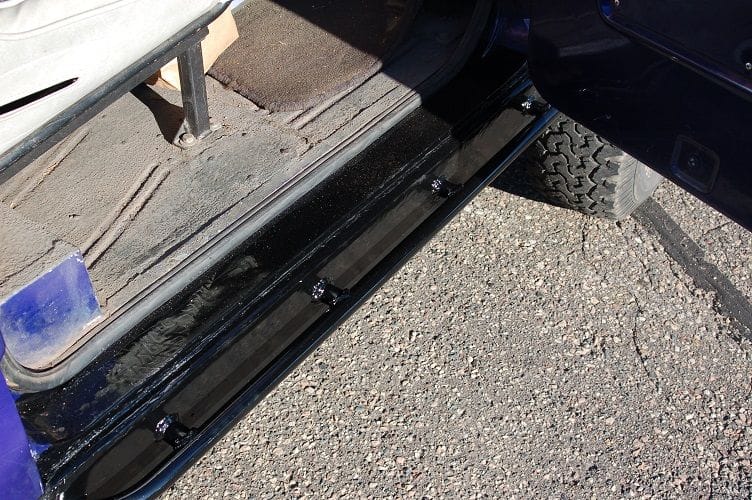
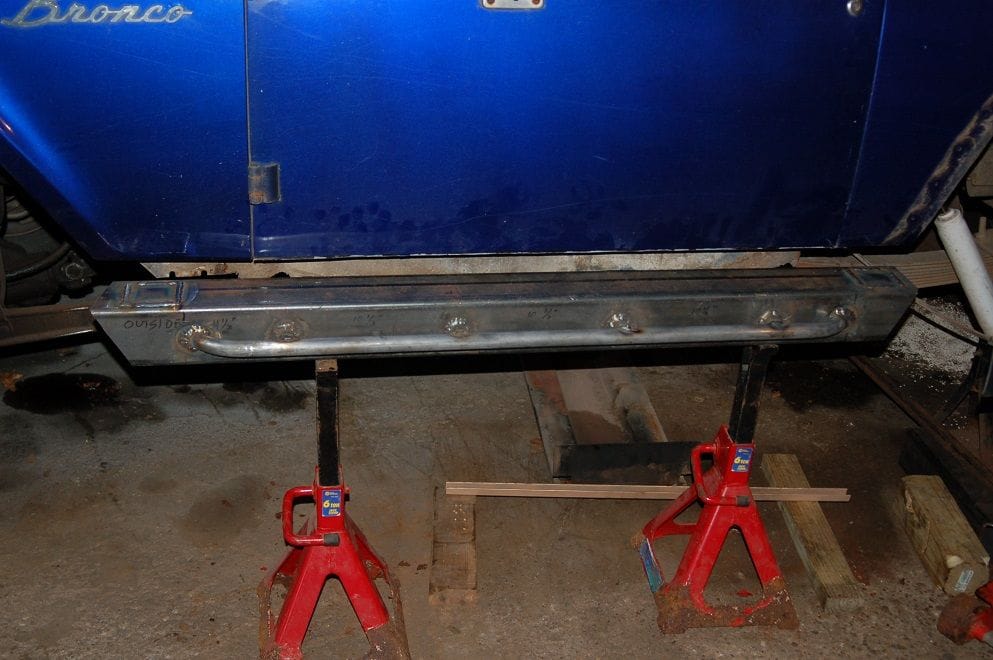
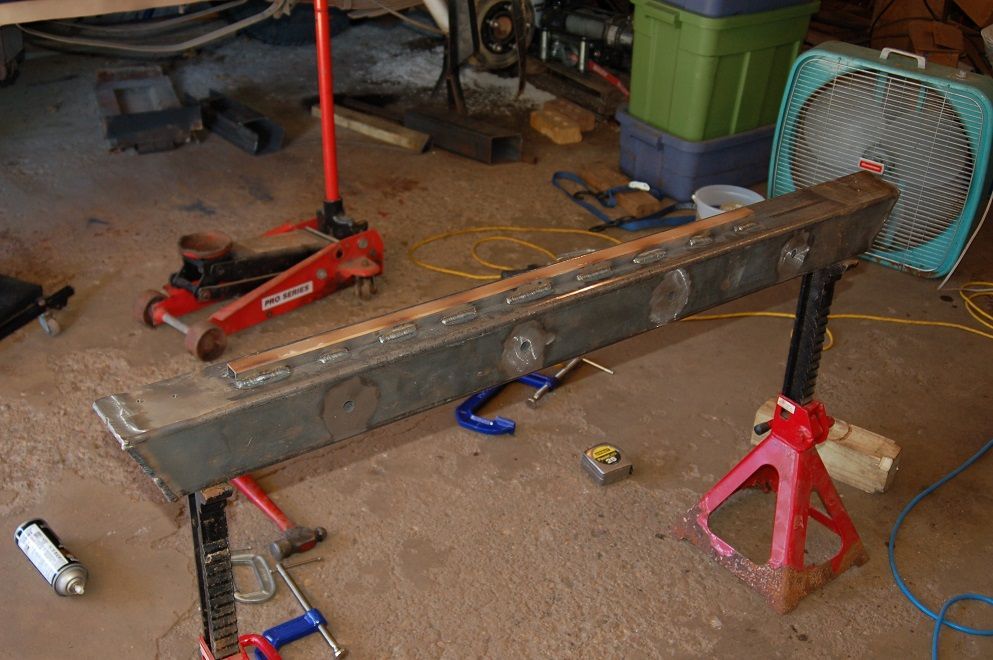
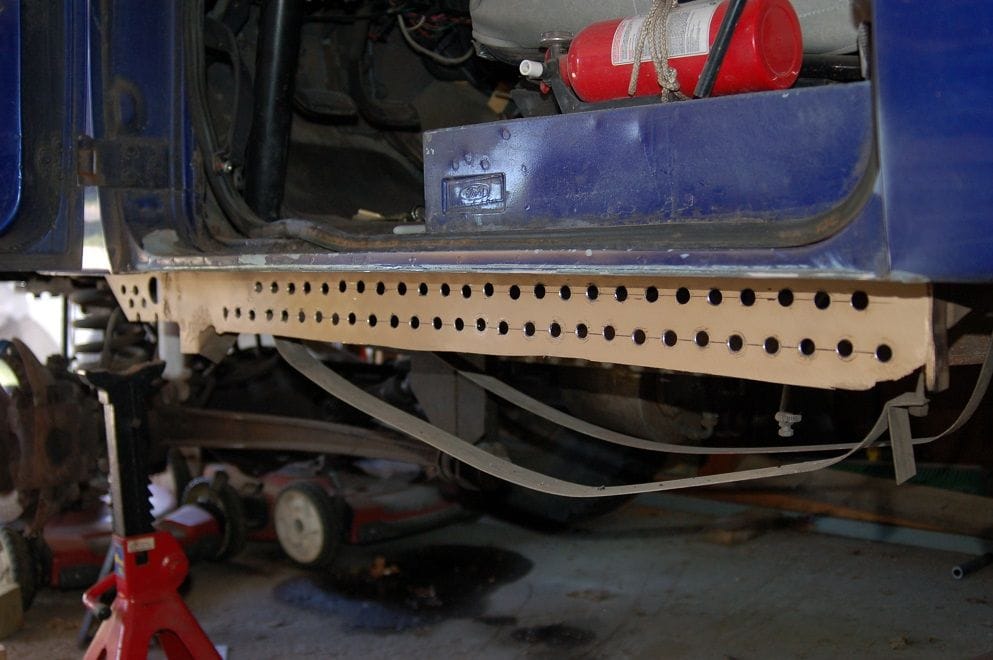
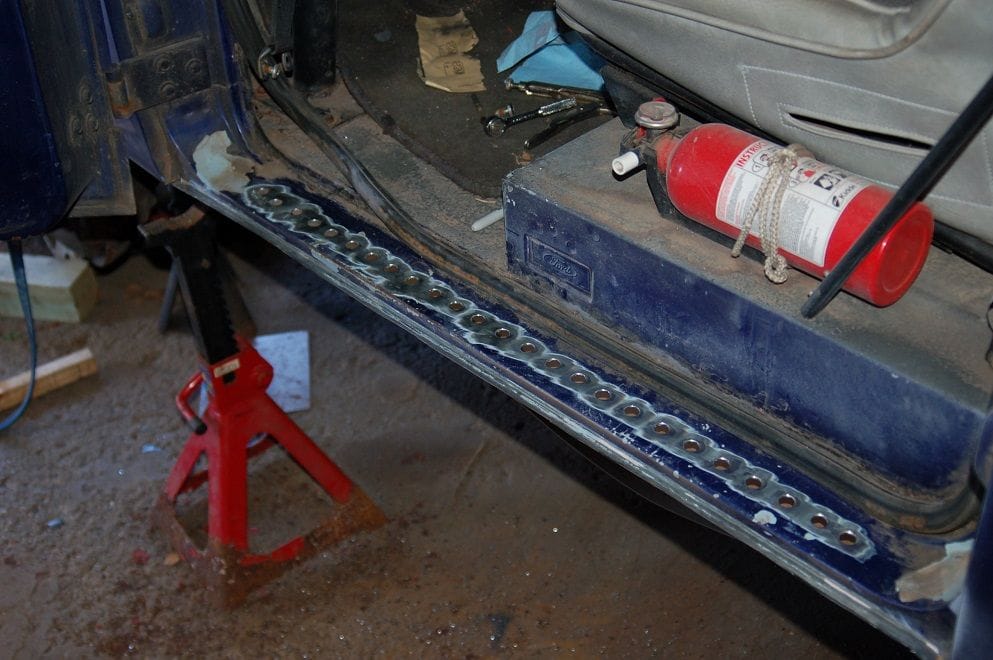
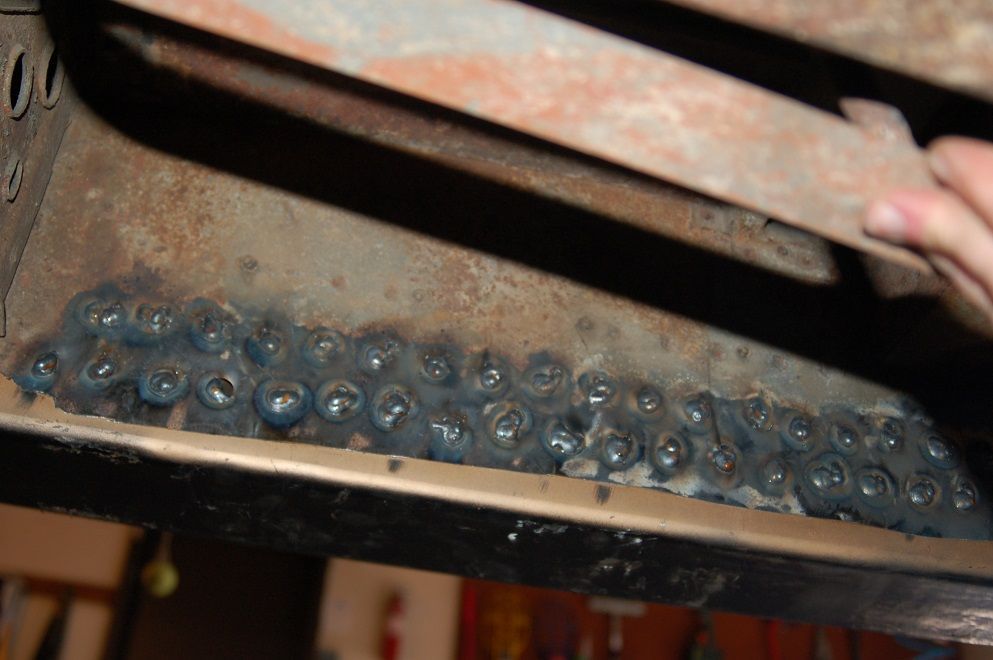
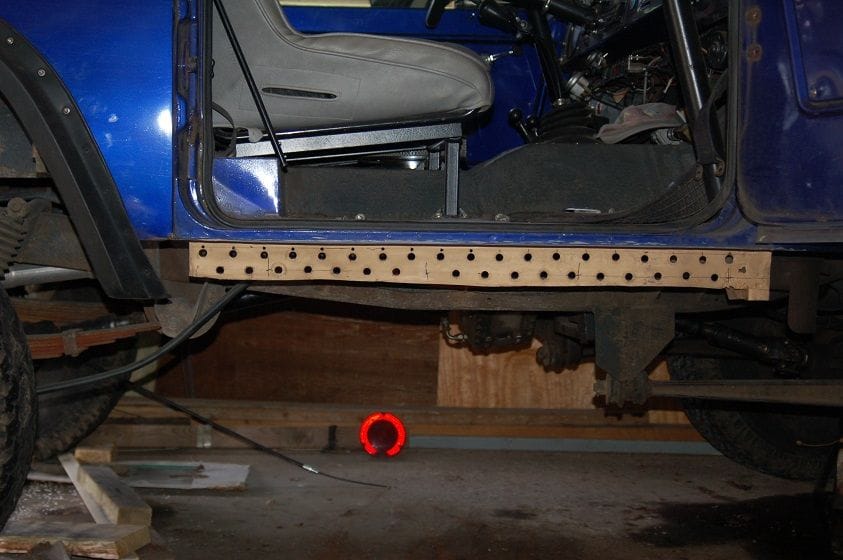
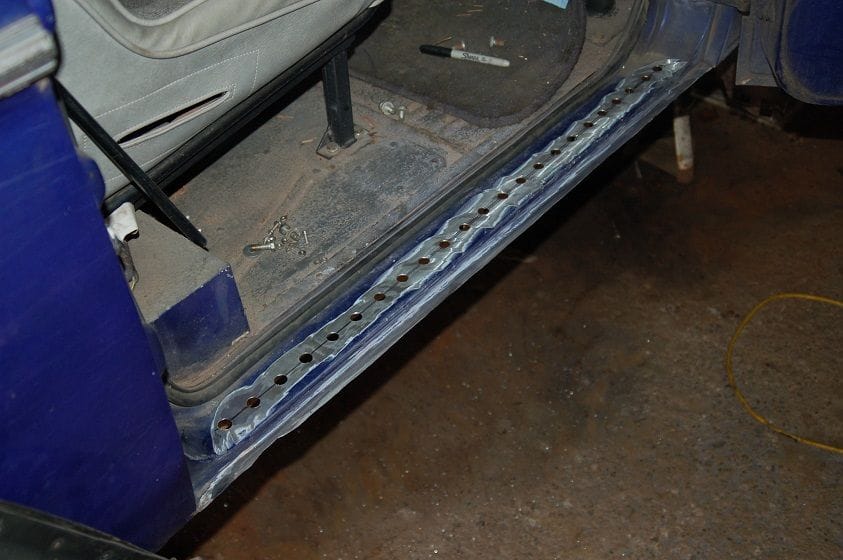
Thanks! Not done yet, but at least it's attached! Today I drilled and plug-welded 69 holes. That went pretty well. The old sheetmetal burned through in a few places, but generally it worked really well to start the weld on the solid metal of the 4x4 in the center of the hole and play the puddle out to get the sheetmetal.

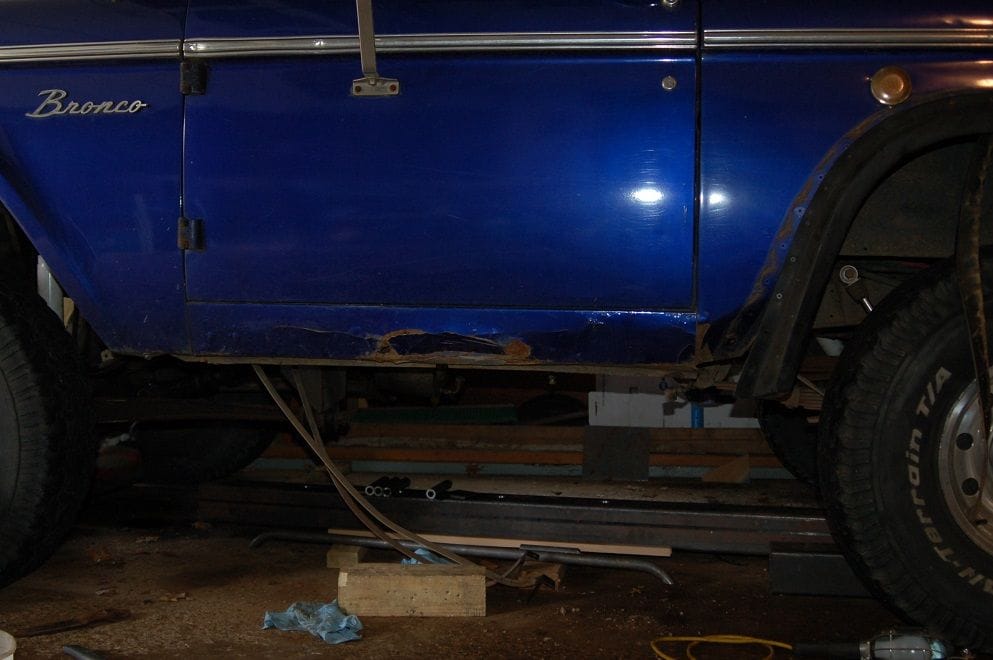
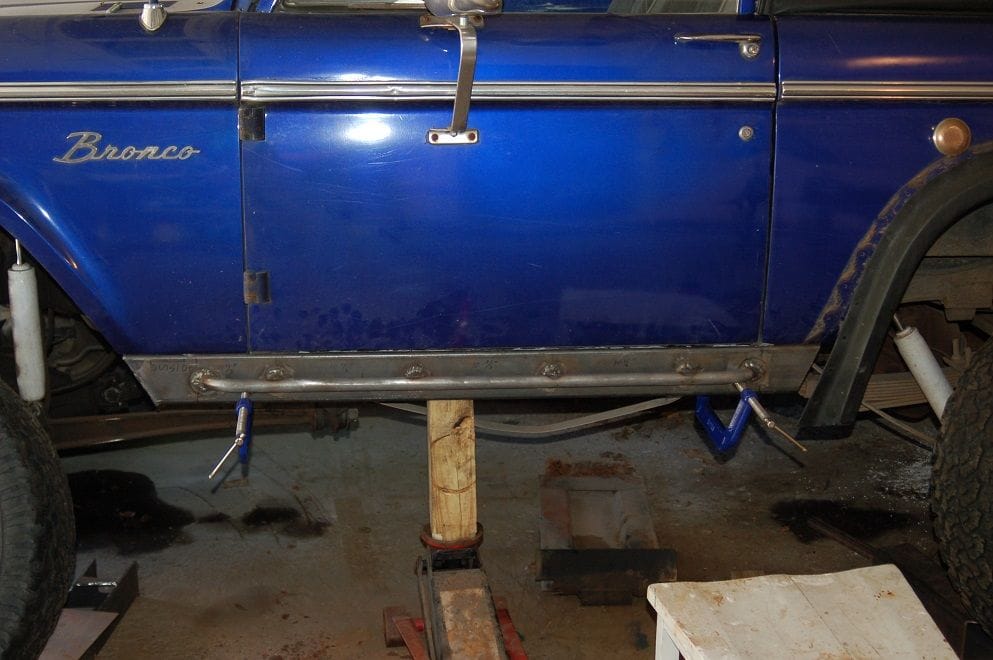
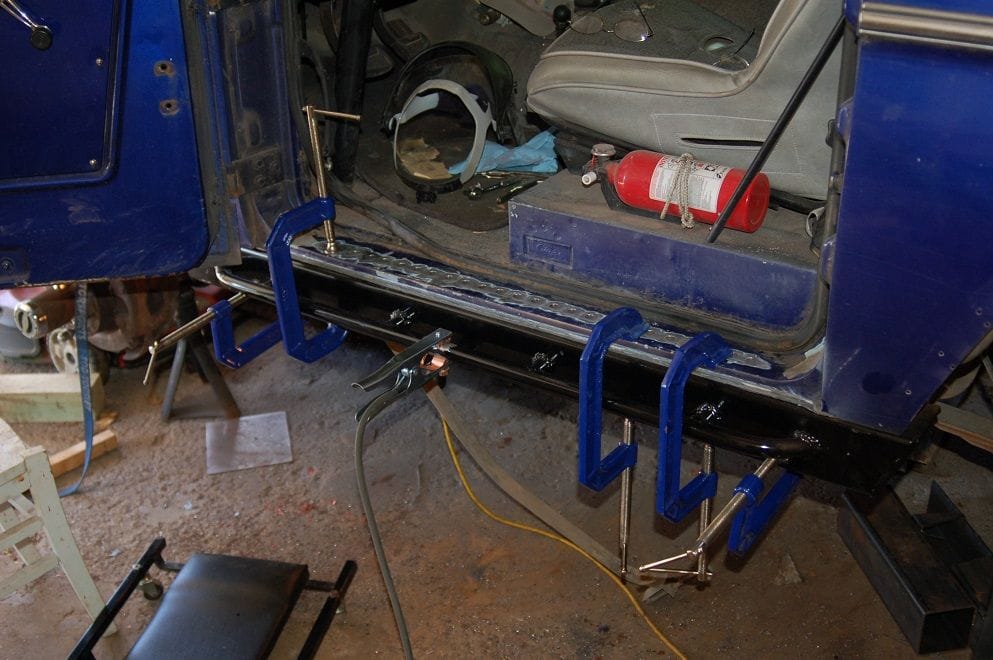
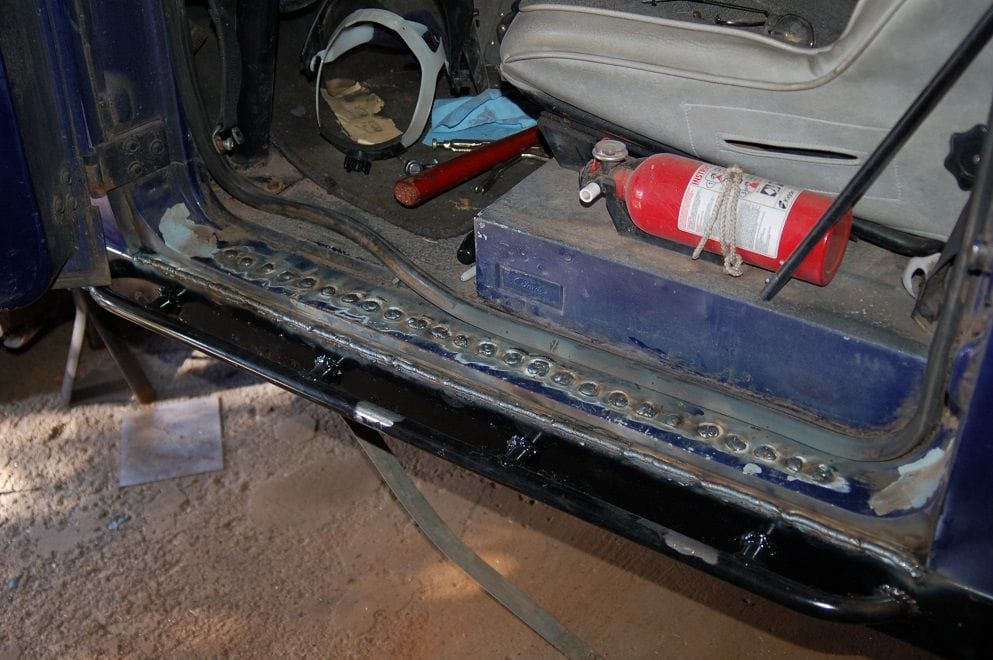
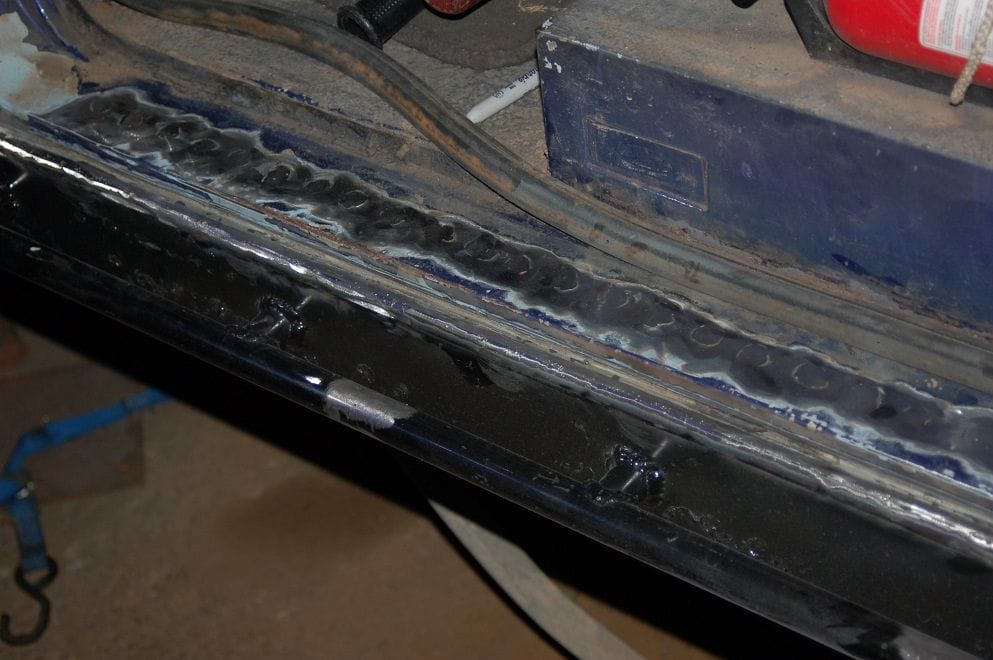
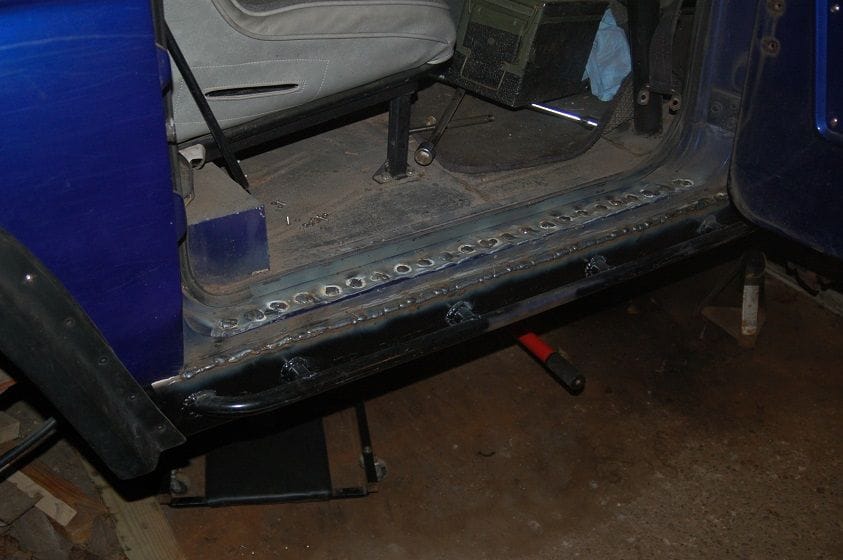
I also laid a bead along the edge of the door sill where it meets the new rocker. I don't expect a lot of strength out of that bead, but otherwise there was going to be a sharp sheet metal edge right where peoples legs bump it getting in and out.

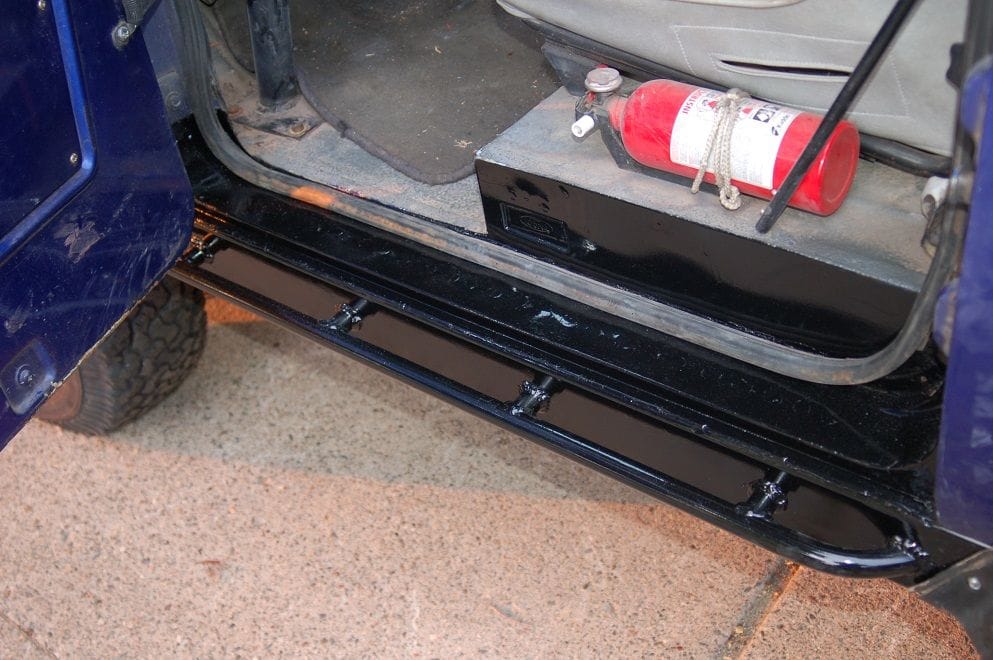
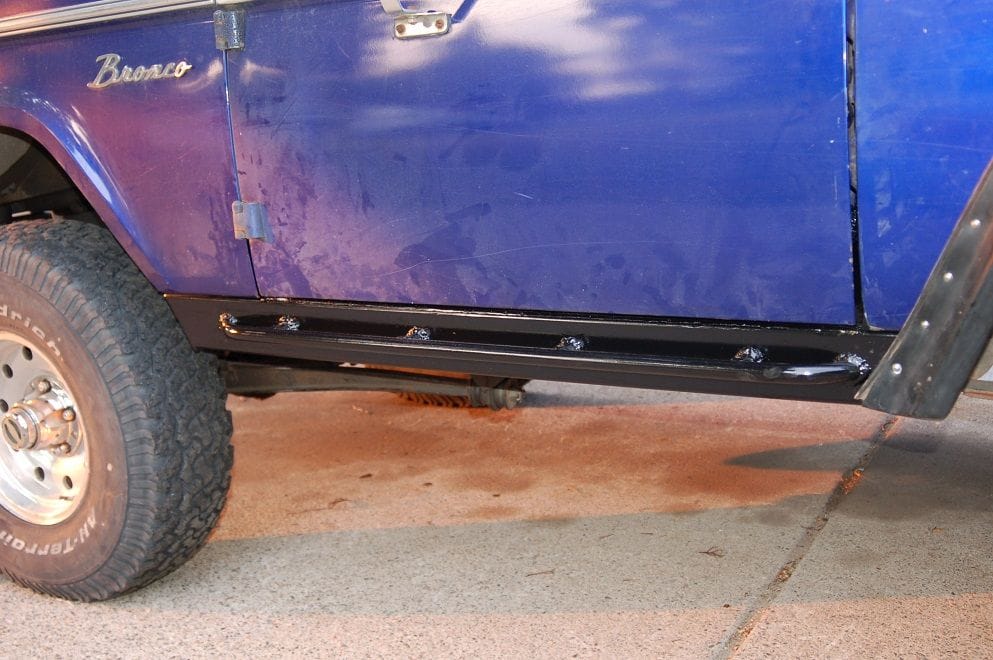
I still need to grind the exposed welds smooth(er) and paint it. Hopefully that will get done tomorrow.

80-dsc_0526_c3e93a5f4117ffd908f37cf749e0781805d5b53d.jpg


80-dsc_0527_047c4838f3e886b3b42a9fb27c85aec9dc4d557a.jpg


80-dsc_0528_022471516c1522134b987a77fc441393a46f540a.jpg
 
OP
OP
Nothing Special

Nothing Special

Sr. Member
Joined
Nov 25, 2016
Messages
805
Thanks! It's turning out as well as I could have hoped!

And now it's back on the road! Tuesday night got a bit busy, so by the time I got to the Bronco all I had time for was to get the welds on the door sill ground out. Then yesterday I took a long lunch and cleaned it up a bit before hitting it with some black spray paint. And last evening I took the typical time to get a vehicle back on the road after it sat in the garage for 8 months. But it's on the road now!

Here are a few pictures of the finished rocker out in the sun light
80-dsc_0539_259fb496d10035d77b077fd2fedb45afa50ee661.jpg

80-dsc_0540_8530eb9f838a64b78444ea476986c1e81daff5c1.jpg

80-dsc_0541_39315a722ce4cf9f5b92a385a0b64968c2535680.jpg

80-dsc_0541_39315a722ce4cf9f5b92a385a0b64968c2535680.jpg
 
OP
OP
Nothing Special

Nothing Special

Sr. Member
Joined
Nov 25, 2016
Messages
805
Thank you! Although at this point it's just "rail" (singular). I've decided that the driver's side needs to wait for winter. I want to drive it for a while before it goes back into the garage.

And speaking of driving it, this past week was finally the road test of the Astro hydroboost with rear drum brakes project (changed from non-functional vacuum boost with 4 wheel disks last winter / spring). I like them! The only touchiness is that I have a habit of resting my foot on the brake pedal just enough to turn on the brake lights when I'm starting to coast up to a stop sign. When I do that with this it slows very noticeably, and I have to lift my foot. But otherwise the feel is really good. The pedal is very high, but while it doesn't take much force to apply the brakes, it's not at all hard to make smooth stops with no feeling like you're going to be kissing the windshield. I'm happy with the results there too!
 
OP
OP
Nothing Special

Nothing Special

Sr. Member
Joined
Nov 25, 2016
Messages
805
When people get new tires for a vehicle they often say "it's got new shoes." Well, these aren't new shoes, they're new boots. Hiking boots.

About 3 years ago I decided that my 33/10.50x15 BF Goodrich All-Terrains were too narrow, too tame and too worn out. Plus I wanted to quit beating up the Alcoa rims I'm using. So I wanted new tires. Didn't happen before Ouray in 2018. Didn't happen before Moab in 2019. But now it's happened!

Last week I picked up a set of ProComp Xtreme MT2 tires, in 33/12.50x15 on black steel wheels (I had been planning on beadlocks, but the budget suggested a different plan). They look quite a bit bigger than the old tires, but as the numbers indicate, they're the same diameter. The Bronco sits 1/4" higher with the new tires, but with ~1/2" tread depth on the new and the old being too close to bald, if these tires were bald and the old ones were new it would be reversed.

They are quite a bit wider (2" in theory, and that seems pretty close), and it's almost all on the outside, just like I wanted. They stick in MAYBE 1/4" more, so I might get a bit more rubbing on my radius arms, but they should clear everywhere else. And sticking out almost 2" more will help keep the sheetmetal off the rocks a little better.

The wheels didn't fit when I first brought them home. The stick-on balance weights hit the brake caliper bracket in front. So I had to take them back to be balanced with the weights farther in-board. Then I was able to put them on the Bronco last night. And I verified that they fit on my spare tire carrier.

So far not a lot of experience with them, just a 10 mile commute. I'd say the handling is OK. Definitely more steering input needed to keep going straight. They are significantly louder than the ATs, probably to the point of being annoying. For the most part they seem to run smooth, but I did get a vibration a little over 60 mph on one stretch of highway. It went away when I sped up or slowed down, and wasn't there about a mile later. Again, probably annoying if these were to get a lot of highway miles.

So obviously these are a worse compromise than the old ATs as far as the on-road performance is concerned. But my intent is for these tires to just be used on 'wheeling trips. So yes, they'll get some highway miles (especially on the tow bar). But for most of my driving I'll keep the nice Alcoa rims, and when the BFGs are completely worn out I'll replace them with a smaller, even more street-oriented tire. Something like an all-season in a P235/75x15. So for what these tires are (the hiking boots!) I think I'm going to like them!

80-img_0001_d147d20f8403fde59669399581a020e10e544b92.jpg
 

sprdv1

Contributor
REBEL
Joined
Mar 8, 2007
Messages
81,779
hiking boots.. love it :) Looks great and nice stance as well
 
OP
OP
Nothing Special

Nothing Special

Sr. Member
Joined
Nov 25, 2016
Messages
805
Last summer I was having some idle issues. Every once in awhile the idle would suddenly drop about 400 rpm for a second or two. Frequently it would die when that happened. I delt with that by using the hand throttle to set the idle up to about 1100 rpm, then it would just bog a bit before catching again. But it was far from ideal.

I sprayed some carb cleaner around the outside of the carb with the engine idling, and the idle changed a BUNCH when I sprayed on either end of the throttle shaft. So my throttle shaft bearings were worn. Not much of a surprise.

In this thread I talked about finding a kit to ream out the throttle shaft bearings and press in bronze bushings. I won't repeat everything I wrote there, but in the end I got it back together. The engine fired right up, it doesn't seem to be spewing gas anywhere, and the idle stays rock-steady when I spray carb cleaner around it. I'm not taking it out of the garage until the salt is gone, so I didn't idle it very long. But hopefully that's fixed!
 

DonaldDouchebag

Bronco Guru
Joined
Apr 17, 2008
Messages
1,097
Can't believe I didn't notice this post until just now. I see you tooling around on 36 during the summer months and always dig your ride. I live in Little Canada and can be spotted in a mint/seafoam green '71 from time to time.
 
OP
OP
Nothing Special

Nothing Special

Sr. Member
Joined
Nov 25, 2016
Messages
805
Small world! I drive 36 on my way to and from work. In the summer the Bronco is my daily driver, so it's on that highway pretty regularly.
 

DonaldDouchebag

Bronco Guru
Joined
Apr 17, 2008
Messages
1,097
Small world! I drive 36 on my way to and from work. In the summer the Bronco is my daily driver, so it's on that highway pretty regularly.

Well, keep your eye open for me. Or if you see a guy in a newish Nissan Pathfinder waving maniacally you'll know who it is. ;D

I think yours is the only other one I regularly see around town. Used to be more of us, for sure.

Mine is due for a bunch of upgrades I've collected so I might be driving kinda sporadically this summer. We'll see. I have all the stuff for a TRO swap, hydroboost, 1" body lift, new shock mounts front and rear, and a new 3" single exhaust I want to build. Also looking to order a new family cage. Oh, and I got a set of Bailie Bilt bumpers!
 
OP
OP
Nothing Special

Nothing Special

Sr. Member
Joined
Nov 25, 2016
Messages
805
Another small maintenance/repair project completed. Last fall when I went 'wheeling in Missouri I had a partial power steering pump failure. I say "partial" because it worked all of the time above about 1500 rpm, but below that every so often the power steering (and power brakes since it's now hydroboost) would suddenly go away. Kind of exciting when you're idling past a big rock and suddenly need to pull HARD on the steering to keep from veering into it!

So I replaced the power steering pump this weekend. I borrowed a puller from NAPA to get the pulley off the old pump and on the new. That went pretty well. Took a bit of effort, but everything worked out. I also had to pull the reservoir off the old pump and put it on the new, but that went easily.

The biggest issue I had was that I had to take the brackets all the way off the engine to get the pump out, and doing that required removing two of the water pump bolts. While they were out I had a little coolant weeping out of the seam, so I'm afraid I'm going to have a coolant leak there now. Oh well, that might be a project for this summer.

After getting the fluid flushed and everything buttoned back up I backed the Bronco out of the garage, turned it around and backed it back in. The next projects require access to the driver's side which I couldn't get at when it was pulled in forward. The significant thing about that is that I did have a bit of Ford power steering pump whine. We'll see how that goes once I'm actually driving it. And the other thing was that it kept dying on me. Since this was the longest it's run since rebuilding the carb I'm guessing I need to clean or adjust something there. But it runs like crap any time it's cold, so who knows? It might be fine once things warm up.
 
OP
OP
Nothing Special

Nothing Special

Sr. Member
Joined
Nov 25, 2016
Messages
805
Another couple of small projects done today. The shock bushings looked rather suspect when I bought this Bronco back in ~2002. Overall I don't thing the shocks have improved in the past 19 years! So I replaced all 4 shocks.

The other thing I did was replace the fuel tank switching valve. Years ago I replaced the mechanical valve with an electrical one wired to the same switch as the fuel gauge. It was nicer just flipping one switch to both change tanks and switch the fuel gauge. But that valve went flaky on my several years ago, so I replaced it with another electrical valve. That one started leaking last summer (not dripping on the ground, it would draw some from both tanks no matter what position the switch was in). So today I went back to the original mechanical valve. OK, so I have to remember to flip both the valve and the switch. But at least it should last more than about 10 years.
 
OP
OP
Nothing Special

Nothing Special

Sr. Member
Joined
Nov 25, 2016
Messages
805
At this point I've decided that the driver's side needs to wait for winter....

Well, I guess "winter" meant May and June. I had intended to get the driver's side rock rail done before the trip we took to Moab in early May, but that didn't happen. However it's done now!

I got started in late May. Here's the "before" picture to show the starting point:
80-dsc_1749_abb91e0f494430aea5724b660c9f86740f80fb68.jpg


Having done the passenger's side a year ago I had more confidence (as well as a complete plan!) as I started cutting, so I got to this point within the first day:
80-dsc_1752_f1638a205c1bc457419f0dd92340d235d3e2b9b3.jpg


I did find a little more rot on this side than the passenger's side, including the license plate that I thought was welded up under the front fender. Turned out it wasn't welded in, it was sort of stuck in with some sort of goop that was holding quite a bit of moisture. So as fun as it was to have that bit of "character", it's gone now. Anyway, the rust wasn't bad enough to make me change the plans.


A few more days of work and I had the tube cut, the plates welded in the top (to bolt the front and rear fenders to the tube) and the rash rail welded on.
80-dsc_1755_c522abb37231927af4a27cd08d917d6c49261c92.jpg


Things slowed down for a bit then as life got in the way for a week or so. But then I was able to fit in a long evening of work on it. Not a lot of visible progress that night, but a lot of progress none the less as I got the cap on the front of the tube )(picture below) and some welds ground down (no pictures of that).
80-dsc_1762_765751d2cf82bf8fbbdefb1636cb67b6e028d326.jpg


Then a long Saturday got a lot more progress with the riser welded to the top of the tube (to "reach up" to the door sill) and the rear end capped:
80-dsc_1764_5561f61f56e678d116b8f31fe2b306f07bc140f7.jpg


I also got the holes drilled and tapped to attach the fenders to the tube and to get the fender flare fit back on. The new rail doesn't hang down quite as far as stock, so the flare has to swing forward a bit to not hang down below the rail. That required trimming the fender out a bit more. Anyway, here's the rail fit in place as I was getting everything lined up.
80-dsc_1763_24858f1a54222cdb264889ffd036aba8aa1094e2.jpg


I also got the underside cleaned up and sprayed some weld-thru primer on it that day. So the next day I got a whole bunch of holes drilled...
80-dsc_1765_0b860252651ac78c17f874df53862e2b46c86c25.jpg

80-dsc_1767_14ca350b72138eeb5dfcdc681e6ff31f2225f9a9.jpg


... got the tube clamped in place...
80-dsc_1768_feea8f47afc86b99f05d65536acc229ad2ed0776.jpg


... and got it welded on!
80-dsc_1769_ab3ebbcb53b05868a158629004e5ebb02201670d.jpg

80-dsc_1771_9a5287fa9e6b2045405fa4a84b040c5f71c06716.jpg


A few more evenings of grinding...
80-dsc_1780_f54aec831bac0af5e7dc907dfa889cf16f0b76b6.jpg


... and painting and it's done!
80-dsc_1785_2fa1710b72864daa94c572c4ceab82eeb99ca15f.jpg

80-dsc_1786_d4cf7612668bcee5791faa0ad916c9ea63c05af7.jpg


It doesn't look professional, but it looks good and I did it myself, so I'm happy with it! Now both rockers are done! Even with the life delays this side took a little under a month, so still quicker than the first side.
 
Last edited:
OP
OP
Nothing Special

Nothing Special

Sr. Member
Joined
Nov 25, 2016
Messages
805
Not a project, but still fun, today I got the personalized license plates I ordered a couple months ago!

80-e_tcket_eb4b7e58cb6f1dfdc4e6d3d53f89d14d0262c830.jpg


For those that don't get the Disney reference, Disneyland and Walt Disney World used to have ticket books you had to buy to go on the rides. The A tickets were for the least popular rides on up to the E tickets. They were for the best rides!
 
OP
OP
Nothing Special

Nothing Special

Sr. Member
Joined
Nov 25, 2016
Messages
805
Today I finally got started on this "winter's" project. I'm a little afraid that I'm biting off more than I should, but the end goal here is to improve my ground clearance.

When I bought this Bronco a previous owner had lifted it, but not done anything to correct the caster. It actually had negative caster. Surprisingly it drove pretty well, but when I flat-towed it the steering would turn the wrong way on corners! I corrected the caster the cheapest and easiest way I could, by dropping the radius arm brackets. But now the radius arm brackets hang really low and I get hung up on them a little too often. You can see how far they hang down in this picture

80-dsc_0485_6edc9b6d11c07276ea1caba4e677bac23e3ca886.jpg


So the first thing is to cut off the dropped radius arm mounts and go back to stock mounts. That will give me a bunch more clearance (probably ~6").

But it also pushes a snowball down the hill, and that snowball gets a lot bigger as it rolls! Once the radius arm mounts are out of the way the Atlas transfer case becomes the lowest point. So the plan is to notch and plate the frame so I can clock the transfer case higher.

But my homemade transmission mount is in the way of that, so I need to make a new trans mount. The intent is to also incorporate a transfer case skid plate.

The reclocked transfer case will kill my front driveshaft U-joints (they're maxed out now). There are two plans to address that. One is to lower the vehicle. It currently has ~3.5" lift (maybe more?) and has room for at least 35" tires if not 37s. I only have 33s, with no plans to go bigger so about a 2.5" lift will lower the vehicle a bit and I think be a better fit for me.

But that won't help the U-joint angles enough, so I plan to cut the wedges off the front axle to rotate the pinion up. Along with reducing my U-joint angles that should also help with the front driveline vibration I'm having.

But that will kill my caster. Of course just getting rid of the dropped radius arm mounts will kill the caster, but this will make it a lot worse. So the next plan is to cut off the inner C's and rotate them back.

So like I said, I hope I'm not getting in too far over my head!

Although I did finally get started today, all I got done was removing the transfer case and transmission. Getting the trans out wasn't really necessary for the plan above, but while I'm in this far I'm also going to do something about the ring gear that the starter won't always engage. And while I said "all I did was...", that was definitely enough work for one day!

80-dsc_3585_47ebb213224ff4cbed2271d77bef2e66d2a00527.jpg
 
OP
OP
Nothing Special

Nothing Special

Sr. Member
Joined
Nov 25, 2016
Messages
805
OK, finally a little progress. It took me a little while to be confident in what parts I needed to fix my starter gears. In the end I decided on going with all stock Bronco 302 stuff. Then it took a while to get the parts in.

But this week I finally got to removing the old ring gear. That went easy enough. I cut most of the way through it with a cut-off wheel in my Dremel, then whacked it with a chisel a couple of times.

Getting the new ring gear on was a bigger chore. It had a pretty sharp edge on the inside, so I had to grind a better lead-in on it. Then I heated it with the oxy-acetylene torch at work until it would start on. Finally a bunch of whacks with a big hammer and a punch and it was seated on the flywheel.

So today I put the flywheel back on, as well as the clutch, bellhousing and starter. Laying on my back while lifting all of those things into position tired me out enough that I decided to call it quits for the day rather than try to put the trans back in (which is the next step).

I did try turning it over with the starter and it cranked over nicely, with no weird noises or anything. So far so good!
 
OP
OP
Nothing Special

Nothing Special

Sr. Member
Joined
Nov 25, 2016
Messages
805
More progress today. I got the transmission back in. It takes a lot less time to type that than it does to actually do it! That wraps up the starter gear replacement (since the trans wouldn't have come out if I wasn't doing that) and it brings me to where I can actually start on the real project.
 
Top