• Welcome to ClassicBroncos! - You are currently viewing the forums as a GUEST. To take advantage of all the site features, please take a moment to register. It's fast, simple and absolutely free. So please join our community today!
    If you have problems registering or can't log into your account, please contact Admin.

OBD II Engine/Transmission Swap - The Next Generation

Bronco73

Bronco Guru
Joined
May 29, 2003
Messages
2,989
Loc.
Cape Coral, FL
One caution: The 98 has a return type fuel rail and the 2000 will be a returnless. I believe there will be some computer differences.

I'm not mixing the 2000 with the 98 stuff. I was able to snag everything from the 2000 explorer except for the long block and upper/lower intakes which my buddy had first claim on. He didn't need the rest of the stuff. I got the fuse block and the engine harness. I unplugged the harness at the trans but can't get under the truck yet to grab the rest of the trans harness from the 2000 yet. I got the computer as well.

The 98 set up will be as complete or as much as I want to remove. I need to finish pulling the PATS from the 2000 and all the sensors on the engine tomorrow plus pull the 98 engine, trans and wiring. I will also snag the intakes from an explorer that had a fire to use on the 2000 stuff. In all I will have everything for a 2000 or a 98 set up. The 98 will be a complete motor and trans set up and the 2000 will be just the wiring, front serp system and intakes.

The only thing I didn't grab was the vapor stuff for the fuel system. Should I grab all of that as well from both the 98 and 2000 explorer?
 
OP
OP
Dave

Dave

Contributor
Bronco Guru
Joined
Aug 25, 2006
Messages
2,262
4R70W Cross Member

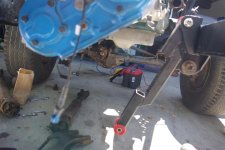
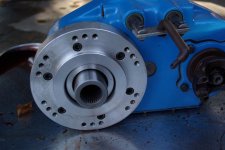
I'm using the 4R70W out of the 2000 Explorer donor. I like the 31 spline stock output shaft better than the one that gets installed with the 4R70W/AODE to D20 adaptor. The ZF adaptor makes the D20 look like the newer style cases and has a very beefy input stub. Staying stock also allows easy bolt up of a Stac or Atlas in the future. It aslo avoids having to tear the transmission down. The downside of using the ZF adaptor is you have to come up with a cross member and modify or fab up the T-case shifter. Not an issue if one goes with a twin stick. One mod that is required to make the ZF adaptor fit is to cut about 3/4" off the output shaft which is mostly a guide taper. I stuffed the tail housing full of rags and used a die grinder with a cutoff wheel. Works pretty slick and takes about 3 wheels and 20 minutes. Break the edge with a file and make sure the splines are touched up with a triagnular V file. Make sure you clean all the shavings out as you remove the rags.

Edit: The ZF adaptor bolts up to the evenly spaced 6 bolt holes on the D20. You have a 1 in 6 chance of getting it indexed correctly so that all 6 holes on the tailhousing line up. I discovered this after smearing gasket cement on all the surfaces and bolting it up. One bolt wouldn't fit. Had to rotate the adaptor on the D20.


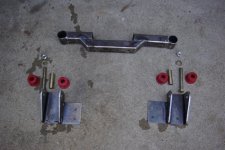
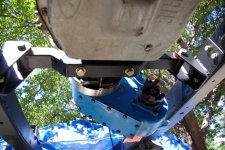
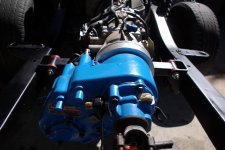
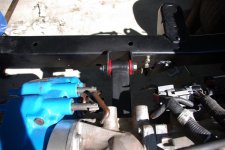
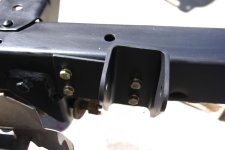
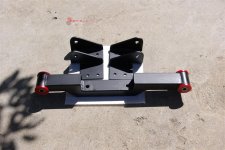
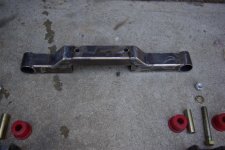
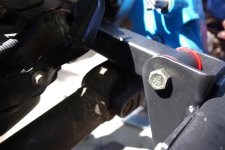
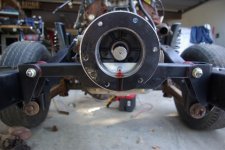
After a few false starts I came up with a design that I'm pretty happy with. Its compact and should provide nice clearance for the 2 into 1 exhaust. Installing it, I found that it swings nicely out of the way if the tranny has to be removed. It also does not restrict access to the transfer case bolts. Its made out of .120 wall 1 1/2" X 2" 4130 tubing. The polly bushings were left over from a suspension project and fit in some scrap 1 3/4" DOM. The side mounts were made out of some 1/4" wall square tubing cut diagonally that just happened to be the same width as the polly bushings. They bolt up to the stock cross member mounting holes. The whole thing was TIG welded with the exception of a couple of fillet welds on the side mounts that I did with the MIG.

I hope that it isn't too rigid with the arm length and the soft polly bushings. If I had to I could modify it with the Explorer mount under the transmission.
 

Attachments

  • cross member 001 (Large).jpg
    cross member 001 (Large).jpg
    124.7 KB · Views: 409
  • cross member 012 (Large).jpg
    cross member 012 (Large).jpg
    125.4 KB · Views: 412
  • cross member 010 (Large).jpg
    cross member 010 (Large).jpg
    84 KB · Views: 363
  • cross member 011 (Large).jpg
    cross member 011 (Large).jpg
    88.3 KB · Views: 358
  • cross member 009 (Large).jpg
    cross member 009 (Large).jpg
    83.1 KB · Views: 352
  • cross member 007 (Large).jpg
    cross member 007 (Large).jpg
    52.1 KB · Views: 336
  • cross member 006 (Large).jpg
    cross member 006 (Large).jpg
    119.4 KB · Views: 372
  • cross member 002 (Large).jpg
    cross member 002 (Large).jpg
    119.4 KB · Views: 353
  • cross member 013 (Large).jpg
    cross member 013 (Large).jpg
    67.9 KB · Views: 346
  • cross member 014 (Large).jpg
    cross member 014 (Large).jpg
    81.1 KB · Views: 395
  • cross member 015 (Large).jpg
    cross member 015 (Large).jpg
    80.5 KB · Views: 334
Last edited:

cougarmandan

Sr. Member
Joined
May 13, 2007
Messages
370
Loc.
Bonanza, AR
My immediate thought was it was a pre made kit and you installed the frame rail brackets upside-down, but the more i look at it, the more it looks right, especially with the everything installed. Looks good. I just disassemblied my 97 Exploder motor and I need to get some pics and start a rebuild thread of my own.
 
OP
OP
Dave

Dave

Contributor
Bronco Guru
Joined
Aug 25, 2006
Messages
2,262
My immediate thought was it was a pre made kit and you installed the frame rail brackets upside-down, but the more i look at it, the more it looks right, especially with the everythingn.

My first idea was to sling everything below the driveshaft with the side brackets hanging down. I think this one is much cleaner and keeps the junk from hanging down. I'm going to try to fit a d44hp up front and a hi9 in the rear. Should make for a nice clean undercarriage.
 
OP
OP
Dave

Dave

Contributor
Bronco Guru
Joined
Aug 25, 2006
Messages
2,262
Need some feedback

Next step is to set up my axles. I have a heavy duty 9 inch that I'm cutting down by cutting the tubes off at the center section and rewelding to stock width. Here's the idea I've been kicking around for some time:

Remove the spring perches and weld 2 flanges on each side. One on each side of each spring. They would be about two inches bigger in diameter than the axle tubes. A large polly bushing would fit over the axle simailar to the front axle except they would be round so the axle could actually turn. A two piece sleeve would fit over the bushing and clamp to the springs via u bolts like the axle tubes. A bar would fasten to the top of the axle housing and paralell the drive shaft up to the frame like a wrap trap with a set up radius arm bushings on each end. It would unload the springs of any wrap.

Any thoughts?
 

70_Steve

Old Guy
Joined
Dec 13, 2002
Messages
8,317
After a few false starts I came up with a design that I'm pretty happy with. Its compact and should provide nice clearance for the 2 into 1 exhaust. Installing it, I found that it swings nicely out of the way if the tranny has to be removed. It also does not restrict access to the transfer case bolts. Its made out of .120 wall 1 1/2" X 2" 4130 tubing. The polly bushings were left over from a suspension project and fit in some scrap 1 3/4" DOM. The side mounts were made out of some 1/4" wall square tubing cut diagonally that just happened to be the same width as the polly bushings. They bolt up to the stock cross member mounting holes. The whole thing was TIG welded with the exception of a couple of fillet welds on the side mounts that I did with the MIG.

I hope that it isn't too rigid with the arm length and the soft polly bushings. If I had to I could modify it with the Explorer mount under the transmission.
Yes, nice crossmember. I though I'd been doing a good job of following this thread, but somehow missed these posts.

My reason for posting is that I'm in the middle of making a very similar crossmember for my NV4500. Two bolts directly into the tranny, and polly bushings at each end. I originally installed the tranny using the AA crossmember, but was never very satisfied with the design. It is/was the lowest thing under my Bronco, and caused me to modify my exhaust in a way I really wasn't satisfied with. So, adding a couple O2 sensor bungs to the exhaust for my eventual EFI conversion is finally enough of a reason to remake the crossmember the way I want it.

I'll post a couple pics of mine (still half done) when I get home.

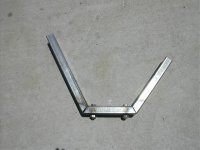
Edit: Here's the last pic I took of it. This is 1 x 2 x .120 wall tubing. The two bolts in the middle mount the tranny. It now has two more ~45 deg bends to flatten it out. It was at this point I realized that one side of the bushing will line up exactly with the rear two crossmember holes in the frame. So, I'm now remaking the crossmember out of 1 x 3" tubing to offset the bushing an inch.
 

Attachments

  • DSCN0803.jpg
    DSCN0803.jpg
    130.5 KB · Views: 30
Last edited:

70_Steve

Old Guy
Joined
Dec 13, 2002
Messages
8,317
Remove the spring perches and weld 2 flanges on each side. One on each side of each spring. They would be about two inches bigger in diameter than the axle tubes. A large polly bushing would fit over the axle simailar to the front axle except they would be round so the axle could actually turn. A two piece sleeve would fit over the bushing and clamp to the springs via u bolts like the axle tubes. A bar would fasten to the top of the axle housing and paralell the drive shaft up to the frame like a wrap trap with a set up radius arm bushings on each end. It would unload the springs of any wrap.

Any thoughts?
Today was a long day. I've read through this description probably a dozen time, and I still don't quite get it... A sketch would help...

But, if I get the jist of it, what you're suggesting is a single bar torque arm, like Wild Horses Wrap Trap, but you intend to allow the axle housing rotate at the springs, so the axle housing rotation is not transmitted to the springs.

First though was.. Good luck finding poly bushings with a 3" id. Second though is that you can kiss your pinion angle goodbye... Sorry, I'm not anything close to an engineer, but do you have an estimate of how many degrees of rotation you expect from the axle housing. My WAG (Scientific Wild Ass guess... minus the scientific part) is that you'd see 20 degrees or more of rotation. I'm thinking thats not what you need at max torque.
 
OP
OP
Dave

Dave

Contributor
Bronco Guru
Joined
Aug 25, 2006
Messages
2,262
Today was a long day. I've read through this description probably a dozen time, and I still don't quite get it... A sketch would help...

But, if I get the jist of it, what you're suggesting is a single bar torque arm, like Wild Horses Wrap Trap, but you intend to allow the axle housing rotate at the springs, so the axle housing rotation is not transmitted to the springs.

First though was.. Good luck finding poly bushings with a 3" id. Second though is that you can kiss your pinion angle goodbye... Sorry, I'm not anything close to an engineer, but do you have an estimate of how many degrees of rotation you expect from the axle housing. My WAG (Scientific Wild Ass guess... minus the scientific part) is that you'd see 20 degrees or more of rotation. I'm thinking thats not what you need at max torque.

I think it should keep the pinion pointed exactly at the transfer case like a 4 link system. I can cut the bushings out of stock. I'm on the road but will try to do some drawings when I get home.
 

DanWheeler

Bronco Guru
Joined
Nov 8, 2005
Messages
2,549
Loc.
Kirkland, WA
dude! love the mount! Beats the hell out of what I did for mine. I'm gonna have to re-do my mount now like yours except I would like it to use the stock explorer rubber mount.
 

67ster

Bronco Guru
Joined
Feb 18, 2002
Messages
1,572
I like the simplicity of the crossmember and the mounting, I just hope torque and frame twist don't overstress the stock aluminum extension/adaptor housing. We tried a deal like that on our HDRA class 8 Ford back in the early 80s , it fractured the C6 ext.housing on a test run so we used a softer center mounting system (urethane spring bushings as I recall), no problemo. Housing/spring sliders/floaters are still used in drag racing,(Art MorrisonChassis) , I don't see why a concept like yours wouldn't work with a center mounted upper and lower control arm or a linked ladder bar. This way the torque reaction would be tranmitted to the frame and let the leaf spring control the lateral forces. With the proper thickness and duro rating bushings , the housing would also have some flex, ala Chuck's spring rockers. Very interesting thread !
 

samamarshall

Full Member
Joined
Nov 3, 2008
Messages
216
What's going on with this Dave? I've been waiting 10 months for an update!!!!!!! Hopefully you've been busy playing with your new bronco toy instead of sitting inside writing up tech posts, but really, let the bronco rest and educate us!!
 

67ster

Bronco Guru
Joined
Feb 18, 2002
Messages
1,572
Obd 2

Yeah , what happened to Dave ? Just as things were really getting interesting - Poof ! Hope he's OK.
 

DirtDonk

Contributor
Bronco Guru
Joined
Nov 3, 2003
Messages
48,104
Is that another EFI "donor" sitting there behind the Toyota?

Paul
 
OP
OP
Dave

Dave

Contributor
Bronco Guru
Joined
Aug 25, 2006
Messages
2,262
Is that another EFI "donor" sitting there behind the Toyota?

Paul

It is indeed! Picked up at auction for $1000. The front end damage turned out to be minimal so I fixed it and we've been driving it for a few years now. If I ever find another Bronco ...
 

Boss Hugg

Contributor
Bronco Guru
Joined
Jun 8, 2010
Messages
2,161
updates??

K, Dave, where ya been, man?? have you finished the bronco? if so how bout some video footage of the finished product?

Just bought a 96 X with hopes of a swap to my 73. That fuel tank is awesome and makes me think about doing one with internal pumps in a thicker steel since i have no experience with aluminum welding.

Update us man!!
 
OP
OP
Dave

Dave

Contributor
Bronco Guru
Joined
Aug 25, 2006
Messages
2,262
K, Dave, where ya been, man?? have you finished the bronco? if so how bout some video footage of the finished product?

Just bought a 96 X with hopes of a swap to my 73. That fuel tank is awesome and makes me think about doing one with internal pumps in a thicker steel since i have no experience with aluminum welding.

Update us man!!

Too many irons in the fire! Hope to get back on it this winter and have it ready for next spring. I'll have some updates soon! I hope...
 
Top