• Just a reminder that you won't be able to start new posts or reply to existings posts in the Archive forum.

    This is where all the old posts go so they can still be used for reference and searched.
  • Welcome to ClassicBroncos! - You are currently viewing the forums as a GUEST. To take advantage of all the site features, please take a moment to register. It's fast, simple and absolutely free. So please join our community today!
    If you have problems registering or can't log into your account, please contact Admin.

Project grocery getter

OP
OP
P

ponyracer

Sr. Member
Joined
Sep 30, 2009
Messages
706
Loc.
Crestview, Fl, 32539
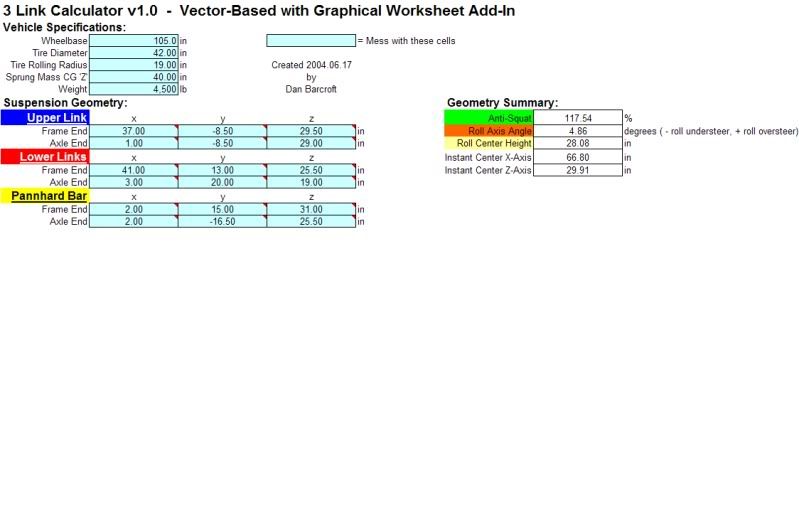
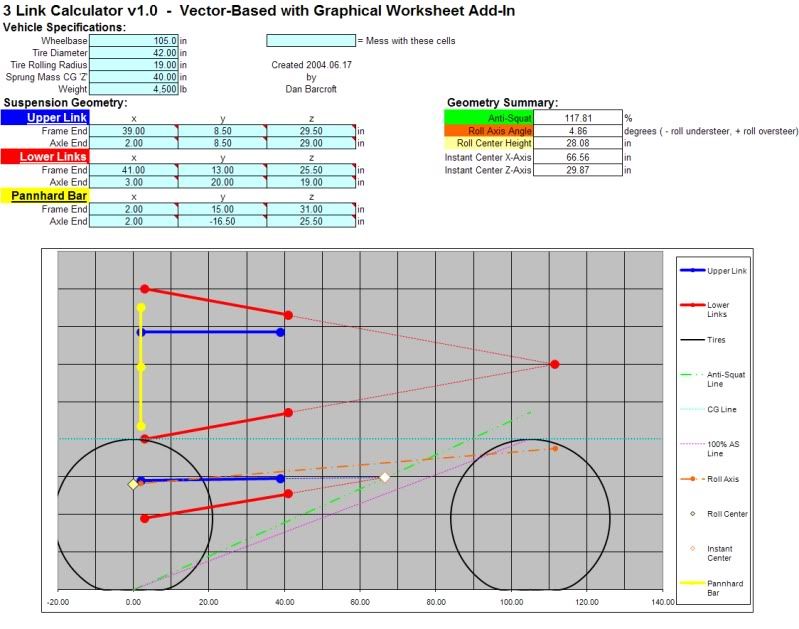
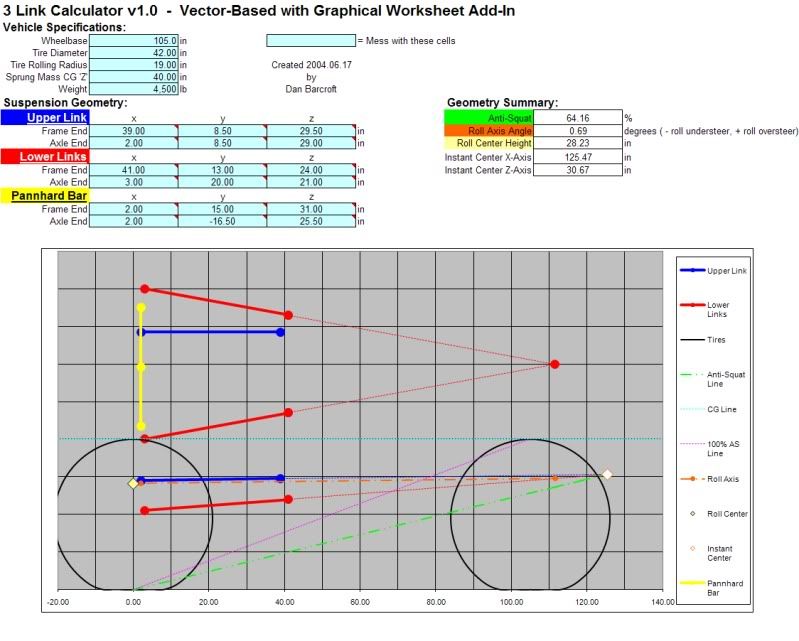
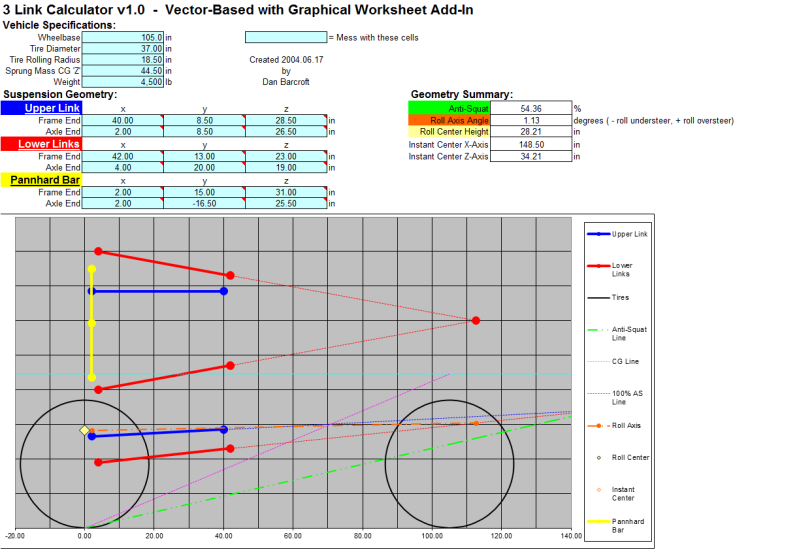
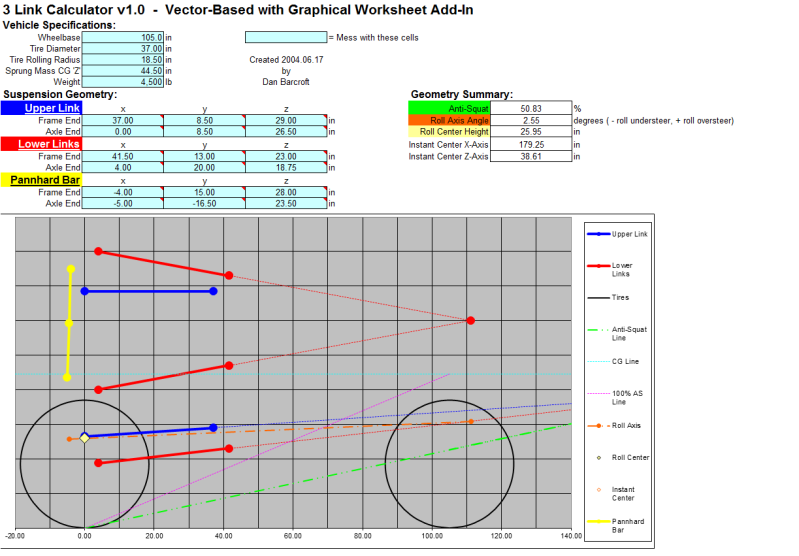
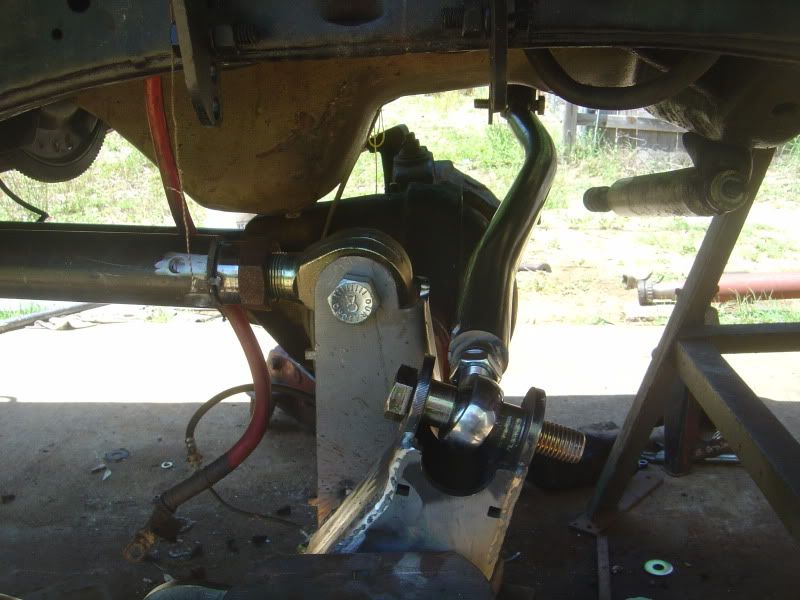
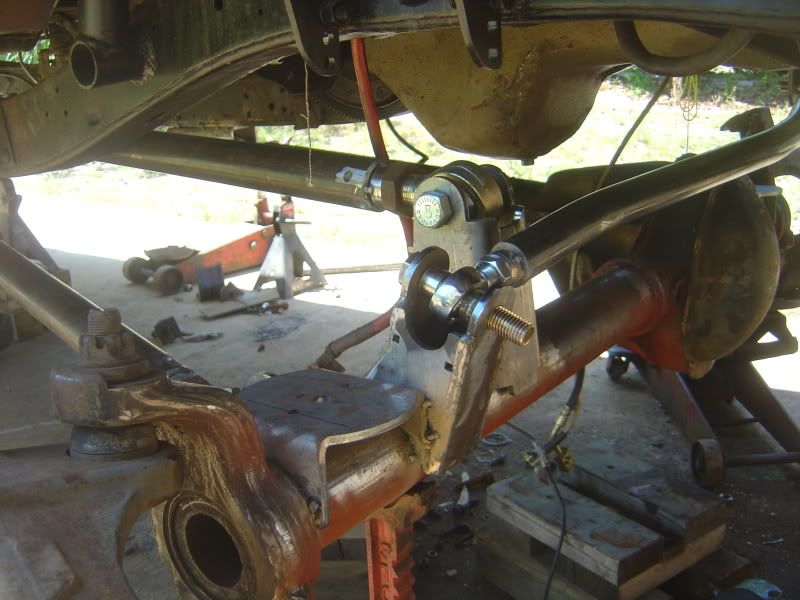
I'm a dumbass. Guess he never updated the descrption in the boxes. I'm measuring from the centerline of the rear axle like it says, I should be measuring from the centerline of the front axle up to the link centerline, hench why evryone elses numbers are 0 or very small amounts (not 68" lol).

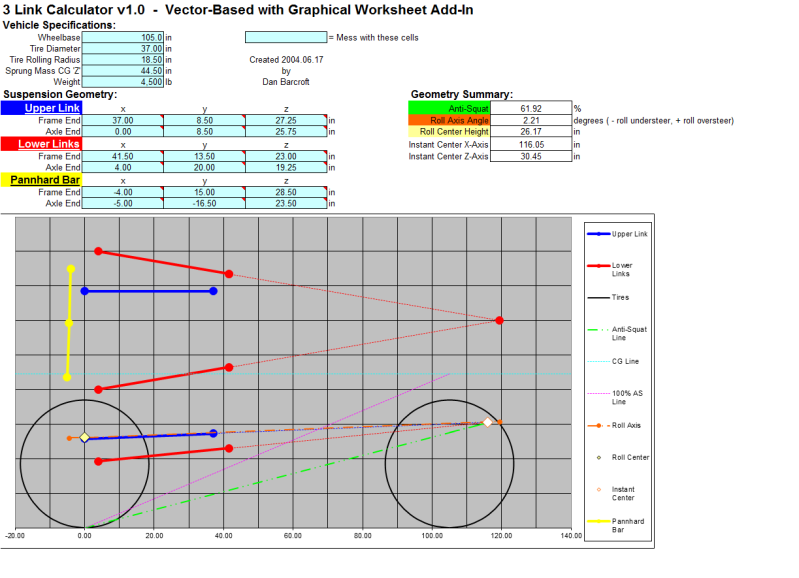
Here's a good explanation for anyone trying to figure this out.
http://www.pirate4x4.com/forum/showpost.php?p=4929623&postcount=21
 

OX1

Bronco Guru
Joined
Aug 26, 2003
Messages
3,462
I used the descriptions in the boxes for where to get the values from, how do you mean reverse them? Maybe I got a bad calculator? I'll double check the CG measurement, it should be fairly close to the BH bolt. I was reading some on the tire height measurements, ya your right, I'll need to shorten that up some as well.

Thanks for the reply

X is your link lengths (essentially, in the front/back direction). No way they are 105 inches long.

In a front axle

X=rearward from front axle centerline
 
OP
OP
P

ponyracer

Sr. Member
Joined
Sep 30, 2009
Messages
706
Loc.
Crestview, Fl, 32539
LOL ya I got it, I'm working on numbers now. The only other prob I'm having is with the trac bar. The axle side should be - since it's right of the axle centerline but the calc won't do it.
 

OX1

Bronco Guru
Joined
Aug 26, 2003
Messages
3,462
LOL ya I got it, I'm working on numbers now. The only other prob I'm having is with the trac bar. The axle side should be - since it's right of the axle centerline but the calc won't do it.

I used neg numbers on my X direction in my front 4 link calc, since my uppers started 1.5 inch forward of the center tube. It took it no problem. That example I posted from pirate, the guy also has one neg number on his track bar.

Maybe fix all the other numbers first and then try that neg one on the track bar??
 
OP
OP
P

ponyracer

Sr. Member
Joined
Sep 30, 2009
Messages
706
Loc.
Crestview, Fl, 32539
Check this out and see what you think. Anyone have any "good" numbers to compare to? I'm wondering how this is going to handle since it will be street driven regularly.

Thanks!!
3link.jpg
 

DanWheeler

Bronco Guru
Joined
Nov 8, 2005
Messages
2,549
Loc.
Kirkland, WA
damn, you really went to town shaving those diffs. looks good!

as for your numbers, I think 117% antisquat (AKA antidive when referencing front suspension) maybe a bit high. Does the calculator your using have the pictures below the numbers? That would help to see a graphical representation.

My understanding is that a positive roll oversteer can be corrected with shock valving and/or antisway bars.
 

DanWheeler

Bronco Guru
Joined
Nov 8, 2005
Messages
2,549
Loc.
Kirkland, WA
It looks like you have the same problem I did. Your lowers have too much angle which is causing the antidive number to be high. You'll want to get that lower as flat as possible. Imagine if your lower was at a 45 degree angle. When you slammed on the brakes, the axle would be more likely to buckle under the vehicle rather than if the lower control arm were completely flat in which case it would be pushing directly backwards horizontally against the vehicle.

at least thats how I understand it.

here's one way to solve that problem:
1174968345_6R8kX-M.jpg


1202142454_qfmyQ-M.jpg


call Carlos and ask for the drop frame brackets he made for Dan Wheeler. He should know what you're talking about. I paid $70 each for them but that included design time. You might get a better deal since they are already designed.
 

DanWheeler

Bronco Guru
Joined
Nov 8, 2005
Messages
2,549
Loc.
Kirkland, WA
change your lower link frame end number from 25.5 to 23.5 and see what it does for your antidive. Thats how much that bracket will drop it compared to the standard Ballistic frame bracket. it's a 2" drop.
 
OP
OP
P

ponyracer

Sr. Member
Joined
Sep 30, 2009
Messages
706
Loc.
Crestview, Fl, 32539
I lowered the frame mount 1" and raised the axle end 2" and it made a big diff. Both are easy changes that I can make using my current brackets. Thanks for tip on yours though Dan, if this doesn't work I may need to go that route.
3linkx4.jpg
 

DanWheeler

Bronco Guru
Joined
Nov 8, 2005
Messages
2,549
Loc.
Kirkland, WA
I am by no means an expert but those look like very good numbers. I wasn't able to get my roll steer down anywhere near that low. I'll have to compare my calc with yours to see why yours is so much lower than mine. nice!
 
OP
OP
P

ponyracer

Sr. Member
Joined
Sep 30, 2009
Messages
706
Loc.
Crestview, Fl, 32539
I also have a small amount of height adjustment on the frame side upper. Moving it down 1.5" yields this change:

90.39
0.69
28.23
78.23
26.94


Moving it up 1.5" does this:

37.41
0.69
28.23
326.54
46.54

This is with the lower changed.

It's AMAZING what a tiny change to bracket placement does to these numbers. Just wish I had enough real world experience to know what changing one number would do to how the truck handles. Guess ya gotta start somewhere!
 
OP
OP
P

ponyracer

Sr. Member
Joined
Sep 30, 2009
Messages
706
Loc.
Crestview, Fl, 32539
I wasn't able to get my roll steer down anywhere near that low.


Playing with the calculator, the roll axis is controlled by how flat you lower link is. I lowered the frame end another 1" and it went negative in a hurry. What hole are you running your lower in? Try playing with the calc again and move it down a hole.
 
OP
OP
P

ponyracer

Sr. Member
Joined
Sep 30, 2009
Messages
706
Loc.
Crestview, Fl, 32539
Well I got her together!! Flexes WAAAAAAYAYYYYYYYYY better than radius arms, even lengthened ones with a heim in the end.

2 problems I ran into, starter clearance on compression and the trac bar kissing the diff cover on drivers side compression.

Prob 1, raising the engine tranny 2" for a flat belly will hopefully give me the extra clearance I need for full compression.

Prob 2, digging out my harbor freight bender tomorrow to try and put a bend in my spare piece of trac bar.

DSC05264.jpg

DSC05265.jpg

DSC05266.jpg

Hard to tell but I have about 1/4 inch clearance between the body mounts and the lowers on full stuff.
DSC05267.jpg

DSC05268.jpg

DSC05269.jpg

DSC05270.jpg
 

broncoitis

Bronco Guru
Joined
Jul 23, 2010
Messages
4,449
Holy Cow! Haven't checked in on your progress in awhile and you are doing a really nice job. I will have to check in alot more often. Keep it up. ;D
 
OP
OP
P

ponyracer

Sr. Member
Joined
Sep 30, 2009
Messages
706
Loc.
Crestview, Fl, 32539
Well I made some more changes, lowered the frame upper and raised the axle lower. Flattened the links out some. Have 7" sep at the axle and 4" at the frame. Here's the numbers.

3linkfinal.png
 
OP
OP
P

ponyracer

Sr. Member
Joined
Sep 30, 2009
Messages
706
Loc.
Crestview, Fl, 32539
Well I flexed it out and tore it apart for welding. Here's the pics

The finished arms. How do ya like those joints? That's a 4.5" sanding disc
DSC05294.jpg

DSC05293.jpg

Upper with starter clearance. Close but should be fine with a newer ford small body starter and when I raise the engine 2" or so.
DSC05290.jpg

DSC05291.jpg

Track bar shape
DSC05289.jpg

Upper frame clearance
DSC05286.jpg

Full droop
DSC05282.jpg

Full stuff on the pass side. Upper hits the frame.
DSC05284.jpg

Little flex
DSC05277.jpg

DSC05274.jpg

DSC05273.jpg


Going to weld up the brackets and put some bracing on them. Also have to weld up the links then hopefully this week I can get it all assembled.

Also started working on the sterling again, if anyone wants to shave one, or weld up the tubes, just use good old E7018, no fancy rods needed. No pre/post heating needed on the 60 or the sterling.
 
Top