


treihesse
Bronco Guru
- Joined
- Aug 1, 2008
- Messages
- 1,459
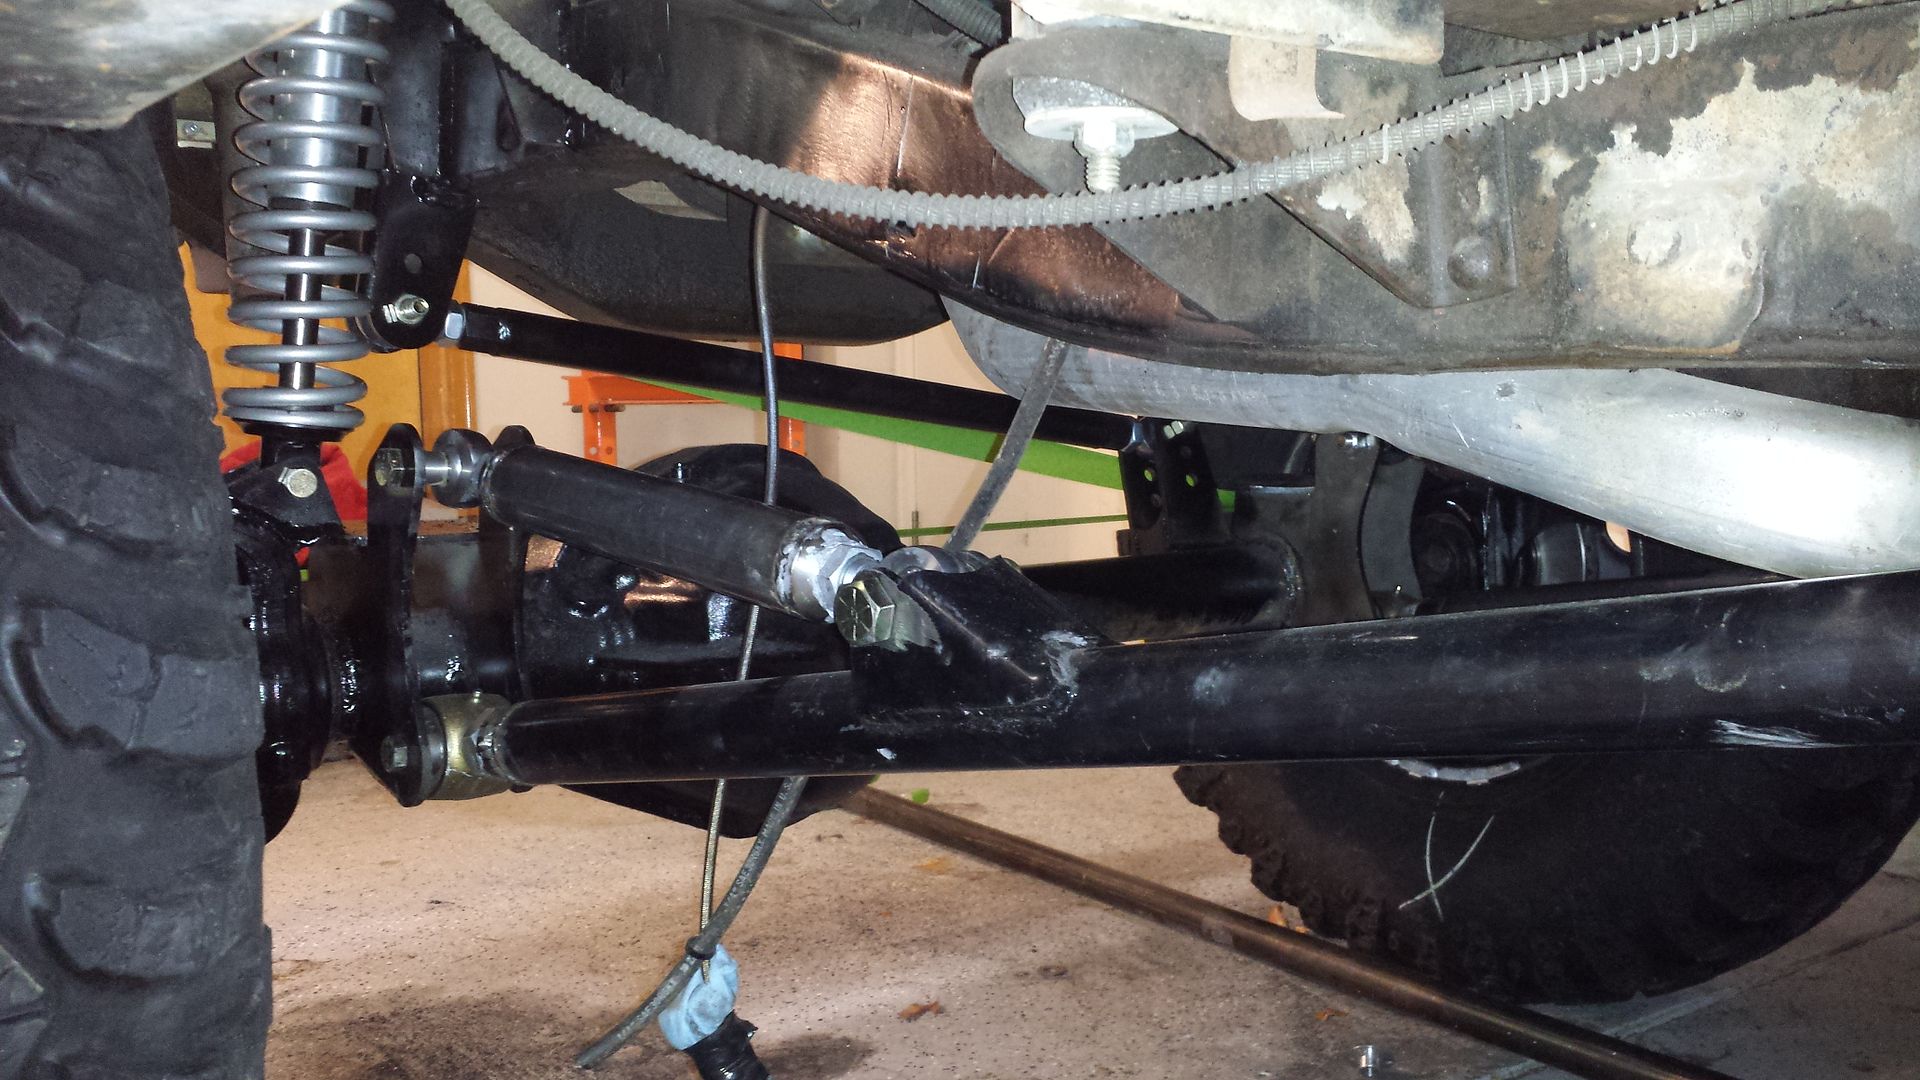
First of all these arms taking a fair bit of fabrication and if you don't want to build them from scratch call Clint from battlement fabrication and order a set from him. Mine are different in some ways but the function is the same.
1. Choose what axle you plan on using. Stock bronco, hp Dana 44, Dana 60 etc.
2. Decide if you want full width or a custom width. Remember with custom you must cut off inner C's cut axle tube re install C set caster and re weld. Not a basic thing.
3. Mocking up axle under the truck. I would highly recommend you spend some time measuring your stock axle off a spot on the frame on both sides. Pick a body mount as a reference point. Take as many measurements as you need. Invest in a couple of brass plumb bobs and hang them from the coil towers to get a reference to center the axle. The inner c is where to measure too.
4. Remove all brackets from frame and axle if you haven't done so. Clean frame rails with a 60 grit flap wheel. If you know how long you want your arns you can tack on the link brackets. Remember to measure a lot and tack only..
Remember your fuel line is on that rail
5. Weld all your brackets together and let them cool.
Another handy tool to invest in is a digital angle finder.
You will need to set your caster on the knuckle. 6 to 8 degrees is pretty common. Set the link bracket on the frame to check fit. I had to remove a portion of the sping perch on the dana 60. Once you like the alignment of the link bracket we need to modify it a little. The bracket sits flat on the tube and we want it kick in toward the frame. Or point toward the link bracket. Once you like the angle tack the axle bracket on making sure the inner c is at the proper angle and the coil plate is at zero. Tack only.
6. Ok we have a axle bracket and a frame bracket. If you don't know how long you want your arm a few inches longer than stock will work up to 10". Measure between the two mounting holes. Lower axle link hole and frame link hole.
7. Welding on the bushings and heim insert should be done by a competent welder. The link will need to be notched or fush mouthed to except the bushing. There should be a slight angle in the notch. Buy a harbor freight tubing notcher for this. Tack the bushings in only. Now tack the Johnny joint insert into the tube. Do this for both sides. Cut the upper tube ,notch it and tack on the bushing. The upper tube is 10 to 12 inches. Tack in the tube insert and mount the upper radius arm bracket to the arm with a couple tack welds you should have this.
8. I would mount the arms to the frame and take measurements. Run a plumb bob down from the coil bucket to insure the coil is vertical.. try and keep the axle at ride height because the axle pivots on a arch and the further down or up it is the arch changes. If the axle is centered and straight you can burn in all the brackets.
9. Welding the brackets and inserts is important welding. These are not bumpers. Clean the metal well (not brake vleaner) you need a 220v welder to do this right. Make a good pass on the brackets to the axle tube. Make sure you bevel the material. Two passes cant hurt if your unsure but not required. Tube inserts and bushings. Concentrate the bulk of the heat on the dom tubing. On the bushings do it in 4 welds so you dont warp the bushings to bad. When welding tube inserts I like to put the tube on a couple bending dies so I can spin the tube. I lock my gun into my body and spin the tube to make one pass welds. Aim the weld at the dom and bring it on to the insert. .LET IT COOL OVER NIGHT.


10. Assemble the arms. Use a little anti seize in the heim joints when threading them in. Paint them. Install coil in buckets.
11. You will most likely need to use a different track bar setup. If so ruffstuff outside the frame worked awesome.

Ask me any questions you have. Im not a expert but I hsve a little know how. I know I did not use bushings on my arms. I will be changing it if they don't function well. The bushings will do two things. Lock the arm so it doesn't rotate and create a little bind which the arms like.
Here is a list I bought from venders or Clint makes a builder kit and a welded kit I believe. Take your time and be careful.
https://www.ballisticfabrication.com...ng_p_1663.html
Theses are what I would use at the axle side 4 total
https://www.ballisticfabrication.com...nt_p_1636.html
I woukd use these on the axle 2 total.
https://www.ballisticfabrication.com...ts_p_1184.html
These are the axle bracket. They make one for coil spring and coil over
https://www.ballisticfabrication.com....asp?#page-211
Theses are the frame link bracket.
http://www.ruffstuffspecialties.com/...de=LNKBrackets
These are the radius arm bracket.
http://www.ruffstuffspecialties.com/...ory_Code=114RE
You could use these in place on the Johnny joint at the frame too..
http://www.ruffstuffspecialties.com/...y_Code=RODENDS
You will need these for the radius arm link mount.
All joints from ballistic need tube insert and jam nuts.
When you setup the brackets on the frame grind the inner mounting surface 1/4 inch to kick the bracket towards the frame rails.
Source 2" .025 dom locally
http://www.ruffstuffspecialties.com...ode=PANKIT&Category_Code=panhardtrackbarTrack bar
Pictures. .


1. Choose what axle you plan on using. Stock bronco, hp Dana 44, Dana 60 etc.
2. Decide if you want full width or a custom width. Remember with custom you must cut off inner C's cut axle tube re install C set caster and re weld. Not a basic thing.
3. Mocking up axle under the truck. I would highly recommend you spend some time measuring your stock axle off a spot on the frame on both sides. Pick a body mount as a reference point. Take as many measurements as you need. Invest in a couple of brass plumb bobs and hang them from the coil towers to get a reference to center the axle. The inner c is where to measure too.
4. Remove all brackets from frame and axle if you haven't done so. Clean frame rails with a 60 grit flap wheel. If you know how long you want your arns you can tack on the link brackets. Remember to measure a lot and tack only..
Remember your fuel line is on that rail
5. Weld all your brackets together and let them cool.
Another handy tool to invest in is a digital angle finder.

You will need to set your caster on the knuckle. 6 to 8 degrees is pretty common. Set the link bracket on the frame to check fit. I had to remove a portion of the sping perch on the dana 60. Once you like the alignment of the link bracket we need to modify it a little. The bracket sits flat on the tube and we want it kick in toward the frame. Or point toward the link bracket. Once you like the angle tack the axle bracket on making sure the inner c is at the proper angle and the coil plate is at zero. Tack only.
6. Ok we have a axle bracket and a frame bracket. If you don't know how long you want your arm a few inches longer than stock will work up to 10". Measure between the two mounting holes. Lower axle link hole and frame link hole.
7. Welding on the bushings and heim insert should be done by a competent welder. The link will need to be notched or fush mouthed to except the bushing. There should be a slight angle in the notch. Buy a harbor freight tubing notcher for this. Tack the bushings in only. Now tack the Johnny joint insert into the tube. Do this for both sides. Cut the upper tube ,notch it and tack on the bushing. The upper tube is 10 to 12 inches. Tack in the tube insert and mount the upper radius arm bracket to the arm with a couple tack welds you should have this.
8. I would mount the arms to the frame and take measurements. Run a plumb bob down from the coil bucket to insure the coil is vertical.. try and keep the axle at ride height because the axle pivots on a arch and the further down or up it is the arch changes. If the axle is centered and straight you can burn in all the brackets.
9. Welding the brackets and inserts is important welding. These are not bumpers. Clean the metal well (not brake vleaner) you need a 220v welder to do this right. Make a good pass on the brackets to the axle tube. Make sure you bevel the material. Two passes cant hurt if your unsure but not required. Tube inserts and bushings. Concentrate the bulk of the heat on the dom tubing. On the bushings do it in 4 welds so you dont warp the bushings to bad. When welding tube inserts I like to put the tube on a couple bending dies so I can spin the tube. I lock my gun into my body and spin the tube to make one pass welds. Aim the weld at the dom and bring it on to the insert. .LET IT COOL OVER NIGHT.


10. Assemble the arms. Use a little anti seize in the heim joints when threading them in. Paint them. Install coil in buckets.
11. You will most likely need to use a different track bar setup. If so ruffstuff outside the frame worked awesome.


Ask me any questions you have. Im not a expert but I hsve a little know how. I know I did not use bushings on my arms. I will be changing it if they don't function well. The bushings will do two things. Lock the arm so it doesn't rotate and create a little bind which the arms like.
Here is a list I bought from venders or Clint makes a builder kit and a welded kit I believe. Take your time and be careful.
https://www.ballisticfabrication.com...ng_p_1663.html
Theses are what I would use at the axle side 4 total
https://www.ballisticfabrication.com...nt_p_1636.html
I woukd use these on the axle 2 total.
https://www.ballisticfabrication.com...ts_p_1184.html
These are the axle bracket. They make one for coil spring and coil over
https://www.ballisticfabrication.com....asp?#page-211
Theses are the frame link bracket.
http://www.ruffstuffspecialties.com/...de=LNKBrackets
These are the radius arm bracket.
http://www.ruffstuffspecialties.com/...ory_Code=114RE
You could use these in place on the Johnny joint at the frame too..
http://www.ruffstuffspecialties.com/...y_Code=RODENDS
You will need these for the radius arm link mount.
All joints from ballistic need tube insert and jam nuts.
When you setup the brackets on the frame grind the inner mounting surface 1/4 inch to kick the bracket towards the frame rails.
Source 2" .025 dom locally
http://www.ruffstuffspecialties.com...ode=PANKIT&Category_Code=panhardtrackbarTrack bar
Pictures. .


") hes a good guy for sure
hes a good guy for sure