• Welcome to ClassicBroncos! - You are currently viewing the forums as a GUEST. To take advantage of all the site features, please take a moment to register. It's fast, simple and absolutely free. So please join our community today!
    If you have problems registering or can't log into your account, please contact Admin.

Saginaw Pump on Explorer Serpentine

OP
OP
E

EricLar80

Bronco Guru
Joined
Jun 14, 2001
Messages
2,170
I just found this thread. I was in the same predicament recently so I built my own bracket. I've been intending to post up pictures and I also have a template if anyone needs it. Mine was made out of 1/4 plate, saginaw pump with Explorer serpentine on a 351. Isn't that hard to make, using a dual return reservoir.

Post up some pics, I am sure we would all like to see it.

Eric
 

ScanmanSteven

Bronco Guru
Joined
Dec 19, 2010
Messages
1,129
Here we go. I just noticed my contributor status ended today, I'll fix it, been out of town.
 

Attachments

  • IMG_0112.jpg
    IMG_0112.jpg
    68.1 KB · Views: 273
  • IMG_0114.jpg
    IMG_0114.jpg
    96.7 KB · Views: 267
  • IMG_0115.jpg
    IMG_0115.jpg
    96 KB · Views: 273
  • IMG_0116.jpg
    IMG_0116.jpg
    115.7 KB · Views: 270
  • IMG_0117.jpg
    IMG_0117.jpg
    107.6 KB · Views: 252
  • IMG_0118.jpg
    IMG_0118.jpg
    96.3 KB · Views: 261
  • IMG_0119.jpg
    IMG_0119.jpg
    101.6 KB · Views: 250
Last edited:

ScanmanSteven

Bronco Guru
Joined
Dec 19, 2010
Messages
1,129
A few more.
 

Attachments

  • IMG_0126.jpg
    IMG_0126.jpg
    97.1 KB · Views: 197
  • IMG_0125.jpg
    IMG_0125.jpg
    103.5 KB · Views: 200
  • IMG_0124.jpg
    IMG_0124.jpg
    97.1 KB · Views: 201

ScanmanSteven

Bronco Guru
Joined
Dec 19, 2010
Messages
1,129
Well since I opened my mouth I owe some more pictures and a diagram. The template isn't as good as I thought so here goes. All of the pieces were made out of scrap so some aren't too pretty.

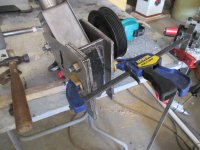
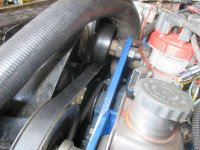
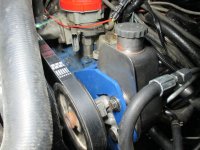
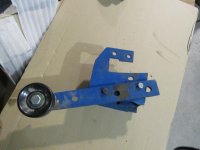
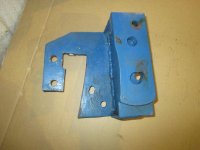
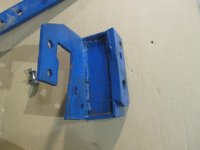
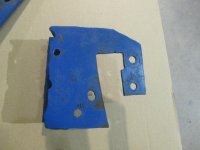
I first made a pattern out of a manila folder, cutting and wacking til it looked like it might fit. I then cut a 1/4x7x6 1/2" plate and cut it to look like the pattern in the enclosed file. All sides of the 7 x 6 1/2 plate started out parallel to each other. I then took a 2 1/2" x 7" x 7/16 flat bar like shown below and drilled 2 holes to match up to the head. I think the critical measurement is the 3 1/4" outside front to back that spaces the pump correctly for the belt. The idler bracket is just a 2x15x7/16 flat bar mounted with the pulley.

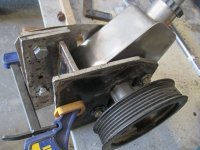
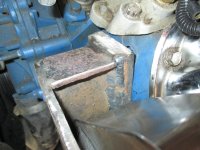
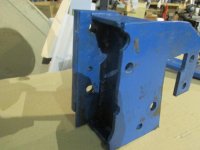
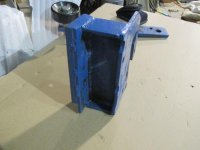
I feel the 2 bolts holding the bracket to the block are sufficient. So bolt the 2 1/2 flatbar to the head, then cut a 2 1/2 x 6 1/2 x 1/4 strip to weld perpendicular to the plate bolted to the head, setting it about 1/4" in. Bolt your pump to the plate, hold it up to your tacked perpendicular piece and if it fits, tack it together. Then cut two small pieces to fit on top and bottom to box the assembly together. You should now be able to unbolt the pump with the bracket still attached to the head. If all looks right, weld that sucker up.

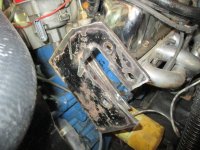
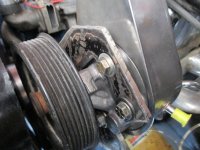
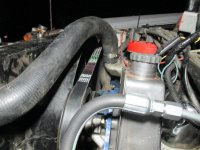
The remaining two holes are for the idler pulley. I had to grind some relief holes for the ratchet extension which is shown in the drawing. So bolt the assembly to the head, bolt the pump in, I had to use a few washers for the bottom hole between the pump and bracket, then bolt the idler arm on.

I forgot to grab the belt I used before I came in so I'll post that later. Whether the size works for you will depend on where you place the idler pulley, mine is 7 1/2" from the top hole in the flatbar. There was lots of trial and error doing this, but with a torch, grinder and determination it can be done.

I had to take my pump off today to get the measurements for the bracket, but I've learned so much here I'm just trying to pay back. I know a guy who might be able to make these, I'll try to see him tomorrow. This bracket isn't fancy, but very functional and since is steel, if you have a welder you can make it.
 

Attachments

  • Pump Bracket0001.pdf
    551 KB · Views: 46
  • IMG_0257.jpg
    IMG_0257.jpg
    71.5 KB · Views: 87
  • IMG_0256.jpg
    IMG_0256.jpg
    66.3 KB · Views: 83
  • IMG_0255.jpg
    IMG_0255.jpg
    63.4 KB · Views: 57
  • IMG_0254.jpg
    IMG_0254.jpg
    66.9 KB · Views: 59
  • IMG_0253.jpg
    IMG_0253.jpg
    74.1 KB · Views: 63
  • IMG_0252.jpg
    IMG_0252.jpg
    65.9 KB · Views: 66
  • IMG_0251.jpg
    IMG_0251.jpg
    62.1 KB · Views: 69

briancave

New Member
Joined
Feb 19, 2013
Messages
115
Thanks for the pictures. This seems totally doable. I think both versions will work great. I like the contrast between the CAD/CAM waterjet approach and the welding steel scrap/file folder template approach. I may shoot for something in between if someone doesn't start selling one of these commercially. I think steel is the way to go but I like Eric's single plate design while using a bolt like steven to mount the idler pulley.
 
OP
OP
E

EricLar80

Bronco Guru
Joined
Jun 14, 2001
Messages
2,170
*sigh*, no. :cry:

He still hasn't done it, so I am going to take it to a local shop. Thanks for keeping me honest! :)

Eric
 
OP
OP
E

EricLar80

Bronco Guru
Joined
Jun 14, 2001
Messages
2,170
Long overdue update!

I finally got it back today from being welded. Now I need to find some time to take everything apart and try it out.

Note the four tapped holes on the top of the flat piece - I plan to mount the coil in that location. We'll see how it works out.

IMG_2197.JPG

acc-140008_w.jpg
 

nvrstuk

Contributor
Just a Bronco driver for over 50 yrs!
Joined
Jul 31, 2001
Messages
9,384
Loc.
PNW
4 letters sum it up... N I C E

Great work...

My goal is to keep my a/c for OBA...I can't imagine not having OBA for everything I use it for... it's not just ARB's and tires...
 

casadejohnson

Bronco Alchemist
Joined
Jan 21, 2005
Messages
3,587
Wild Horses has their bracket up on the website again. Looking at the instructions, it specifically says "This Kit fits 5.0 Explorer not for use with 5.8 (351W)". I'm not really sure why, must be some sort of interference somewhere. Anyone know why?
 

KyleQ

Bronco Guru
Joined
Apr 24, 2008
Messages
5,480
Wild Horses has their bracket up on the website again. Looking at the instructions, it specifically says "This Kit fits 5.0 Explorer not for use with 5.8 (351W)". I'm not really sure why, must be some sort of interference somewhere. Anyone know why?

What bracket? I'm running Explorer serpentine on my 5.8 - so whatever fits Explorers should fit on a 351W.
 

welndmn

Bronco Guru
Joined
Nov 12, 2001
Messages
2,112
Wild Horses has their bracket up on the website again. Looking at the instructions, it specifically says "This Kit fits 5.0 Explorer not for use with 5.8 (351W)". I'm not really sure why, must be some sort of interference somewhere. Anyone know why?

The bracket keys off some holes in the head and holes in the block, on a 351 those holes moved.
You can just modify this bracket to work on a 351, but it will be up to you to do it.
 

WILDHORSES

Sponsor/Vendor
Bronco Guru
Joined
Nov 7, 2003
Messages
2,227
Loc.
USA

Attachments

  • 16454_10795_popup.jpg
    16454_10795_popup.jpg
    31.4 KB · Views: 152
  • 16340_10501_popup.jpg
    16340_10501_popup.jpg
    88.2 KB · Views: 210
Last edited:

73azbronco

Contributor
Bronco Guru
Joined
Nov 11, 2007
Messages
8,192
That sure looks nice!

I bet you could come up with a sanden compressor adapter to match as well, come on guys!!
 

nvrstuk

Contributor
Just a Bronco driver for over 50 yrs!
Joined
Jul 31, 2001
Messages
9,384
Loc.
PNW
X 2 on combining that with a Sanden 709 OBA compressor!!

Very frustrated with with the PSC's hi-volume/hi-pressure P/S pump and location of it...
 
Last edited:

Desert Thrasher

Bronco Guru
Joined
Jul 14, 2001
Messages
2,353
Any updates on this bracket?
I am thinking of going with the explorer setup for my 351w to get rid of the turnbuckle style tensioner I have now.
 

73azbronco

Contributor
Bronco Guru
Joined
Nov 11, 2007
Messages
8,192
love to use the sanden as OBA, but here we need it for OBAC (on board Air Conditioning)
 
Top