• Welcome to ClassicBroncos! - You are currently viewing the forums as a GUEST. To take advantage of all the site features, please take a moment to register. It's fast, simple and absolutely free. So please join our community today!
    If you have problems registering or can't log into your account, please contact Admin.

T-Bird Caliper Brake Pads

DirtDonk

Contributor
Bronco Guru
Joined
Nov 3, 2003
Messages
47,841
If you still have your old retainer plates and springs, I would reuse them.
They are supposed to be firmly planted, but they are not supposed to be so hard that you need to hammer them hard to get them in.
I agree that that would make the caliper hard to slide under normal wear conditions.

It’s just not right in my limited experience.
Limited meeting I probably only worked on 20 or 30 Ford brakes back in the day, and they were all relatively easy to remove and replace. I could do it with light tapping with a small hammer, or even just push them by hand. It was definitely not easy to do without some sort of tool, but some could be done that way.
I never bought new springs and plates, but the first time I ever used them was when a fellow bronco owner purchased them, and we attempted to install them on his.
They were so hard to install they had to have either been made wrong, or they were the wrong size. Needless to say we didn’t use them.
It turns out there were at least two different sizes, or the manufacturers just started making them wrong.
 

ba123

Contributor
Bronco Guru
Joined
Oct 29, 2022
Messages
1,803
Loc.
CA
If you still have your old retainer plates and springs, I would reuse them.
They are supposed to be firmly planted, but they are not supposed to be so hard that you need to hammer them hard to get them in.
I agree that that would make the caliper hard to slide under normal wear conditions.

It’s just not right in my limited experience.
Limited meeting I probably only worked on 20 or 30 Ford brakes back in the day, and they were all relatively easy to remove and replace. I could do it with light tapping with a small hammer, or even just push them by hand. It was definitely not easy to do without some sort of tool, but some could be done that way.
I never bought new springs and plates, but the first time I ever used them was when a fellow bronco owner purchased them, and we attempted to install them on his.
They were so hard to install they had to have either been made wrong, or they were the wrong size. Needless to say we didn’t use them.
It turns out there were at least two different sizes, or the manufacturers just started making them wrong.
Thanks for that info…o wish I still had my old ones. They might be in some random box somewhere but I looked and couldn’t find them. The pass side went in much more reasonably with light tapping, which is more what I expected. I’ll remove the drivers side and try another one or also just could be the paint on there and maybe it’ll go back in more easily when I try again.

The inside pads also just barely fit and there was no way of getting the rattle clip in there so hopefully I don’t need them!

Thanks!
 

ba123

Contributor
Bronco Guru
Joined
Oct 29, 2022
Messages
1,803
Loc.
CA
Ok. In and out a couple times. Still too tight. Put it in without the spring and goes in great but caliper moves a little too much and don’t want that.

Would you grind them down a little or what would you do other than not use them? I have two different sets from two sources and both the same.m

I could prob go old school and use a file to make it just right.
 

Oldtimer

Contributor
Jr. Member with Sr. moments
Joined
Feb 4, 2005
Messages
956
Loc.
Sunnyvale, CA
Mine could never be installed by hand.
Always had to hammer them in,and back out.
Old ones, new ones, didn't matter.
In fact I always wonderd why they had the springs.
Definitely not needed as anti rattle feature.

Any "sliding caliper brake" experts out there that can tell us how much force it should take to slide the calipers?
 

ba123

Contributor
Bronco Guru
Joined
Oct 29, 2022
Messages
1,803
Loc.
CA
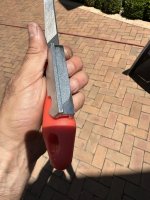
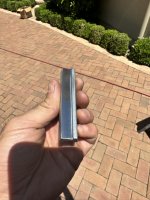
When I started filing, it was clear that the ends on this one were much higher:
IMG_5181.jpeg
I filed for a bit but got nowhere. Used my dremel with a cylindrical course sandpaper and got it down enough to be happy.
IMG_5182.jpeg
I kept measuring along the way. Once happy, I also used that dremel attachment for the caliper bracket and got the paint of those contact points.

Then put some silicon brake grease that came with my pads on both bracket points as well as the top of the spring. I still hammered it in but gently. Went in so much better and seems like the caliper will be able to move when it needs to.

This whole process also reminded me that my old rotors were unevenly worn so my original clips just not have been any better. I’m gonna try to keep an eye on it if I ever get to drive it.
 

DirtDonk

Contributor
Bronco Guru
Joined
Nov 3, 2003
Messages
47,841
Paint is not your friend. And Powder coat is definitely the enemy!
You definitely want to carefully dress down those sliding surfaces with a file. Any rust or debris or coatings where the two components meet is to be smoothed down to a good mating surface.
Even when you’re not replacing parts, cleaning and lubricating that area is standard brake maintenance.
In normally dry regions it’s not as big a deal. Usually lubricate it once and it’s clean and smooth most of its life. But too many washings and too long lapses between driving sessions and eventually rust will build up there.

Perhaps the really loose ones have been dressed down too many times.
That or they have stretched under stress.
I’ve never actually experienced one of those (that I know of) but I’ve heard about them especially on the F250 set ups.
Where the big thick cast caliper bracket spreads it’s ears a little bit.
Sometimes actually too much for them to be usable.

Of course, it seems there are also two sizes of twin piston calipers out there too, so another mismatch is possible even with the F250 brakes.
 

Oldtimer

Contributor
Jr. Member with Sr. moments
Joined
Feb 4, 2005
Messages
956
Loc.
Sunnyvale, CA
Photo snipped from u-tube video.
I don't think mine have ever had a gap (indicated by arrow) between retainer and caliper.

retainer gap.jpg
 

DirtDonk

Contributor
Bronco Guru
Joined
Nov 3, 2003
Messages
47,841
I am going to have to go look at mine again to see how they are in that regard.

And speaking of the anchor bolts… Time to talk about that.
Never put them in dry. At least for the final installation. Obviously you could put them in dry while you’re working on things but don’t leave it that way for a long period of time.
They tend to rust in place and snap off when you go to remove them next time.

Either use a very mild thread locker or just go ahead and use anti-seize.
I’ve always used anti-seize and never had one back out yet.
 

ba123

Contributor
Bronco Guru
Joined
Oct 29, 2022
Messages
1,803
Loc.
CA
I am going to have to go look at mine again to see how they are in that regard.

And speaking of the anchor bolts… Time to talk about that.
Never put them in dry. At least for the final installation. Obviously you could put them in dry while you’re working on things but don’t leave it that way for a long period of time.
They tend to rust in place and snap off when you go to remove them next time.

Either use a very mild thread locker or just go ahead and use anti-seize.
I’ve always used anti-seize and never had one back out yet.
You mean the bolt that locks the caliper? If so, I used blue loctite.
 

DirtDonk

Contributor
Bronco Guru
Joined
Nov 3, 2003
Messages
47,841
Over the years, I’d say most of them snapped when people were trying to loosen them, but they were too rusted.
But more often than should be the case, someone puts he-man, kung fu grip Uber-torque into the wrench and snaps it off.
Maybe it’s confusing because it’s got a big head so they forget it’s just this little thing.
Maybe they are just cheap, or overly necked down under the bevel.
I don’t really know. Just that a lot of people have snapped them off.
 

sprdv1

Contributor
REBEL
Joined
Mar 8, 2007
Messages
81,824
When I started filing, it was clear that the ends on this one were much higher:
View attachment 903052
I filed for a bit but got nowhere. Used my dremel with a cylindrical course sandpaper and got it down enough to be happy.
View attachment 903053
I kept measuring along the way. Once happy, I also used that dremel attachment for the caliper bracket and got the paint of those contact points.

Then put some silicon brake grease that came with my pads on both bracket points as well as the top of the spring. I still hammered it in but gently. Went in so much better and seems like the caliper will be able to move when it needs to.

This whole process also reminded me that my old rotors were unevenly worn so my original clips just not have been any better. I’m gonna try to keep an eye on it if I ever get to drive it.

definitely....
 

sprdv1

Contributor
REBEL
Joined
Mar 8, 2007
Messages
81,824
Over the years, I’d say most of them snapped when people were trying to loosen them, but they were too rusted.
But more often than should be the case, someone puts he-man, kung fu grip Uber-torque into the wrench and snaps it off.
Maybe it’s confusing because it’s got a big head so they forget it’s just this little thing.
Maybe they are just cheap, or overly necked down under the bevel.
I don’t really know. Just that a lot of people have snapped them off.
combo of different things for sure
 
Top