


Community
Message Forum
Photo Gallery
Event Calendar
Book Reviews
Bronco Wallpaper
Bronco FAQ
Link Back to CB!
Photo Gallery
Event Calendar
Book Reviews
Bronco Wallpaper
Bronco FAQ
Link Back to CB!
Buy / Sell


Bronco Tech
3 Arm Wiper Setup
Fix Motor Mount
Roll Cage Braces
Throttle Body 65mm
Wheel Alignment
Heat Riser Replacement
Vent Window Repair
Center Console Mount
Straighten Bumper
Ford 6R80 6 spd
More Tech...
Fix Motor Mount
Roll Cage Braces
Throttle Body 65mm
Wheel Alignment
Heat Riser Replacement
Vent Window Repair
Center Console Mount
Straighten Bumper
Ford 6R80 6 spd
More Tech...

Install the app
-
Welcome to ClassicBroncos! - You are currently viewing the forums as a GUEST. To take advantage of all the site features, please take a moment to register. It's fast, simple and absolutely free. So please join our community today!If you have problems registering or can't log into your account, please contact Admin.
You are using an out of date browser. It may not display this or other websites correctly.
You should upgrade or use an alternative browser.
You should upgrade or use an alternative browser.
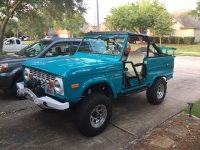
The Saga Begins
- Thread starter The Far Side
- Start date
- Joined
- Jun 19, 2014
- Messages
- 4,026
You may want to throw some new body mounts in before you start squaring everything up and welding it back in.
x2.......
- Joined
- Dec 4, 2010
- Messages
- 961
Hey Far Side, just saw your posts and Welcome Aboard! (or condolences on the addiction!)
I am in Pearland (288 and Beltway) so not far away. TX SS (Scott) has 2 awesome Broncos and his new one has the body off the frame and stripped, so that can be a great resource. I did the ZF-5 conversion 8 years ago and just recently went EFI, so you're welcome to take a look at mine. (never been wrecked and body is mostly untouched)
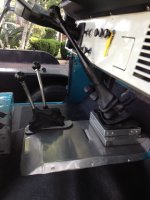
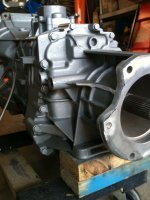
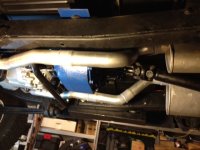
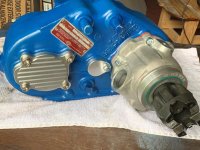
Holler at me when you have a chance and we can meet up for a beer! ;-) I don't have much to offer in the body work dept except for a mig machine and a very sucky welder that I know! Here's some pics for reference if you decide to go ZF-5. (you'll want a 2" body lift for that upgrade) Hope to see you soon!
Cheers, Bill (B2)
713-478-4646
I am in Pearland (288 and Beltway) so not far away. TX SS (Scott) has 2 awesome Broncos and his new one has the body off the frame and stripped, so that can be a great resource. I did the ZF-5 conversion 8 years ago and just recently went EFI, so you're welcome to take a look at mine. (never been wrecked and body is mostly untouched)
Holler at me when you have a chance and we can meet up for a beer! ;-) I don't have much to offer in the body work dept except for a mig machine and a very sucky welder that I know! Here's some pics for reference if you decide to go ZF-5. (you'll want a 2" body lift for that upgrade) Hope to see you soon!
Cheers, Bill (B2)
713-478-4646
Attachments


OP
OP
- Joined
- Sep 21, 2018
- Messages
- 109
Bferrari and rydog.......yeah the plan was to have new body mounts in before the welding. One question. Was considering staggering the amount of body lift to bring the door jam openings into line a bit closer. Anyone every do that? Or is it sacrilage?
Bsquared......yep not far. Will take you up on the beer and the zf install for sure.
Bsquared......yep not far. Will take you up on the beer and the zf install for sure.
Bferrari
Sr. Member
- Joined
- Mar 6, 2013
- Messages
- 856
Bferrari and rydog.......yeah the plan was to have new body mounts in before the welding. One question. Was considering staggering the amount of body lift to bring the door jam openings into line a bit closer. Anyone every do that? Or is it sacrilage?.
It is common to shim the mounts to fine tune the jambs however try putting on the new body mounts first, may fix the issue and you may not need to shim or stagger anything.
- Joined
- Jun 19, 2014
- Messages
- 4,026
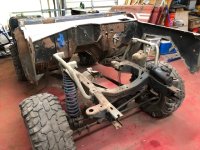
- first is brace the body. Have done a bunch of measurements and looks like the body is slightly bowed (up) in between the door jams. Top measurement is about 3/4" too large. Was not planning on doors but might someday.
- second is remove engine, trans, and transfer case.
- third is weld up sheet metal in front of firewall. Inner fenders, fender wells, radiator support and associated brackets.
- fourth is to replace driver firewall and "adjust" the bad inner fender and kick panel on driver side.
- fifth is to replace windshield cowl and cowl panel.
- sixth, I can start replacing the 5 floor panels OR start on rocker panels. I think I want to leave rockers and do what I can to smooth out and just replace floor pans.
- I do have a rear quarter to replace but that is separate.
I have attached pics. Let me know what you think.
After looking at your pictures I would change your process I would make #4&5 your number #2 then once you get your kick panels and cowel good then go on to #3 in your list as you inner fender aprons,wheel tubs, and core support attach to those kick panels. You may find that once you fix those areas your door jamb area will be easier to fix.
Sometimes a shim (ie flat washer can be added) to achieve that effect if your using a tub from a different bronco or you've replaced the worn out bushings and find things aren't quite lining up afterwards. I'm not sure if youre replacing your striker/door posts or not but if you are you could probably get away with out body mount shims because you'll be making the adjustments by hanging your posts.
This is a passenger side door chart I put together based off measurements from some broncos at Jeffs Graveyard. I'll try finding this other chart that comes with the new tubs on body shim placements to correct door related issues.

Last edited:
OP
OP
- Joined
- Sep 21, 2018
- Messages
- 109
Thanks rydog. Have that for driver but not passenger. Did all my measuring but a few I didn't have references on passenger side.
Bferrari......good point on replacing mounts and see where I stand. I checked them all and there does not appear to be issues or compression (they look fairly new actually). Anyway will see how it looks.
BTW rydog LOL. Just walked in from a few hours continuing the saga and came to the same conclusion you mentioned. Don't think I will replace rockers or windshield cowl. Rockers will be patched and windshield cowl patched and reinforced.
I guess it is normal to go about 3 layers deeper than the original plan. LOL
- Joined
- Jun 19, 2014
- Messages
- 4,026
Bferrari and rydog.......yeah the plan was to have new body mounts in before the welding. One question. Was considering staggering the amount of body lift to bring the door jam openings into line a bit closer. Anyone every do that? Or is it sacrilage?
Bsquared......yep not far. Will take you up on the beer and the zf install for sure.
this chart tells you where to place shims to correct t body issues ...id replaced all mounts first...

OP
OP
- Joined
- Sep 21, 2018
- Messages
- 109
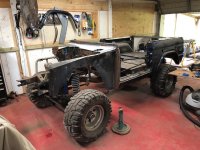
Hey Guys......been awhile since I posted on my thread. Have gotten a lot of disassembly done. Drive train is out and only a few odds and ends still needed to be removed underneath. Also completed the bracing and took all my measurements. From one of the two hits on the passenger rear quarter, the tailgate area wasn't square so it needed a bit of persuasion. Once I got that right and all the door post and jam measurements were checked and mostly correct, I completed the bracing. (had some unused HD fencing materials that I utilized to go with the angle iron so no snarky comments!) So tomorrow is the big day to remove and replace the cowl/windshield support. Just too rusty underneath to salvage. Once that is in, on to the floors and front.
Attachments


OP
OP
- Joined
- Sep 21, 2018
- Messages
- 109
Bump
Not sure why it didn't post.
Not sure why it didn't post.
- Joined
- Mar 8, 2007
- Messages
- 81,756
Bferrari and rydog.......yeah the plan was to have new body mounts in before the welding. One question. Was considering staggering the amount of body lift to bring the door jam openings into line a bit closer. Anyone every do that? Or is it sacrilage?
Bsquared......yep not far. Will take you up on the beer and the zf install for sure.
he got some good stories too
")
OP
OP
- Joined
- Sep 21, 2018
- Messages
- 109
Dirt.......it looks like it did. Still figuring out this site. Thanks
OP
OP
- Joined
- Sep 21, 2018
- Messages
- 109
An Update
Wow......I cant believe that it has been 2yrs since I updated my build. I started chasing rust about then and just got so frustrated that I had to let it sit. Then life got in the way BUT started back a few months ago with smaller things to work on. Figured that if I compartmentalized the build, that it would not seem so overwhelming.
I started off with the heater box. Why? Who knows, maybe it was the first box of parts in front of me. Well it is clean, painted, all new parts and ready for install.
Next, I started blasting, priming, painting, powdercoating the small stuff. Very fulfilling and got to rebox and rename the huge pile of boxes that I already had.
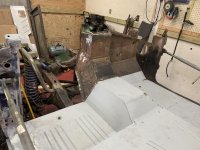
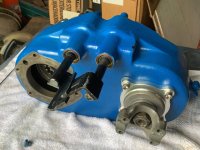
Then one frigid day a couple of months ago, I decided to tackle the Dana 20. Why? Who knows. I never had torn apart a transmission, transfer case, or axle but seemed like a great idea at the time. The funny thing is that you read everything, print everything, watch everything you can and you still need to rebuild it 4 times to get it right. I really feel for the guys that build these everyday. Some guy with small hands that were all nicked up from the sharp edges in the case I guess. Once for me was enough.
Moved on to the drive shafts since they were on the same shelf and the Dana 20. They are all disassembled, cleaned, painted, and all the parts to put back together are bought. Check.
But the elephant in the room just kept growing. Everytime that I looked over at the body sitting on the frame, I felt the weight of the world on me. No mind you, I worked my way through college as a roughneck and a welders helper but that was so many years ago. I am the neighborhood mister fixit but after getting my a** handed to me in cutting out all of that rust, I just knew that my mind needed to be right to dive in. This wasn't a couple of hours here and there, this was like marriage (a commitment). Well last month, I got my mind right, blocked off some days from then through May and dove in. It's not gorgeous work, this wont be a trailer princess. It is my goal for it to hold together, not leak, and not rust for the rest of my lifetime. I WOULD like to put a decent coat of paint on it in the end and at know that I did it all myself.
My wife asks, "why do you do this?", "you really enjoy doing all that?". I guess I do.
Wayne
Wow......I cant believe that it has been 2yrs since I updated my build. I started chasing rust about then and just got so frustrated that I had to let it sit. Then life got in the way BUT started back a few months ago with smaller things to work on. Figured that if I compartmentalized the build, that it would not seem so overwhelming.
I started off with the heater box. Why? Who knows, maybe it was the first box of parts in front of me. Well it is clean, painted, all new parts and ready for install.
Next, I started blasting, priming, painting, powdercoating the small stuff. Very fulfilling and got to rebox and rename the huge pile of boxes that I already had.
Then one frigid day a couple of months ago, I decided to tackle the Dana 20. Why? Who knows. I never had torn apart a transmission, transfer case, or axle but seemed like a great idea at the time. The funny thing is that you read everything, print everything, watch everything you can and you still need to rebuild it 4 times to get it right. I really feel for the guys that build these everyday. Some guy with small hands that were all nicked up from the sharp edges in the case I guess. Once for me was enough.
Moved on to the drive shafts since they were on the same shelf and the Dana 20. They are all disassembled, cleaned, painted, and all the parts to put back together are bought. Check.
But the elephant in the room just kept growing. Everytime that I looked over at the body sitting on the frame, I felt the weight of the world on me. No mind you, I worked my way through college as a roughneck and a welders helper but that was so many years ago. I am the neighborhood mister fixit but after getting my a** handed to me in cutting out all of that rust, I just knew that my mind needed to be right to dive in. This wasn't a couple of hours here and there, this was like marriage (a commitment). Well last month, I got my mind right, blocked off some days from then through May and dove in. It's not gorgeous work, this wont be a trailer princess. It is my goal for it to hold together, not leak, and not rust for the rest of my lifetime. I WOULD like to put a decent coat of paint on it in the end and at know that I did it all myself.
My wife asks, "why do you do this?", "you really enjoy doing all that?". I guess I do.
Wayne
Attachments
- Joined
- Mar 8, 2007
- Messages
- 81,756
Wow......I cant believe that it has been 2yrs since I updated my build. I started chasing rust about then and just got so frustrated that I had to let it sit. Then life got in the way BUT started back a few months ago with smaller things to work on. Figured that if I compartmentalized the build, that it would not seem so overwhelming.
I started off with the heater box. Why? Who knows, maybe it was the first box of parts in front of me. Well it is clean, painted, all new parts and ready for install.
Next, I started blasting, priming, painting, powdercoating the small stuff. Very fulfilling and got to rebox and rename the huge pile of boxes that I already had.
Then one frigid day a couple of months ago, I decided to tackle the Dana 20. Why? Who knows. I never had torn apart a transmission, transfer case, or axle but seemed like a great idea at the time. The funny thing is that you read everything, print everything, watch everything you can and you still need to rebuild it 4 times to get it right. I really feel for the guys that build these everyday. Some guy with small hands that were all nicked up from the sharp edges in the case I guess. Once for me was enough.
Moved on to the drive shafts since they were on the same shelf and the Dana 20. They are all disassembled, cleaned, painted, and all the parts to put back together are bought. Check.
But the elephant in the room just kept growing. Everytime that I looked over at the body sitting on the frame, I felt the weight of the world on me. No mind you, I worked my way through college as a roughneck and a welders helper but that was so many years ago. I am the neighborhood mister fixit but after getting my a** handed to me in cutting out all of that rust, I just knew that my mind needed to be right to dive in. This wasn't a couple of hours here and there, this was like marriage (a commitment). Well last month, I got my mind right, blocked off some days from then through May and dove in. It's not gorgeous work, this wont be a trailer princess. It is my goal for it to hold together, not leak, and not rust for the rest of my lifetime. I WOULD like to put a decent coat of paint on it in the end and at know that I did it all myself.
My wife asks, "why do you do this?", "you really enjoy doing all that?". I guess I do.
Wayne
LOL, when you get her trained to take pics of the ones she sees out rolling around, then you know you got her trained...
- Joined
- Mar 8, 2007
- Messages
- 81,756
Great way to bring us up to date! Transfer case came out great. Don't let the body drive you insane until you get to drive it too.
Thanks for showing us the progress.
Damn sure will try to give a hard time...
Similar threads
- Replies
- 120
- Views
- 17K
- Replies
- 26
- Views
- 3K