• Welcome to ClassicBroncos! - You are currently viewing the forums as a GUEST. To take advantage of all the site features, please take a moment to register. It's fast, simple and absolutely free. So please join our community today!
    If you have problems registering or can't log into your account, please contact Admin.

The what did I get myself into 1971 Restomod - BUILD THREAD

OP
OP
A

Audifan

Contributor
Full Member
Joined
Nov 25, 2018
Messages
250
This week it began...

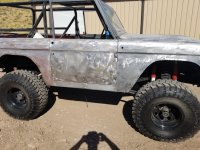
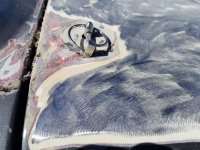
Started on stripping the paint using chemicals on the exterior before taking it apart.

I had no idea what we were going to find underneath the many layers of paint...as it turns out there were 4 different paint colors in addition to the primer, all built up on each other.

Good news is there were no real surprises so far. Minimal surface rust all in locations we already knew about due to paint bubbling. A little blasting and that should all go away.

Next week we'll be stripping the rest of the parts and taking it apart.

The one crazy thing, was there was a TON of bondo on the bronco...but all of it was covering GOOD metal...as an example, the entire hood had been coated in bondo, but when we removed it, the hood was perfect....zero reason for the bondo.
 

Attachments

  • 20190906_160936.jpg
    20190906_160936.jpg
    108.4 KB · Views: 94
  • 20190906_160943.jpg
    20190906_160943.jpg
    127.4 KB · Views: 85
  • 20190906_160954.jpg
    20190906_160954.jpg
    137.4 KB · Views: 91
  • 20190906_161002.jpg
    20190906_161002.jpg
    131 KB · Views: 83
  • 20190906_150551.jpg
    20190906_150551.jpg
    106.8 KB · Views: 78
  • 20190906_161057.jpg
    20190906_161057.jpg
    160.7 KB · Views: 87
OP
OP
A

Audifan

Contributor
Full Member
Joined
Nov 25, 2018
Messages
250
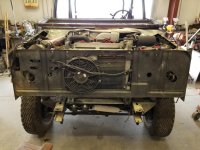
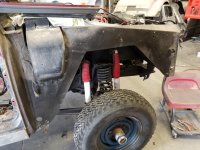
Stripping and tear down continues.So far no big surprises.

The worst rust we've found is in the front door posts where the hinges were, but it doesn't looking like it's eaten through. Will find out soon enough though.

Took the roll bar out today as well.

Starting to look less and less like a bronco the farther down we take her :cry:

But, now I'm excited to start building her back up.
 

Attachments

  • 20190915_144947.jpg
    20190915_144947.jpg
    95.8 KB · Views: 73
  • 20190915_144928.jpg
    20190915_144928.jpg
    129.3 KB · Views: 80
  • 20190915_144840.jpg
    20190915_144840.jpg
    113.3 KB · Views: 76
  • 20190915_144515.jpg
    20190915_144515.jpg
    128.8 KB · Views: 76
  • 20190915_144952.jpg
    20190915_144952.jpg
    129.5 KB · Views: 74
OP
OP
A

Audifan

Contributor
Full Member
Joined
Nov 25, 2018
Messages
250
One of my biggest concerns with the Bronco since day one, was safety for my kids in the back seat.

The bronco is already an old car and not the safest, but throw in some crappy seatbelts and a fold and tumble rear seat with one latch point, and it's even worse.

I had always planned to upgrade to either a modern bench seat with built in child restraints or dual bucket seats in the rear with the same. However, the problem is that there is only 40" to work with between the wheel wells, which really limits your options.

Fellow CB member Cortez managed to fit a 2017 heep bench seat from a JK wrangler in the back of his, but it was a super tight fit even with only a bedliner.

I plan to run bedliner, noico sound deadener, insulation and carpet...meaning I have even less than 40" to work with when all is said and done.

So, we decided to get creative and shave 1.5" off the inside of each wheel well and then re round it to look right. It came out great and does not impact my travel or tires in any way.

Now I have 43" to play with, which is plenty of room for all the stuff I want to put down on the tub and run practically any rear bench or dual buckets that I want.

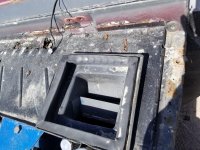
Next up is cutting an access plate door in the bed over the fuel pump.
 

Attachments

  • imagejpeg_0005.jpg
    imagejpeg_0005.jpg
    191.9 KB · Views: 82
  • 20190920_130637.jpg
    20190920_130637.jpg
    125.5 KB · Views: 58
Last edited:
OP
OP
A

Audifan

Contributor
Full Member
Joined
Nov 25, 2018
Messages
250
Welded in some steel bar stock underneath the bed rails. Going to drill and tap the bar stock for the soft/hard top hardware.

Was originally going to use nutserts, but saw quite a few other members who went that route have buckling issues with the thin sheet metal.

Which is why I ran 1.5" x 1/4" barstock down the full length under the rails...hoping that spreads out the pressure and prevents it from buckling. Plus, I'll never have to dick with removing my interior quarter panels to add/remove the soft top hardware ever again.

Also filled in the front gas tank hole, and welded up all the holes from the fender flares so I can start fresh.
 

Attachments

  • 20190920_130830.jpg
    20190920_130830.jpg
    102.8 KB · Views: 71
  • 20190920_130653.jpg
    20190920_130653.jpg
    112.5 KB · Views: 74

Cortez

Bronco Guru
Joined
Jan 29, 2009
Messages
1,193
Audifan, you are in deep now, very impressive the progress you made. I can imagine all the stripping was brutal work, but it will pay off in the end...keep at it.
 

DirtDonk

Contributor
Bronco Guru
Joined
Nov 3, 2003
Messages
48,744
I just noticed that yours is also one of the oddballs with the radio antenna on the passenger side.
Mine was the first I'd ever seen, but since then have seen quite a few more owned by members here. We've discussed it before, but I don't remember if there was ever any consensus reached on why some are like that.
My Marti does not specifically list a radio as being optioned from the factory. Were they listed that way, or was it assumed unless you got a radio-delete instead?
Pretty sure it was an option, rather than a delete, but maybe dealer installed radios often got the odd antenna placing.

Paul
 
OP
OP
A

Audifan

Contributor
Full Member
Joined
Nov 25, 2018
Messages
250
I just noticed that yours is also one of the oddballs with the radio antenna on the passenger side.
Mine was the first I'd ever seen, but since then have seen quite a few more owned by members here. We've discussed it before, but I don't remember if there was ever any consensus reached on why some are like that.
My Marti does not specifically list a radio as being optioned from the factory. Were they listed that way, or was it assumed unless you got a radio-delete instead?
Pretty sure it was an option, rather than a delete, but maybe dealer installed radios often got the odd antenna placing.

Paul

Not sure on mine either. When I took it apart, it sure didn't look like something factory...or well done for that matter.

I've already welded that passenger side hole up, and will be installing the correct, driver side antenna (which I got from you guys) when we put her back together.
 
OP
OP
A

Audifan

Contributor
Full Member
Joined
Nov 25, 2018
Messages
250
Well, we finally found the rust.

The front cowl is eaten through in multiple spots and rather than try and weld in a bunch of patches, I just ordered new cowl pieces from WH.

My windshield frame is also questionable at this point, will be making the decision today as to whether to save it or ditch it, but good news is I have another extra windshield frame and hinge in great condition at my father in laws.

Bad news... snaking those damn wires back through the windshield frame :-X
 

Attachments

  • 20190920_130608.jpg
    20190920_130608.jpg
    158.3 KB · Views: 108
  • 20190920_130704.jpg
    20190920_130704.jpg
    217.7 KB · Views: 98

sprdv1

Contributor
REBEL
Joined
Mar 8, 2007
Messages
81,964
Well, we finally found the rust.

The front cowl is eaten through in multiple spots and rather than try and weld in a bunch of patches, I just ordered new cowl pieces from WH.

My windshield frame is also questionable at this point, will be making the decision today as to whether to save it or ditch it, but good news is I have another extra windshield frame and hinge in great condition at my father in laws.

Bad news... snaking those damn wires back through the windshield frame :-X

good luck.. always gonna be something w/these things
 
OP
OP
A

Audifan

Contributor
Full Member
Joined
Nov 25, 2018
Messages
250
Made a bit more progress on the body modifications...

1. Cut in the access panel over the fuel pump and added some metal to make a bolt on cover. Still gotta tighten it up a bit and going to make up a rubber/foam gasket to on the inside of the cover to help it seal better.

2. Roughed in the new flush mounted fuel door. Had to move it over a bit from the stock location, but I'm pretty happy with how it came out.


Also got the rusted front cowl cover and was excited to get the new sheet metal on...until I got home and saw the box that was delivered from WH. One end of it was smashed in like an accordion and gave the cowl a nice little curl on the drivers side. So, back to WH it goes and they are gonna ship me out a replacement.
 

Attachments

  • imagejpeg_0(1).jpg
    imagejpeg_0(1).jpg
    172.2 KB · Views: 70
  • imagejpeg_0(2).jpg
    imagejpeg_0(2).jpg
    135.9 KB · Views: 84
  • 20190925_083646.jpg
    20190925_083646.jpg
    68.3 KB · Views: 81
OP
OP
A

Audifan

Contributor
Full Member
Joined
Nov 25, 2018
Messages
250
Ripped off the lower cowl today and realized I'd been deluding myself to think the main cowl wouldn't be rustes....it was in fact rusted completely through.

So ordered a new cowl from WH. Good news is that once that's here, we are good to go for bodywork. Everything else is good to go and no more possible rust spots.

Also did some more work on the gas door and the access panel in the bed.

QUESTION:
In the second picture below, you can see some insulation...there was a piece of this insulation laying underneath the lower cowl piece...Is this factory insulation? Should I replace it? If so where do I find it? (I can't find mention of it anywhere.)

Note: this piece of insulation was directly under the lower cowl piece, NOT stuck up underneath the dash.
 

Attachments

  • 20190927_143811.jpg
    20190927_143811.jpg
    106.9 KB · Views: 76
  • 20190927_143956.jpg
    20190927_143956.jpg
    92.9 KB · Views: 82
  • 20190927_143838.jpg
    20190927_143838.jpg
    118.7 KB · Views: 81
  • 20190927_145727.jpg
    20190927_145727.jpg
    142.2 KB · Views: 94
  • 20190927_145743.jpg
    20190927_145743.jpg
    133.8 KB · Views: 82

904Bronco

Contributor
Bronco Guru
Joined
Sep 28, 2004
Messages
5,926
Loc.
San Martin, CA
Yes there was factory insulation on the top/or bottom of the cowl. I have not seen it as thick as yours, usually it is like 1/4" thick. But it could be that it is starting to separate and expanding? after 40-50 years the factory stuff pretty much falls off.
I believe the replacement fire wall insulator that the vendors sell, comes with sections that you can glue (spray adhesive) to the bottom of the cowl.
Having done this once, I prefer to use dyna-mat, boom-mat, or a similar product instead on the fire wall.
 

DirtDonk

Contributor
Bronco Guru
Joined
Nov 3, 2003
Messages
48,744
Speaking of rusty cowls... Is anyone just sealing the dumb things off completely?
I know the argument for "breathing" and all that, but it just seems to me like the venting of the cowl area was not very well thought out and water just gets in and takes it's time to evaporate when not driven regularly. Especially in a moister climate.

Seems to me like blocking off all the upper holes in the engine compartment area would be better. And if you just had to vent it to alleviate that last bit of worry, just open up a couple of holes under the dash.
Sure, if water got into the cowl it would leak into the cabin. But the whole point is to keep it out of the cowl in the first place.
Once dirt and gunk get in, the drying factor is reduced and the rust factor enhanced. If heat intrusion into the cabin is an issue with holes (as if those would make it any worse!) then you could rubber plug them like many body cavities are done.
Then just once a year or whenever the mood strikes, open them up to let it breath for awhile.

Anyone thinking along those lines?
I think we've talked about it before, but don't remember the comments.

Paul
 
OP
OP
A

Audifan

Contributor
Full Member
Joined
Nov 25, 2018
Messages
250
Speaking of rusty cowls... Is anyone just sealing the dumb things off completely?
I know the argument for "breathing" and all that, but it just seems to me like the venting of the cowl area was not very well thought out and water just gets in and takes it's time to evaporate when not driven regularly. Especially in a moister climate.

Seems to me like blocking off all the upper holes in the engine compartment area would be better. And if you just had to vent it to alleviate that last bit of worry, just open up a couple of holes under the dash.
Sure, if water got into the cowl it would leak into the cabin. But the whole point is to keep it out of the cowl in the first place.
Once dirt and gunk get in, the drying factor is reduced and the rust factor enhanced. If heat intrusion into the cabin is an issue with holes (as if those would make it any worse!) then you could rubber plug them like many body cavities are done.
Then just once a year or whenever the mood strikes, open them up to let it breath for awhile.

Anyone thinking along those lines?
I think we've talked about it before, but don't remember the comments.

Paul
I'm all for it. no idea how to go about it.

I'm my completely uneducated opinion, the biggest leak points are...1. the vents in the top of the hood and...2. the water sliding down the windshield and going behind the hood to land on the cowl.

At least thats how it looks to me for the way the most water could get in and then sit.
 
OP
OP
A

Audifan

Contributor
Full Member
Joined
Nov 25, 2018
Messages
250
Yes there was factory insulation on the top/or bottom of the cowl. I have not seen it as thick as yours, usually it is like 1/4" thick. But it could be that it is starting to separate and expanding? after 40-50 years the factory stuff pretty much falls off.
I believe the replacement fire wall insulator that the vendors sell, comes with sections that you can glue (spray adhesive) to the bottom of the cowl.
Having done this once, I prefer to use dyna-mat, boom-mat, or a similar product instead on the fire wall.

I'm planning on using a dynamat type product on the inside of the tub and firewall...sound deadener first, then closed sell thermal barrier over that.

Regarding the insulation in my picture above...the layer that was on top of the cowl and under the lower cowl piece...in terms of replacing that...

Should I or could I just attach some dyna mat or closed cell barrier to the bottom of the lower cowl piece before tacking it on?

Then find another piece of insulation to stick up on the bottom side from under the dash.

Thoughts?
 
OP
OP
A

Audifan

Contributor
Full Member
Joined
Nov 25, 2018
Messages
250
Turned into a rainy day today after kids soccer, so I decided to play with dash layouts in the garage.

Planning on running AC when we redo the dash, and leaning towards going with a Restmod Air system (made by classic), but of course Vintage air is still on the table as well.

Whichever system I go with I will be using digital controls instead of the OEM pull nobs.

The only OEM switches/pulls I will be using is the Wipers And Lights.

I'm also gonna be running a touch screen receiver (found a super shallow one) which complicates layout and fitting everything.

Other items include Rocker switches (which might not wind up on the dash) and a 12V Charger and separate USB charger.

----

So far, my favorite layout is the one with the Ignition, Lights and Wipers over on the far left next to the speedometer.

I don't actually know though, if there is enough room over there on the left for ignition, 2 switches and the accompanying behind the dash components....can anyone confirm this will work?


Ignore the extra "templates" stuck to the top of the dash.
 

Attachments

  • 20190910_161145.jpg
    20190910_161145.jpg
    111.7 KB · Views: 61
  • 20190908_170527.jpg
    20190908_170527.jpg
    105.4 KB · Views: 51
  • 20190908_170054.jpg
    20190908_170054.jpg
    114.9 KB · Views: 53

DirtDonk

Contributor
Bronco Guru
Joined
Nov 3, 2003
Messages
48,744
In my completely uneducated opinion, the biggest leak points are...1. the vents in the top of the hood and...2. the water sliding down the windshield and going behind the hood to land on the cowl.

The windshield hinge area is another point of contention. I was always kind of a fan of leaving the hinge usable, "just in case" you ever wanted to be one of the cool kids and fold it down.
But of the thousands of members here, I wonder just how many have ever even tried it, much less done it regularly? Maybe less than 10 of us?
I rode in one once that way and decided I'd never do that again!

So now I'm a fan of literally filling the hinge cavity with sealer instead of relying on the rubber seal which only keeps water from obviously getting inside the cabin. But not from sitting in the area surrounding the hinge.

Most Bronco cowls have one or two breather (gaping!) holes in their extreme ends. Right where water is virtually guaranteed to get inside the cowl. Closing them off would be a simple matter while you're building a new cowl. Just weld two small rectangles (roughly rectangle anyway) over them and done. Or in most of our cases where we're not welding, just glue them in place with silicone sealer and they're probably good for decades that way.

I've never had a leak through the vent that was visible, but can't say water did not get between the pieces from that point.
Basically though, if you see those rectangular breather holes out near the fender line, plug 'em up.

Paul
 
OP
OP
A

Audifan

Contributor
Full Member
Joined
Nov 25, 2018
Messages
250
Most Bronco cowls have one or two breather (gaping!) holes in their extreme ends. Right where water is virtually guaranteed to get inside the cowl. Closing them off would be a simple matter while you're building a new cowl. Just weld two small rectangles (roughly rectangle anyway) over them and done. Or in most of our cases where we're not welding, just glue them in place with silicone sealer and they're probably good for decades that way.

Paul

Are these 2 holes in the windshield frame cowl panel...this part:
https://www.wildhorses4x4.com/product/Windshield_Frame_Cowl_Panel/Bronco_More_Steel_Body_Parts

or a different piece?
 
Top