• Welcome to ClassicBroncos! - You are currently viewing the forums as a GUEST. To take advantage of all the site features, please take a moment to register. It's fast, simple and absolutely free. So please join our community today!
    If you have problems registering or can't log into your account, please contact Admin.

Tips and Tricks on Getting the Transmission re-installed

clinem03

Full Member
Joined
Sep 9, 2017
Messages
400
Specs - Stock 302 and 3 speed Transmission and T-case (j Shifter) on a 76 Wagon.

I recently pulled my Transmission to have it rebuilt and am planning to reinstall it myself. Figured i'd kick off a discussion to see if anyone has any good tips on getting it back in? It was a project to get it out, but splitting up the trans and t-case made it a bit easier. The biggest challenge I had was getting the support bar under the transmission/t-case off and then lowering it all down. If I dropped it straight down on the transmission jack with the support bar on, it wouldn't clear my dual exhaust pipes. My plan to get it back in is to have the transmission and t-case strapped down on my transmission jack as a single unit, then loosely bolt one side of the support bar to the transmission, so I can swing the other side around to clear the exhaust pipes then swing it back around to get it to rest on the two mounts on the frame, then slide the whole trans forward into place.

What am I missing? Any ideas/tips to help make this an easier project? Any tips on getting the J shifter into position?
 

BanditBronco

Sr. Member
Joined
Jul 2, 2008
Messages
690
I would recommend mating it to the engine first while still on the transmission jack. Usually you have a lot more available side to side movement that way. One thing I have learned over the years of wrenching is; if it is in the way, take it out. You will come out ahead rather than fighting two exhaust pipes for two hours.
 

Broncobowsher

Total hack
Joined
Jun 4, 2002
Messages
35,007
Make sure you lock the transmission in gear with the transfer case removed. Or you get to rebuild the transmission again as the main shaft pulls out.

New clutch? You did use the alignment tool that comes with most clutch kits? Hint that often gets overlooked on those tools. The tool is mass produced and is a bit sloppy in tolerances. If you put just the disk and the too up on the flywheel you can wiggle the tool around and move the disk a little bit on the flywheel. Not a lot, maybe 1/16" up and down. The trick is to lift up on the tool a little bit and center the disk in the play as you put the pressure plate on. Yes, that is a pain to do. Often you can have the pressure plate in place and all the bolts loose and still wiggle the tool around and center the disk. The end result is the tool slides in and out without binding. Not force the tool in and out. That little plastic tool will flex and has more play than the real transmission it is mocking up. If you want the real transmission to go in smoothly the tool has to come out smooth.

I've done it both ways, I find the bellhousing on the transmission loaded with the throw out bearing and clutch fork is the better way of doing it. I always struggle trying to feed the transmission through the throw out bearing without it falling off the clutch fork if the bellhousing is on the engine first.
 

Rustytruck

Bronco Guru
Joined
Feb 24, 2002
Messages
10,875
You will need to change the clutch pilot bearing first. you will need to fabricate the tool for the shift linkage. diagram for the shift linkage tool is in the factory service manual. you will also nee a clutch alignment tool if it doesnt come with your clutch kit. make sure you take the flywheel in to be resurfaced. when you bolt it up to the crank use red loctite. you need to seal the threads anyway. replace the crank shaft seal the less leaks you have the better off you are. look up the instructions for the shift linkage you are using now is the time to get all the worn bushing replaced especially the column shifter that is 50 years old. all these little bits and pieces are important and easier done while the tranny is out. go over the drive shafts with a fine tooth comb, replace anything that is suspect. When you pulled the transmission, did the spud shaft stay in the transfer case if not make sure you count the 13 roller bearings in the cup where the spud shaft goes in. hold them in place with grease. always replace the double lip seal where the spud shaft rides every time the transfer case is removed. you don't want it leaking right after you just replaced the tranny. The transfer case is very heavy and very off valence you drop it and get pinched under it you may loose a didget it or 2 so take every precaution. make sure the rubber doughnuts that support the transfer case are in good shape. the replacement poly ones are better. That should keep you out of most trouble.
 

DirtDonk

Contributor
Bronco Guru
Joined
Nov 3, 2003
Messages
47,787
Sounds like you’re at a disadvantage with the dual exhaust. If you think you can get it up that way though, more power to you.
Personally I never put them in the vehicle bolted together. Just too much weight and awkwardness on a regular jack. But if you do have a transmission jack that can hold the assembly tight that’s a big advantage.
The transfer case really wants to twist things and get in the way.

But the main thing relates to what was just said about clutch alignment.
If your transmission goes in all but 3/4 of an inch to the end, never pull it up the rest of the way with the bolts. If it’s a quarter inch or less, you’re probably there and can use the bolts to get it the rest of the way.
I’ve just learned never to do it with bolts because when everything is lined up correctly, the transmission will pop right up to the bell housing with no resistance.

With the transmission almost seated, but not wanting to go the rest of the way, be prepared to somehow release the clutch so the disc can float and realign itself.
Once you can do that the transmission will just pop right in the rest of the way.

To that end, have something handy that you can apply extra leverage to the release fork with.
If you can push the clutch fork just like you would by using the clutch pedal, that will be enough to get the transmission that last little bit.
 

Oldtimer

Contributor
Jr. Member with Sr. moments
Joined
Feb 4, 2005
Messages
949
Loc.
Sunnyvale, CA
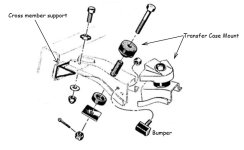
The cross memeber supports are bolted to frame rail (originally).
I removed them, installed tranny and transfer mated together, install cross member to transfer, and then supports to frame/crossmember.

I also cut the heads off of two long bolts and threaded them into top holes in bell housing to help guide the assembly into place.
Used transmission jack, and a 4x4 notched to support assembly in proper orientation, to install.

2022-08-15_095319.jpg
 
Last edited:

DirtDonk

Contributor
Bronco Guru
Joined
Nov 3, 2003
Messages
47,787
That sounds like a good method. The crossmember gives you a lot of leverage to twist things around if needed.
 

pcf_mark

Bronco Guru
Joined
Jun 11, 2010
Messages
3,590
You have some great advice above and I'll add my two cents. Put two small studs into two engine block bellhousing bolt holes that stick out 1 - 2" with nice rounded ends to act as guides to orient and support the trans as it is going in. I also agree the t-case is too much weight in a really bad place (far back and off to the side) to install together. Also may be helpful to have two jacks. I angled my engine down a few more degrees using a bottle jack on the balancer while you work the trans into place with the other jack.
 

DirtDonk

Contributor
Bronco Guru
Joined
Nov 3, 2003
Messages
47,787
Good call on tilting the engine. I always had to do that.
Especially with no body lifts.
 
OP
OP
clinem03

clinem03

Full Member
Joined
Sep 9, 2017
Messages
400
Awesome, advice everyone - thank you! I already replaced the clutch and flywheel about 3-4k miles back, so its already on the back of the engine and set properly...thankfully I wont have to tackle that as well.

After reading through your tips, it seems I should leave the cross member off until I can get the trans past the dual exhaust pipes...then add it for leverage to get the trans fully seated. I ordered all new parts bumpers and plan to blast and spray the cross member so its looking fresh too. Will keep you all posted when I get it back in after its rebuilt.
 
OP
OP
clinem03

clinem03

Full Member
Joined
Sep 9, 2017
Messages
400
I would recommend mating it to the engine first while still on the transmission jack. Usually you have a lot more available side to side movement that way. One thing I have learned over the years of wrenching is; if it is in the way, take it out. You will come out ahead rather than fighting two exhaust pipes for two hours.
This is such great advice. I realize now I should have removed the exhaust when dropping the trans
 

SteveL

Huge chevy guy
Joined
Jun 24, 2001
Messages
11,680
Loc.
Hawthorne ca
The cross memeber supports are bolted to frame rail (originally).
I removed them, installed tranny and transfer mated together, install cross member to transfer, and then supports to frame/crossmember.

I also cut the heads off of two long bolts and threaded them into top holes in bell housing to help guide the assembly into place.
Used transmission jack, and a 4x4 notched to support assembly in proper orientation, to install.

View attachment 887107
Using a couple headless bolts as guide studs makes a world of difference getting it lined up and easily slid into the clutch assembly. Then after you put the other bolts in place remove your guide bolts with some channel oaks and replace with bolts. Also take some measurements before making your guide bolts. You want them plenty long but if they're too long you get interference with a crossmember or something trying to get the tranny level to slide in.
 

fuzzball

Newbie
Joined
Sep 21, 2011
Messages
4
I bought a 4 point jack adapter from 911 Motorsports, and it made installing the trans and t-case very easy. A little pricey but well worth it. I bought the extra attachments and use it to easily install doors by myself, bumpers, rearend, etc.. It makes easy work of just about anything.
 

1970 Palmer

Full Member
Joined
Mar 2, 2020
Messages
455
Using a couple headless bolts as guide studs makes a world of difference getting it lined up and easily slid into the clutch assembly. Then after you put the other bolts in place remove your guide bolts with some channel oaks and replace with bolts. Also take some measurements before making your guide bolts. You want them plenty long but if they're too long you get interference with a crossmember or something trying to get the tranny level to slide in.

The helper guide bolt length is very important as stated. Too long or too short will not work.

It also helps to cut a screwdriver slot in the end of the bolt. This will allow for easy removal after you have it in place. Use a cutoff wheel or just a hacksaw cut.
 

Insayn

Newbie
Joined
Jul 19, 2020
Messages
10
I laid the transmission only on my chest and benched it up to the flex plate. I used my legs to help hold it up. I had my son push it towards the engine and the alignment studs...when I lined it up and he started a bolt. What was a pain in the a$$ was the top bolt of the transfer case mount when installing.
 

Jdgephar

Bronco Guru
Joined
Sep 25, 2012
Messages
1,333
Harbor freight hydraulic lift cart. Shim the transmission and transfer case with 2x4s to sit level. Get it in position, raise it up, and roll it straight in. With my lift and tires, I don't need jacks on the Bronco and it all clears the frame and body on the cart when lowered.

Sent from my SM-G981U using Tapatalk
 

.94 OR

Bronco Guru
Joined
Jul 5, 2009
Messages
1,734
I installed mine as a mated pair using an ATV jack that I made a wooden platform on. I used a small car scissor jack under the T-case to lift and hold it into place and it worked to rotate the assembly once in position to slide on the guide pins. This method was narrow enough to slide up between my dual exhaust and had wheels so it could roll into position. One man show here so I had to get creative.
 

Attachments

  • 1018474_x800.jpg
    1018474_x800.jpg
    36.9 KB · Views: 10
OP
OP
clinem03

clinem03

Full Member
Joined
Sep 9, 2017
Messages
400
I installed mine as a mated pair using an ATV jack that I made a wooden platform on. I used a small car scissor jack under the T-case to lift and hold it into place and it worked to rotate the assembly once in position to slide on the guide pins. This method was narrow enough to slide up between my dual exhaust and had wheels so it could roll into position. One man show here so I had to get creative.
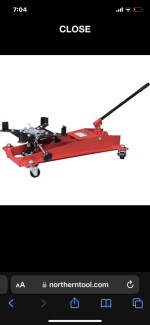
Do you have a pic of how you set this up? I picked up the Pittsburgh trans jack and would like to set it up with a wooden platform as well so I can install it in one piece.
 

Attachments

  • 4030349A-9413-4187-82B4-5E50804A42ED.png
    4030349A-9413-4187-82B4-5E50804A42ED.png
    136.4 KB · Views: 8

Jdgephar

Bronco Guru
Joined
Sep 25, 2012
Messages
1,333
Had to pull mine today. Piece of cake by myself and a harbor frieght lift cart..

690b20cb15503818e5e4ca63fecc79bd.jpg
897617a4a0acf6a86498cbcbc28ac808.jpg
8e3934356ce449c076a4c84172b4580d.jpg


Sent from my SM-G981U using Tapatalk
 
Top