• Welcome to ClassicBroncos! - You are currently viewing the forums as a GUEST. To take advantage of all the site features, please take a moment to register. It's fast, simple and absolutely free. So please join our community today!
    If you have problems registering or can't log into your account, please contact Admin.

Tom’s T-style Steering Conversion - Tie Rod Question

jeffncs

Contributor
Sr. Member
Joined
May 4, 2004
Messages
1,220
Loc.
Raleigh, NC
I have the 76/77 T-style steering linkage kit from Tom’s Off-road. I installed it maybe 6 months back with rough adjustments while the truck was getting built. I left everything loose for the shop to final tighten, align, etc. (trailer ride to the shop, not driven)

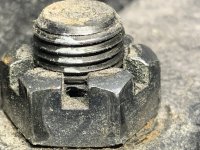
I decided to tighten the tie rod castle nuts and add the cotter pins since the shop doesn’t need to touch them during install but I ran into a problem. The cotter pin holes are too low on the threaded pin coming through the steering knuckle. In other words, the hole is not accessible for a cotter pin to pass through. I have since stripped the threads of both outer tie rods trying to get the castle nut down enough so the cotter pin hole is accessible.

Complicating my situation - I have NO CLUE for the tie rod part numbers to replace them. Any one help me out here?

I know it’s a 77 EB D44 housing with the stock knuckles. Do I need to ream the knuckle?

Thanks to all for the help!

@tomsoffroad76
 
Last edited:
OP
OP
jeffncs

jeffncs

Contributor
Sr. Member
Joined
May 4, 2004
Messages
1,220
Loc.
Raleigh, NC
Here’s a pic. If you look closely, you’ll see the top of the cotter pin hole. That’s as far as the castle but will go. The threads on the tie rod stripped getting it to this point.


IMG_2886.jpeg

IMG_2885.jpeg
 

DirtDonk

Contributor
Bronco Guru
Joined
Nov 3, 2003
Messages
48,743
I am so sick about seeing these problems with modern parts. Doesn’t seem to matter anymore who makes them. They’re all suspect!

But don’t compound any more problems. Don’t talk about reaming out for something else, when all you did was strip the threads on the correct part.
Unfortunately, you should’ve stopped while you were ahead. Yes you can torque a little over spec to line things up but it’s pretty obvious that this one was never gonna make it.
In cases like this, you stop while you’re ahead and leave it at the correct torque and drill a new hole.
Not necessarily right through the existing location, but in another castellation. Perhaps 90° offset from this one.
If you’re going to continue to use the stock linkage, there’s nothing for it but too get new ones.

Scratch that. Perhaps you can remove the nuts and save the threads. Have you removed them and taken a look to see how bad they are?
Are you sure they’re stripped, and you’re not just experiencing the typical spinning stud?

And just so that we’re all on the same page, can you shoot a picture of your entire linkage? Or the very least a link to Tom’s part on their site?
 

DirtDonk

Contributor
Bronco Guru
Joined
Nov 3, 2003
Messages
48,743
By the way, did you make sure to clean out the holes before you push the tapered studs up in them?
Were they hanging loose all this time, or were they at least seated in the taper?
 
OP
OP
jeffncs

jeffncs

Contributor
Sr. Member
Joined
May 4, 2004
Messages
1,220
Loc.
Raleigh, NC
Hi @DirtDonk . Thanks for the response. I never considered drilling new holes. I always thought that the holes were set in a pre-defined spot by design.

The holes were clean and free of bits, etc.

I’m clear and will just order new tie rods as this is clearly my fault.

Also - I wasn’t blaming Tom’s. I knew I messed up by overtorquing but also wanted to see if by chance the holes were in the wrong spot as I’ve never run into this situation with all the cars I’ve worked on / built over the years
 

Brush Hog

Contributor
Jr. Member
Joined
Mar 16, 2022
Messages
149
Loc.
NorCal
I just installed a 3 way adjustable tie rod/drag link from wild horse. When I was torquing down the castle nut on the knuckle I was having to go way to far to get the cotter pin in. I took the castle nut off to see what I was doing wrong. On closer inspection of the tie rod end I noticed a second cotter pin hole 90 degrees off set from the one I was trying to uses. And it was several threads higher up. Both ends had 2 sets of holes pre drilled. Just didn’t see them.
 
OP
OP
jeffncs

jeffncs

Contributor
Sr. Member
Joined
May 4, 2004
Messages
1,220
Loc.
Raleigh, NC
I’ll buy a couple new tie rods and look for the second pin hole. If none exist, I’ll drill them.
 

DirtDonk

Contributor
Bronco Guru
Joined
Nov 3, 2003
Messages
48,743
Yours is also an interesting case from the low location of the hole.
Hopefully you end up finding a second hole already, which will at least answer your question. but one of the issues that comes up now and then and I think it came up just a few weeks ago is that the hole is too high.
The last one was even above the slots in the nut! They had to use a thick washer if I remember.
I wonder if he also had a second hole that we didn’t see.
 

Jdgephar

Bronco Guru
Joined
Sep 25, 2012
Messages
1,357
I think these are the tie rod ends used in the conversions. Measure yours and make sure though.

2x - ES2011R (80s Chevy Truck application)
Length: 4.120
Rod threads: 1.0-18R


There are others that will likely work if you need:

ES2914r | Front Right Outer Tie Rod | Ford E-250 Econoline 78-91
Length: 5.46
Rod threads: 1.0-18R
Small Taper: 0.615
Large taper: 0.72
Stud: M14-1.5
Taper Delta: 0.105

ES3009r | Front Left Outer Tie Rod | 1988-1997 Ford F-350
Length: 5.37
Rod threads: 1.0-18R
Small Taper: 0.613
Large taper: 0.723
Stud: M14-1.5
Taper Delta: 0.110

ES2396r | Front Right Outer Tie Rod | 1989-1996 Ford F-250
Length: 5.36
Rod threads: 1.0-18R
Small Taper: 0.594
Large taper: 0.703
Stud: M14-1.5
Taper Delta: 0.109
 
Top