Coil Spring Retainers
Tech article by admin and filed under SuspensionTech article by Tim Bowsher (Broncobowsher)
When changing those front springs, you will probably encounter a small problem. This is a simple way to install the bolts back into the retainer. The bolt on top of the spring tower is easy to start. The one on the side is a little more difficult.
What you will probably find is the bolt holes don’t line up and you can’t get the bolt started. Here is what you do to install that bolt. Don’t just leave it out.
|
|
This is what you are likely to find. Just start the bolt on top and tighten it about ½ way. It will need to be loose to get this one started. |
|
|
Take a big screwdriver and stick it in the holes. The biggest screwdriver that will fit, the better. An alignment bar works the best, but I didn’t have one. |
|
|
Pry the retainer up to align the holes. This is almost too obvious. But it is important before the next step. |
|
|
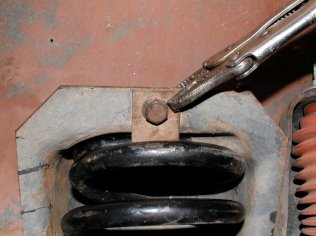
Vice grip the spring retainer to the spring tower. This will keep the holes aligned so you can….. |
|
|
Remove the screwdriver. |
|
|
The holes are now aligned and you can install the bolt. After the bolt is installed, remove the vice grips. Tighten the bolts and you are done. W |


April 9th, 2014 at 10:12 pm
Perfect. I am just abou to do mine!
June 17th, 2014 at 3:14 pm
Very easy & useful tip! Thank-You.