


NV 3550 Install
Tech article by MarsChariot and filed under - Manual, TransmissionTech article by Larry C. (MarsChariot)
General Comments
The following comments are based on my experience installing a complete Advance Adapters NV3550 5-speed conversion kit into a ’71 Bronco in the summer of 2002. The conversion is a perfect fit and is not particularly difficult. It requires almost no modifications or fabrications, almost as though it was designed for the early Bronco. No drive line modifications are required since the complete assembly is within 1/4 inch of the original transmission/transfer case length, the shifter is perfectly located in the center of the transmission tunnel, and the gearing is better suited for the multi-purpose Bronco. To further emphasize how simple the conversion is, I should mention that although I have done a lot of general and heavy maintenance on my Bronco over the twenty-five years that I have owned it, I have never before dropped the transmission myself nor have I done a clutch job myself. Yet I did the whole conversion in my garage with a simple transmission jack and had no significant problems.
Advantages of the NV 3550
The NV 3550 conversion came on the market in 2001 just as I was looking for a way to get an overdrive. So I must have been among the first to do the conversion. When I saw the NV 3550 it was instantly clear that this was the answer after all those years of not really liking the existing options. I selected the NV3550 over the NV 4500 because I did not desire the mass or size of the 4500, nor do I do a lot of rock crawling, nor did I care for the excessive body modifications necessary to install one. The NV 3550 is almost a direct replacement and is also a much better fit for the compact size and weight of the Bronco. More importantly, having lived with a granny low previously, I can attest that dragging a “dead” first gear around and driving what is effectively a three speed for 90 per cent of trail and street driving is no fun. So the NV 4500 just did not appeal to me at all. The 4:1 first gear on the NV3550 is lower than the first gear in most transmissions (usually 3:1), so it provides some additional low gear “grunt”, yet it is very usable in town and an added benefit on most trails where the 3:1 first gear of the typical transmission is not quite slow enough for most situations. For that one to five percent of the time that you really need to crawl, the Dana 20 low range (2.46:1) is pretty low and when combined with the 4.01:1 NV 3550 first gear nets a respectable 40:1 crawl ratio for a 4.11:1 rear axle as in my case. If you are doing competition rock crawling, get a set of Dana 20 ultra low crawler gears and keep your drive shafts, floor boards, and drive train weight intact. The fifth gear in the NV 3550 is 22 percent overdrive which is a better match for the typical 302’s torque range at highway speed than the 27 percent overdrive on the other option.
All around, the NV 3550 is one of the cleanest early Bronco transmission conversions ever to come on the market and lives quite happily behind the typical 302. It exceeds the old NP 435 for simplicity of fit and overall clean appearance without unnecessary modifications or weigh. The installation is about as simple as it gets. It is as though the NV 3550 was designed with the early Bronco in mind. It will carry a lot of early Broncos well into the 21 st century.
The NV 3550 is a new five-speed transmission that was introduced in 2000 as standard equipment in the Jeep Wrangler and, recently, for the Jeep Liberty. The gearing is as follows:
| Gear | NV 3550 | Stock 3 spd |
| 1st | 4.01 | 2.99 |
| 2nd | 2.32 | 1.77 |
| 3rd | 1.40 | 1.00 |
| 4th | 1.00 | |
| 5th | 0.78 | |
| Reverse | 3.57 |
The weight is 97 pounds, which is only about 15 pound more than the stock three speed. It ships new from Advance Adapters fully filled with a special standard transmission fluid that is also available from any Chrysler dealer. Mine arrived in a cardboard box packed in foam, not on a wooden platform, so I was shocked when I found that I could hand carry it into the garage. That is how light it is. Yet the transmission is fully rated for the torque of the standard and slightly modified 302 and for the weight of the early Bronco. The kit is priced at $2178.00. With a twin-stick transfer case kit, Centerforce clutch, new carpet, and premium exhaust system that I installed while doing the conversion, along with other miscellaneous replacements and clean ups, the whole project cost came to $3600.00. You would spend that just installing the basic NV 4500 set up without the drive-line and exhausts costs.
How Well Does the Transmission Work?
The transmission is an excellent match to the Bronco. First gear is used routinely just like the original, but with less clutch slipping and quicker off the line starts. Second gear is slightly higher than the stock first gear, so starting in second is an option. The first gear is just low enough that you no longer need to slip the clutch for all those little daily driving situations like pulling into the garage or a parking space. And you can crawl just enough slower on the trail to avoid excess clutch slipping for the small obstacles that you encounter on side dirt roads. If I really want to slow down, I snick the rear axle transfer case stick into low, and instantly I am crawling slower (4.01x 2.46= 9.9:1) than if I had a granny low. Unless you are really into rock crawling, a 4:1 ratio is a much nicer ratio for daily and trail use than a granny low or the typical 3:1 of most transmission first gears. Fifth gear is even more important these days. With highway speeds routinely posted at 75 mph, most of us need overdrive just to drive on the local freeways and certainly when traveling outside the city. With 4.11 gears in my Bronco I am now doing the same rpm at 75 mph that I formerly did at 58 mph! Fifth gear is like instantly dropping in a 3.20:1 rear axle for the highway, but keeping the 4.11 for everything else. Cruising all day at 75 mph is not a hardship. For comparison, my wife’s ’73 Bronco (yes, a two Bronco family) has a 3.50 rear axle, C-4, and 2 inch larger tires and turns over just under 100 rpm more at 75 mph. Sustained speeds of 80 mph on the highway are common now, and with a 4.11. Incredible.
Although the engine speed is way down, things are still spinning smartly underneath, so any rotational balance issues will become apparent. My experience tells me that tired wheel bearings are a common source of vibration, so new ones are a great asset in reducing strange vibrations. The wind is now moving past all the corners on the Bronco body at a bit of a clip. So 75 mph, while much less frantic-sounding, still generates a few more decibels than optimal. But it is now possible to move with the traffic without excessive RPMs.
The transmission shifter is much better located than any previous Bronco conversion because it emerges from the transmission tunnel almost exactly in the center of the tunnel, the handle is shorter than most the other conversions, right where the hand expects a shifter to be, and all floor-board cross-members remain untouched. Altogether the fit and finish of the Advance Adapter NV 3550 conversion is very professional and clean. It cannot be too highly recommended.
The Advance Adapters kit is very complete and includes the following:
| Qty | AA Part No. | Description |
| 1 | 26-3550 | New NV 3550 transmission |
| 1 | 716000 | NV 3550 transmission mount kit |
| 1 | 716050K | Shifter knob |
| 1 | 716099 | Shifter handle |
| 1 | 51-9920 | Special Dana 20 adapter plate |
| 1 | 52-0209 | Special spud shaft 23T internal |
| 1 | 715544 | Shifter linkage bracket |
| 1 | 716223 | Bearing retainer |
| 1 | 716312 | Ball bearing |
| 1 | 716455 | Snap ring |
| 1 | 716513 | Gasket |
| 1 | 716517 | Gasket |
| 1 | 716713 | Seal (C/R 18676) |
| 1 | 716714 | “O” ring |
| 6 | 723704 | 3/8″ lock washers |
| 4 | 723722 | 3/8″ – 16×1-1/4″ long HHCS |
| 2 | 723723 | 3/8″ – 16×1-1/2″ long HHCS (shifter braket bolts) |
| 6 | 723729 | 3/8″ – 16×1-3/4″ long SHCS |
| 1 | 711544 | Bell housing adapter plate |
| 1 | 716122 | 0.750 pilot bushing |
| 9 | 729930 | Transmission bolts – SHCS 10mmx 1.25x30mm |
| 4 | 724317 | SHCS 7/16″ – 14×1-1/4″ bolts |
| 1 | 383735 | 11″x1-1/8 10 spline clutch disc |
| 1 | – | Instruction sheet |
Comments on the Transmission Conversion and Installation Process
The NV 3550 is slightly taller than the stock transmission, so one inch of extra clearance in the form of a one inch body lift is really necessary. Otherwise, the NV 3550 requires only that a hole be cut in the center of the transmission tunnel for the shift tower. First I will discuss the benefits of a 1 inch lift, followed by a short discussion of how to install one, and then details of the NV 3550 installation.
Body Preparations
My Bronco is an uncut 1971 Sport Model that I have had since 1977, so I looked carefully into any modifications that would be necessary before committing to the task. I first examined just what this would entail and what this might affect by going around the Bronco and carefully noting just what would be involved and what would be changed. This turned out to be one of the greatest benefits of the whole project. A 1 inch lift:
- Is hardly noticeable at the bumpers or wheel wells, but actually gives a little more “stance” to the stock look (see Figure 1).
- Provides enough clearance that you can reach the upper starter bolt from the side; also the rear lower reflectors now have 1 1/2 inches from the bumper instead of the 1/2 inch finger pincher of the stock lift; you can stick your hand ont the top of main tank (there are various reasons why you may want to do this)
- Does not adversely stretch the gas tank rubber connections (although I installed new ones for general ease of fit and better flex).
- Gives you 1 inch more clearance under the hood!! No more air cleaner just rubbing the inside of the hood. And, since I had installed an MSD Pro Billet distributor with a Digital 6A ignition, I gained much needed clearance between the distributor top and the hood.
- Brings the radiator fan into the center of the radiator, whereas it was slightly below the radiator before.
- Moves the lower radiator hose off of the frame where it was always rubbing before.
- Moves the auxiliary tank up above the frame (since the aux tank is attached to the body) providing more clearance for the tank overall.
- Gives a more generous clearance between the drive line and the body, which is fairly close in stock form; and between the exhaust pipe and lower body in rear.
- Restores the vehicle to level; the rear set of mounts are actually quite flattened over the years; once the old mounts were replaced, my Bronco actually tipped to the front slightly whereas it was tipping to the back!
- Locates the shift tower precisely at the level of the tunnel surface.
In short, my recommendation is that even if you don’t do this conversion you would benefit from a 1 inch body lift. It is the body spacing that the Bronco should have come with out of the factory. Why not go with 2 inches while you are at it? A 2 inch lift is o.k. but starts to look like a lift and approaches the limits of the gas tank filler hoses and begins to move things like the radiator higher than nominal. At three inches the body is on “stilts” with corresponding harmonics.
The body lift was in fact the hardest part of the conversion, but only because the old body mounts are nearly impossible to remove in any elegant manner. Experienced advice on the details of the removal and installation (which are not supplied by the kits!) would have helped immensely, so some pointers here will save a lot of head scratching. First, one inch lifts are not common, but Wild Horses has a complete kit. The old mounts have large washers on the outside of the rubber mounts that are pressed together via a spacer that connects the two halves. So just removing the body bolts does not loosen them. The body bolts on even a Southwestern Bronco are old and slightly rusted in, so a big 1/2 pull handle and much penetrating oil is the best way to start with loosening the bolts. There are eight mounts. Of course all the interior floor covering must come out, but this is a good time to do a once-over on the floors and paint any rust, etc.
Once the bolts are removed, the lower part of the metal halves on the outside of the mounts must be either cut off or, as I did, grabbed with a pair of Vise Grips and worked back and forth until a large segment of the lower half of the washer is broken off. Those possessing both a Sawzall and great skill in using it may opt for the saw approach. Continue around the lower washer until there is nothing but a nub of mangled metal. Then massage the remaining ragged part to something round so that when you get to the next step below, the spacer can be pushed up through the middle of the mount to free the upper half. This must be done for the front, foot well and back ones. The ones just behind the seats in the center of the body appear not to be pressed together, which is fortunate since the space and angle are really tight for the human hand. These two come right apart once the through-bolt is removed probably because they are in the center of the body out of harms way and therefore tend to be the least rusty. Caution: There is a hole in the frame just beneath this set of mounts. Put tape or cardboard over the hole before you start and until the new ones are in place or you will lose something down the hole where it will reside forever inside the frame. The rear mounts are accessible by removing the rear bumper, but are least accessible for the vise grip trick and really require a hack saw or equivalent along with a little jacking to provide clearance for the saw blade in order to remove them.
Now comes the part where you actually remove the old mounts. Loosely install the bolts again on one side and place a jack under the rocker panels on the other side (use a block of wood to distribute the load) and jack up the side an inch or two to provide room to remove the old mounts from the top of the frame.
When the lift is done, the clutch linkage-to-pedal rod must be lengthened (Wild Horses has an adjustable one) and the throttle bell crank-to-pedal linkage must be shortened or otherwise slightly modified to accommodate the lift of the body with respect to the engine. The steering column mounts and its cover plate should be loosened before the lift and re-attached, as should the gas tank filler hose. The same steering column mount holes line up for a 1″ lift with no strain. That’s about it. Patience and care is the key for the whole operation, but pays in the end.
Installing the NV 3550 Transmission
The Advance Adapter instructions are a bit terse, but are fairly clear and easy to follow. Basically they involve (1) preparing the bell housing and its adapter, (2) preparing the Dana 20 spud shaft assembly, (3) preparing the Dana 20 adapter, (4) installing the shifter bracket, (5) making a hole in the floor for the shifter handle, and (6) installing the new rear cross-member. Since a new 10 spline clutch is used, I also installed a Centerforce stage 1 pressure plate. While the bell housing was off I also installed a new rear engine seal to help the clutch life a little, installed a new oil pump, and cleaned and painted the oil pan. Likewise with the bell housing and transfer case off, and given the down time between major operations, they both got cleaned, painted, and re-bushed, as did the clutch equalizer bar, drive shafts, and other miscellaneous parts, all of which added up to more time than the transmission installation alone.
Rather than re-produce the AA instructions, the following is a short summary of some of the questions that I had before the installation and that I resolved during process:
- In the instructions, a grinder is specified to modify small clearances needed on the transmission casing and on the bell housing. Instead I used a small half-round metal file. It works and the metal is not tough, and the finished job is more professional in my opinion.
- The instructions go into detail about cutting a round hole in the tunnel for the shift tower. Instead I cut a square out of the top of the tunnel, cut the round hole in a cover plate made from thick sheet metal and screwed that down onto the tunnel. It provides additional access for future maintenance. It is very useful to note that the shift tower on the NV 3550 is just rearward of the major cross-member that arches over the inside of the tunnel. Thus no cutting of that cross-member is required, thereby preserving the structural integrity of the floor as well as saw blades. Can’t say this about the NV 4500 or NP 435.
- The new rear transmission support cross-member that replaces the old stock member is very professional appearing with a black wrinkle finish, thoroughly modern compared with the Victorian-appearing stock cross-member, and fits like a glove. A little tapping may be required to get it in place, but it bolts right up to the stock frame holes. This is literally the last thing to go on besides the drive shafts, which you will have cleaned, rebuilt, and painted by this time. Hint: While the CV joints are clean, put a dab of bright orange paint on the CV housing right next to the zerk fittings. This will help you locate them in the future.
- The Dana 20 adapter allows for installation of the transfer case in the stock position or a rotation above the stock position, somewhat like an Atlas transfer case. I don’t think the extra clearance is necessary or worth the additional effort in modification of shifter linkage, so I kept the stock rotation. The clearance between the T-case and the cross-member is tight in the stock rotation. So much so that AA manufactures the cross-member with a small dimple to clear the lower bolt of the front T-case output shaft retainer. I found that the dimple was an inch to the left of where it needed to be. This only required a careful drilling and filing of an elongate hole in the cross-member to gain the necessary clearance.
- The big modification (for me) was the exhaust system. The left pipe goes under the cross-member much like the stock situation. I was even able to hook up my old pipe with plenty of clearance. But the right pipe must go over the cross-member. This is no big problem except that my header collectors end just in front and below the cross-member, so the bend was too abrupt to accommodate with my existing set up. Ultimately I had a new exhaust system installed to make the fit.
- The transmission input shaft should be the right length for the pilot bearing hole depth, but be sure to measure it first. If necessary the tip of the input may need to be slightly cut off.
- A new spud shaft with the NV 3550 spline count is supplied, which is itself a thing of art suitable for framing. The input gear from the Dana 20 is re-installed on this along with the new bearing and bearing retainer. When installing the spud shaft into the retainer, be sure to lubricate the rubber seal very well, otherwise the small coil that supports the lips of the seal will pop out when pressing the assembly together. I used my vise as a proxy for a bench press by being very careful to press in small increments. The snap ring is not easy to remove from the old spud shaft, but I happened to discover that I had the snap ring tool, which is somewhat of an odd one, after spending about an hour trying to remove it with a screwdriver. It took two minutes with the snap ring tool. Get one or get a machine shop to do the removal and install of this snap ring if necessary.
- Use RTV blue for the T-case adapter sealing surfaces. And have a supply of red, green, and blue Loc-Tite and thread sealers on hand for the miscellaneous bolts, including the flywheel bolts. I re-surfaced the flywheel and used new bolts from Mr. Gasket.
- The transfer case linkage bracket is designed for use with the old T-handle. But I opted to convert to the twin stick linkage offered by Wild Horses. It is slick and fits with a little modification to the bracket supplied by Advance Adapters. The T-case shifter comes out of the floor just to the left of the shift tower. The combination of levers coming out of practically the same hole in the floor looks as though it will be too close to work until you actually do it. There is plenty of clearance between the T-case shifter and the transmission shifter. I did cut a second access hole in the side of the tunnel because the twin stick uses a through-bolt that is difficult to install otherwise. A small plate held on with sheet metal screws covered the hole and allows future access.
I made up my own boot for the NV shifter from vinyl and used a flat piece of aluminum (cookie sheet) to make up a trim and hold-down ring for the boot. Since the shifters are close, the best way to do this is to make one integral hold-down ring that wraps around both boots. As always do this in cardboard as a mock-up first. Refer to the finished product in the included pictures to see what I mean. - The NV 3550 has an integral back-up light switch, which is located almost exactly where the old one was on the three speed, so the wires link right up. The plug for the switch on the transmission uses a two-prong arrangement the mate for which can be found in the electrical section on the shelf at a Pep Boys and spliced right on the existing back-up light wiring. This is another of the many small examples illustrating how the whole conversion just comes together like it was designed for the Bronco. Remember, it is the small things that count in any conversion.
- The instructions recommend bolting the transmission and transfer case together before lifting it into place. But I found that it was more manageable to mount the transmission first, then go in with the transfer case. The transfer case weighs about as much as the transmission, but does not fit on the transmission lift easily, so I got my wife to help me lift it up and juggle it into place. Because you should use RTV blue sealer between the two, you must time it right so the RTV is skinned over correctly before the two go together, but the mass is more manageable in two parts.
- I initially had a rather mysterious transmission leak with an unidentifiable source, until I discovered that I forgot to torque down the shift tower bolts. Oil was escaping from beneath the shift tower and seeping down the side of the transmission. I had been driving it with the shift tower bolts finger tight!
- As a finishing touch I cobbled together a purely gratuitous little 5-speed logo to put on the tailgate just below the license plate. I used a two inch wide strip of aluminum, polished it, then laid a self-adhesive vinyl template of the lettering and Bronco logo on it (designed it in my favorite drafting application on my Mac, and transferred the paper print out to the vinyl which I then cut out), spayed the surrounding black, removed the vinyl, shot the whole thing with clear lacquer, and presto, looks like a factory option.
Summary
The installation went off without any real hitches. From the included photographs I believe that you can see the finished product is clean and professional. Throughout the whole process I kept looking for the Big Compromise that would leave me with remorse at having started. By this I mean the sort of thing that results in something that you really did not want, or some clearance that was a deterrent to good maintenance. But I never encountered it. If the tally of small annoyances is any measure of how difficult a big project is, such as searching for two weeks for a fitting, or finding out that you need to buy a really expensive tool, and so on, then the NV 3550 conversion from Advance Adapters gets an “A plus.” I can’t say that about any other projects of this magnitude that I have done in the past.
Tech article by Larry C. (MarsChariot)

Figure 1. Gratuitous shot of my 1971 Sport Bronco getting a cleaning just prior to the transmission surgery.

Figure 2. Comparison of before and after 1 “ body lift necessary for NV 3550 installation. No gapping hole here. Just enough clearance to look like it was meant to be this way.

Figure 3. Left: View of the bell housing assembled with adapter to the front of the NV 3550. Right: View of the inside of the bell housing showing clearance for the transmission shift rail boss. I painted the inside of the bell housing to aid run off of oil and grease.
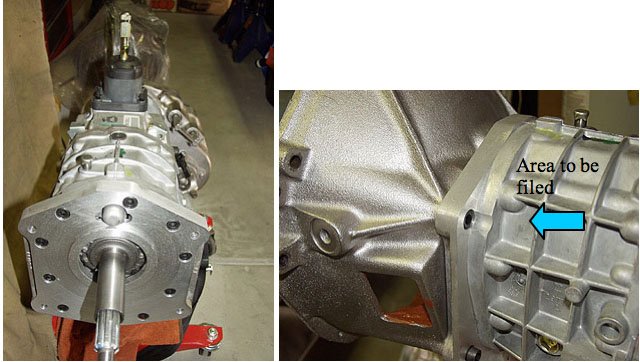
Figure 4. Left: The front of the NV 3550 showing the bell housing adapter installed. Note the Dana 20 attached at rear. Right: View of the bell housing adapter and area on the transmission case that must be ground for bolt clearance. The adapter is so well engineered and designed that you probably cannot really detect it in this photo – it looks like part of the transmission. Note that the transmission attaches to the bell housing with recessed socket head bolts. So make certain that you have a set of socket drivers.

Figure 5. Inside the tail of the NV 3550 showing the splines on the output shaft that are accommodated by the new transfer case input spud shaft.

Figure 6. The Dana 20 adapter plate and input gear assembled to the new bearing retainer and spud shaft.

Figure 7. Interesting look at the 1/4” diameter “needle” bearings in the Dana 20 input. Keep the transfer case on its back like this while removing the old adapter and the needle bearings will stay put.

Figure 8. The Dana 20 assembled with the NV 3550 adapter. Looks like an Atlas transfer case. Note the two adjacent bolt holes in the adapter that allow for clocking the T-case higher than stock if desired.

Figure 9. The assembled NV 3550 and Dana 20. Essentially the same length as the stock transmission and transfer case and only 15 pounds heavier. The absence of the old long, “iron sculpture” adapter housing makes this look like it was originally engineered for the Dana 20 case.

Figure 10. The Centerforce clutch, pressure plate, and release bearing ready for the transmission. Get a dial indicator and check the run-out on the bell housing like the Centerforce instructions recommend. I had to shim the face and the bore to get within factory tolerances despite what everyone says to the contrary. A new bell housing was not the answer. It had the same reading.

Figure 11. The NV 3550 rear support cross-member (outlined in red). Note that the exhaust pipes route above and below the cross-member. The overall assembly is very clean and very professional in appearance, and very massive. But it bolts right up to the existing frame holes

Figure 12. Arrangement of the NV shifter and twin stick transfer case shifters. Left: With the interior out, I opted to install floor insulation to a total of about 3/4”. No more heat or noise from the driveline. Right: A boot sewn up from black vinyl and a polished aluminum trim ring complete the interior. The NV shifter is in first gear in this photo and sits “readily to hand.” Note there is nothing to the left of the tunnel and the NV shifter is smack in the middle of the tunnel where a shifter belongs, not up under the dash! This is the Bronco shifter arrangement that should have been. (The red Bronco script logo was salvaged from my old vinyl floor covering, painted silver, then shot with candle apple, and sewn onto the new carpet.)

Figure 13. View from the driver’s side showing location of twin stick transfer case shifters and position of the NV shifter (in first gear).

Figure 14. Custom logo in Bronco script!
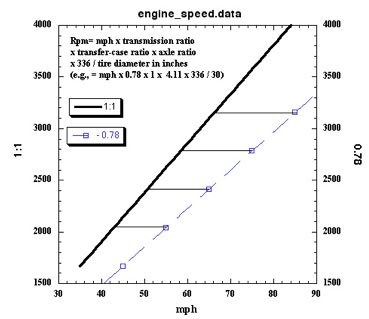
Figure 15. Plot showing rpm in fourth gear (direct 1:1) and fifth gear (0.78:1) at various speeds.
January 28th, 2009 at 3:44 pm
Larry, how many hours (weekends) do you estimate it would take to complete the NV 3550 conversion?
Just a ballpark would help with our planning.
Thanks
February 4th, 2009 at 2:27 pm
I’m currently in the phase of putting parts back on this NV3550 conversion. Given the fact that I had no idea what a ‘spud shaft’ was until recently, the install and the kit are really good. The instructions bite for a newbie like me though – they tell you to do things like ‘remove the pilot bushing and replace it with the one provided’. They fail to tell you (a) where the pilot bushing is and (b) what is involved in removing it. They also fail to tell you how hard it is to remove the flywheel bolts, which happens to be impossible with a regular wrench but my lowly cordless Makita impact wrench had no problems. This leads to lots of delays to google for answers (by the way, I highly recommend the grease and socket method for the pilot bushing!).
All said, I spent two days on the 1″ body lift (largly due to some rear-end damage that the previous owner had hidden). After that, it’s about a day to get the old parts out, a day to reassemble the spud-shaft/tranny/transfer case. I probably have one day left to re-install everything (new flywheel and clutch are already in), provided I don’t find too many other things to fix along the way (replacing header gaskets, cleaning greasy parts, rebuilding drive shafts, etc.). It’s hard not to do more though, since by the time you have the bellhousing and tranny out you want to do as much as you can while you’re down there.
Hope this helps…
May 2nd, 2009 at 7:13 pm
I have a 1975 with 351w planning to install efi with mild rv cam will the nv 3550 trans stand up with this combo
November 11th, 2009 at 11:45 pm
What I would like to know if I could buy my own trans insted of buying the trany from A Adapters? and if I could what year?
Thanks Jose
November 14th, 2009 at 12:05 pm
I guess that I was not aware that the tech section now had a comment section. Sorry I missed answering all those previous posts!
Jose, A lot of people are getting their NV3550s from other sources these days and just getting the adapter kit from AA. But I also gather that there is an alternate clone of NV3550 that is now being offered….but I forgot who is doing that. It’s buried somewhere in the CB forums though, that I know. The J**P Liberty and some Dodges of 2000 vintage used the NV3550. A quick internet search ought to find a bunch of sources.
The question about the strength of the NV3550 comes up repeatedly. There has been a lot of discussion, but the bottom line is that the weight/torque numbers outlined above speak for themselves. Unless your Bronco has gained about twice the weight of a typical Bronco and you are pounding out way more torque, the NV3550 is fine. A 351 is no problem.
February 4th, 2010 at 2:50 am
How does the twin stick tranfer case shifter mount to this assembly?
February 8th, 2010 at 9:23 pm
The twin stick mounts pretty much like the T-stick since it too uses just a single through bolt. You may need to fiddle with the mount supplied with the kit to get it stiff enough
April 4th, 2010 at 3:58 pm
was your original t case shifter handle up near the dash? That is what I have and I just want to know with this kit does it move the shifter back to where your twin sticks are.
April 7th, 2010 at 7:43 am
jnewt6979
The T-case shifter handle on the stock Bronco emerged from the floor at the left rear edge of the transmission hump. When in four-wheel low, the handle could be near the dash, but not near enough to be an issue.
The location of the T-case shifter attachment on the NV 3550 conversion is essentially the same as the stock location. If your T-case handle is far forward, something is very strange. Maybe a previous owner did some sort of re-arrangement of the linkage for some reason. In any case, the NV 3550 assembly should get you back to the stock location.
April 14th, 2010 at 3:26 pm
Great information and a big help in performing the swap. I’m 95% complete with mine now….
I was just wondering if there is a neutral safety switch on the NV3550?
April 14th, 2010 at 9:34 pm
bucko,
No. there is no neutral safety switch. Other than the back-up light switch on the driver’s side, there is no electrical connections of any sort to deal with.
June 18th, 2010 at 11:24 am
Great info, Larry! Are adapters available to set up the NV 3550 behind an inline 200?
June 21st, 2010 at 5:01 pm
It looks like some folks are doing the 200, too. Check out this thread:
http://classicbroncos.com/forums/showthread.php?t=158423&highlight=NV3550
August 28th, 2010 at 1:11 pm
Great read and lots of help. I just had one little question. I put the whole thing together following the advanced adapters instructions and directions above and I am getting ready to do the final installation. There is one thing that Is making me loose sleep. I didn’t put any grease on the bearing and seal in the spud shaft assembly thinking oil would make its way up in there and now feel I made a grave mistake. Do I need to take the whole thing apart? or does oil make its way into the assembly?
August 29th, 2010 at 9:26 am
Well, the grease is mostly for easing it in there as far as I know. And in any case, if lubricant was important and it did not get in there from the general spray of fluids when operating, then it would be dry in a year anyway. In other words, I think you are o.k.
December 26th, 2010 at 4:11 pm
Which twin stick set up did you use?
January 10th, 2011 at 7:20 am
Idaho_Marine , As I recall I used the Wild Horses twin stick.
June 6th, 2011 at 1:23 pm
I have a 1978 Bronco and back many years ago I swapped a 460Ci engine for the original 351M.Not the brightest decision on my part.The Bronco came with a standard 3 Sp Trans,which is still in the operation.I would like to increase the fuel mileage and this 5sp.overdrive trans sounds like a possibe option.I have 3:50 gearing.With all that said,do you think the nv3500 could be a viable swap?
June 6th, 2011 at 2:12 pm
Correction –I have a standard 4sp. trans. w/the granny low 1st.gear
July 16th, 2011 at 1:25 am
Hi. This is my first post here. I have owned Broncos since I was 19. I am thinking about the tranny swap and was wondering what you actually need to buy. I have a C4 now.
Thanks
Ben
July 22nd, 2011 at 8:04 pm
Bump
July 26th, 2011 at 8:34 am
Ben, because this is a tech article it’s not visited as often. You’ll get a better response by posting in the forums.
July 26th, 2011 at 7:37 pm
ben62670,
If you look up there in the tech article I list all the components that are in the complete kit. These would be all the things that you will need eventually. So that represents the “shopping list.”
August 5th, 2011 at 11:39 am
Thanks Larry. Your post was invaluable to me in my swap. I absolutely love this tranny. My np435 was a relic in comparison. Only problem now is wife and kids like driving it. Oh oh!
Nick Koch
August 7th, 2011 at 11:03 pm
Thanks much.
Ben
August 21st, 2012 at 11:24 am
It’s important to note the top hole on the D20 clocking adapter is in-fact the correct hole for stock positioning of the transfer-case. That’s what the AA documentation states, however many users here have posted that the center hole is closer to stock. I originally used the center hole based on these posts and found my front drive-shaft interfered with the Dside header and the driveline angle to be too excessive (when it otherwise worked fine). I had to re-clock back to the first hole in order to lower the TC and regain stock position where everything worked fine. Also note the gasket between the transmission and D20 adapter only has 1 set of clocking holes. So you can’t re-clock without removing the TC and rotating the gasket. It’s best to solve this prior to install so that you can re-clock as needed without removing the TC. I did this by simply adding additional holes to the gasket for all 3 clocking positions.
July 8th, 2013 at 12:21 pm
I have a 67 bronco, with the original 289, and a 3 speed. I want to install a NV3550, and I have one that came with my bronco when i bought it. is the adapter kit as simple for my set up as you state here in your artical?
July 20th, 2013 at 8:14 pm
wheelentime, the 289 will work just like the 302. There are no significant differences as far as the conversion goes. You are good to go.
March 12th, 2014 at 9:00 am
What rpm would I have at 55? Nv3550, 4:65 gears, 35 in tires?
March 20th, 2014 at 5:26 pm
Looks like those gear and tire combinations would put you just under 2000 rpm at 55 mph.