Smittybuilt Front Roll Cage Install
Tech article by admin and filed under - Roll Cage, Interior
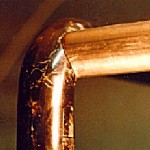
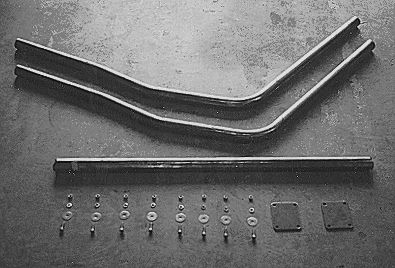
 At the very minimum a total of four cuts must be made to install the Smittybilt front rollcage. Two angled cuts where the side bars meet the floor plates and two “fishmouthed” cuts where the side bars attach to the main roll bar. (The spreader bar comes pre-cut to go between the side bars) The “fishmouth” cuts can be accomplished in a few different ways…a drill press with the right size holesaw would work pretty well, as would a gas torch with a little care. However since I don’t own either one of those tools, I used a hacksaw and a 4″ angle grinder. It sounds pretty inefficient, but it really didn’t take very long to get tight fitting joints.
 Fitting the side bars requires some patience and careful measuring. Smittybilt purposely supplies these bars a few inches long so they can be trimmed to each specific truck. Although most trucks will vary, mine needed ~1/2″ off the bottom of each side bar and ~4″ off where the bars attach to the rear rollbar. The easiest way to accomplish a proper fit is to concentrate on just one side. Take the time to make that bar fit perfectly and then use it as a template when cutting the other side bar. This is especially important with the “fishmouthed” cuts.
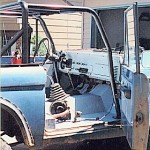
 Before any cuts are made place one side bar roughly in the position it will eventually be in. Rest the leading (lower) edge of the side bar on the floor of the truck so that it has proper clearance from both the door (~1″ on my truck) and the dash (~1/2″ on mine). Then hold the rear of the side bar up near the spot where it will intersect the main roll bar. (on most rollbars this will be right at the radius of the bend) I used a small level taped to the horizontal portion of the side bar (assuming the truck is on a level surface) and moved the rear end of the bar around until it was level.
 Once you’ve determined the side bar is level make note of how much higher the horizontal of the side bar is than the horizontal of the main rollbar. This is approximately the amount you will need to cut off the end that attaches to the floor. However keep in mind that if you’re attaching the side bar to the rear bar in the middle of the radius it will be slightly lower. And if the rear bar is a larger diameter (as mine was) the side bar will be even lower. Also remember that you will have a 1/4″ mounting plate between the side bar and the floor and that your cut will be at a slight angle to match the floor. This can make quite a difference in final placement if you forget it.
 Making the “fishmouth” cuts just takes a careful eye. Try to hold the side bar up against the roll bar near the radius. (One way of finding out where the side bars should intersect the rear bar is to measure the spreader bar. The distance between the side bars should be approximately the same at the front as it is at the rear.) Standing beside the truck in line with the horizontal of the main roll bar, try to sight down the bar while holding up the side bar and mark the shape and size of the fishmouth that will be needed to attach the side bar to the radius. I found it safer to make the bar a little long and grind it down than try to mark it perfectly the first time. If you’re anything like me your vision of the “fishmouth” shape won’t be exactly right anyway and will require some grinding before it fits nicely. If you do accidentally cut the bar too short it simply means the spot where it attaches to the floor will be further away from the dash.
 Once the cuts are made to both side bars and you’re happy with the fit, tack weld the floor mounting plates to the side bars. It works best to have the side bars in place resting (and centered) on the mounting plates before welding. Placing the spreader bar is a little tricky without a second pair of hands but can be done alone if you get creative with duct tape and C-clamps. Once you have the spreader bar in place turn on the windshield wipers to make sure the arm doesn’t hit it. This is a good time to check all other clearances (glove box, e-brake, window cranks, hard top, etc.) It’s a lot easier to fix it now than after final welding. Once you’re satisfied with the fit, make a few tack welds at all the connections. While it’s possible to completely weld up the cage in the truck the chances of you setting your garage on fire are much higher. It seems like a pain but it really is easier at this point to unbolt the main roll bar and lift the whole cage out of the truck. It will be both easier to weld and paint once it’s out of the truck.
 In addition to the basic cage I also decided to install a center roof panel. Basically this consisted of two extra lengths of 2″ tubing that I cut to fit between the spreader bar and the rear bar. I placed them about 11″ apart so that I could put my CB, some speakers and two dome lights up in the cage. These two bars were covered by a 14 gauge sheet metal cap and fully welded to keep the rain away from the electronics. Since I knew I would be needing power up in the cage before I started building it, I drilled holes in the side bars and spreader bars and ran all my power leads and speaker wires inside the cage tubing. The wires enter the tube from the passengers side under the dash and come out up near the CB and speakers. It proved to be much more of a hassle to run the wires internally, but then again nothing about Broncos is easy, right?


