• Just a reminder that you won't be able to start new posts or reply to existings posts in the Archive forum.

    This is where all the old posts go so they can still be used for reference and searched.
  • Welcome to ClassicBroncos! - You are currently viewing the forums as a GUEST. To take advantage of all the site features, please take a moment to register. It's fast, simple and absolutely free. So please join our community today!
    If you have problems registering or can't log into your account, please contact Admin.

69 Build Up Progress F150 axles out Dana 60's going in updated pics 9/25/05

malcolmzilla

Bronco Guru
Joined
Mar 18, 2003
Messages
1,522
Loc.
Calgary, AB, Canada
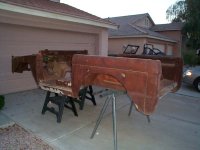
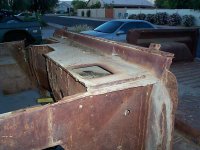
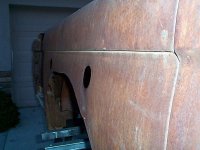
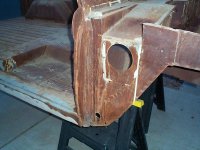
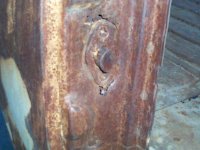
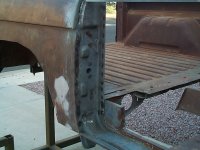
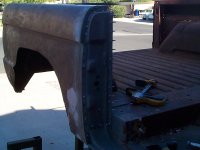
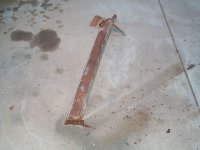
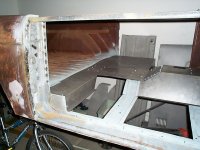
If the upper part to the quarter where it meets the inner fender and bedrail is OK, you can cut off the lip that wraps around the striker post and build a new lip from 18ga and weld it on, get full penetration to prevent corrosion from behind, plan on seam sealer, clean it up carefully with a cutoff and flapper. That is what I did.

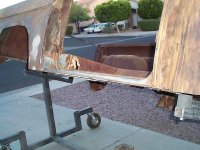
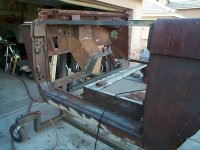
In hindsight, if the quarter is rusty anywhere else just order a new one and weld it in. Don't try to patch it back together with all those radiuses... %)
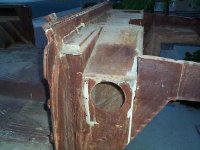
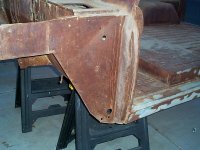
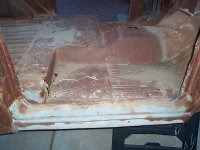
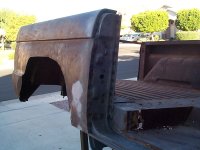
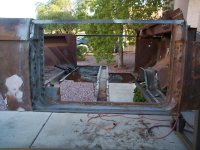
Edt: seeing your quarter panel closeups now just order new ones. :p

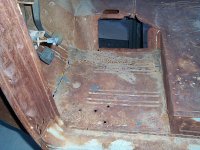
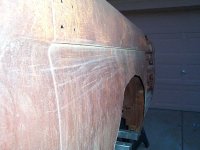
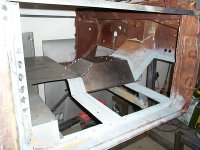
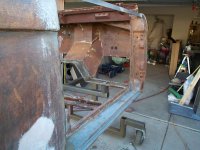
As for the other pinholes / cracks, cut 'em out back to good metal and weld 18ga in, use .023 wire, move fast, a piece of copper behind helps as a heat sink. Again, any curvatures / visible pieces will be hard to fix w/o filler. Lots of body hammering work at any rate. ;D
 
OP
OP
Tgure

Tgure

Bronco Guru
Joined
Jan 2, 2004
Messages
1,152
Loc.
Phoenix
Bronco Wild said:
Your panels look fine...wished I live in AZ! Just keep them and work with them, they will be jus' fine ;)

heh this bronco came from Utah and was a bloody rusty freaking mess. Wish I could of affoarded a bronco from AZ but all the rust free ones bring a pretty penny.
 
OP
OP
Tgure

Tgure

Bronco Guru
Joined
Jan 2, 2004
Messages
1,152
Loc.
Phoenix
Ok new tub is home, Looks ugly as hell as it was sandblasted then sat outside for a couple years to be rained on. However it is in AZ and it only rained twice :p.

Anyway it only needs 4 panels replaced, Drivers side floor pans, passenger floor pans, seat platform and passenger striker post.

Cowl is B-E-A-UTIFULL as is the kick panels, door posts, rear quarters. Should clean up real nice. ;D
 

Attachments

  • DCP01081.JPG
    DCP01081.JPG
    73 KB · Views: 59
  • DCP01082.JPG
    DCP01082.JPG
    68.9 KB · Views: 29
  • DCP01083.JPG
    DCP01083.JPG
    68 KB · Views: 28
  • DCP01084.JPG
    DCP01084.JPG
    101.4 KB · Views: 38
  • DCP01085.JPG
    DCP01085.JPG
    112.3 KB · Views: 37
  • DCP01086.JPG
    DCP01086.JPG
    123.9 KB · Views: 46
  • DCP01092.JPG
    DCP01092.JPG
    92.4 KB · Views: 32
  • DCP01091.JPG
    DCP01091.JPG
    90.7 KB · Views: 33
  • DCP01090.JPG
    DCP01090.JPG
    94.4 KB · Views: 30
  • DCP01089.JPG
    DCP01089.JPG
    105.8 KB · Views: 32
  • DCP01088.JPG
    DCP01088.JPG
    80.5 KB · Views: 29
  • DCP01087.JPG
    DCP01087.JPG
    91 KB · Views: 35
Last edited:
OP
OP
Tgure

Tgure

Bronco Guru
Joined
Jan 2, 2004
Messages
1,152
Loc.
Phoenix
OK made some progress. Cut off passenger rocker, cut out passenger striker post, cleaned up area with marine clean and metal ready, sprayed weldable primer, screwed in post for fit, welded it in and cleaned up welds. This was kind of a pain ;D
 

Attachments

  • DCP01112.JPG
    DCP01112.JPG
    159.6 KB · Views: 50
  • DCP01108.JPG
    DCP01108.JPG
    151.3 KB · Views: 38
  • DCP01104.JPG
    DCP01104.JPG
    125.2 KB · Views: 37
  • DCP01102.JPG
    DCP01102.JPG
    128.2 KB · Views: 35
  • DCP01101.JPG
    DCP01101.JPG
    188.1 KB · Views: 38
  • DCP01100.JPG
    DCP01100.JPG
    187.1 KB · Views: 49
OP
OP
Tgure

Tgure

Bronco Guru
Joined
Jan 2, 2004
Messages
1,152
Loc.
Phoenix
Now for floor boards, tunnel cover and seat platform. Have a bit more to do to finish this up tommorrow. ;D
 

Attachments

  • DCP01119.JPG
    DCP01119.JPG
    164.3 KB · Views: 87
  • DCP01118.JPG
    DCP01118.JPG
    157.1 KB · Views: 87
  • DCP01115.JPG
    DCP01115.JPG
    160.5 KB · Views: 63
  • DCP01114.JPG
    DCP01114.JPG
    167.9 KB · Views: 40
  • DCP01113.JPG
    DCP01113.JPG
    180.1 KB · Views: 61
  • DCP01111.JPG
    DCP01111.JPG
    191.5 KB · Views: 62

crawln68

Bronco Guru
Joined
Oct 8, 2004
Messages
3,045
Look'n good man! This sheet metal work takes a lot of time huh? It's well worth it in the long run though when you can stand back and say "Yeah, I did that". Awesome work! :cool:
 
OP
OP
Tgure

Tgure

Bronco Guru
Joined
Jan 2, 2004
Messages
1,152
Loc.
Phoenix
Passenger floor pan installed. I have to fab a piece to fill the angle at the rear of the passenger pan as it does not come with the seat platform or the 1 piece passenger pan. I should have just bought the complete floor kit as it would have then come with and the floor pans would be in smaller pieces making fitment easier. But I thought I was being smart saving a few bucks. %)
 

Attachments

  • DCP01120.JPG
    DCP01120.JPG
    157.9 KB · Views: 84
  • DCP01121.JPG
    DCP01121.JPG
    161.6 KB · Views: 98

Bronco Wild

Sr. Member
Joined
Jan 20, 2005
Messages
767
Loc.
Nubraska
Ya' always learn after the fact...remember to never look back ;) Looks great dude! Keep em' comin', I need the motivation to get the 77 over to the media blasters after the 4th, then haul some A$$!!!
 
OP
OP
Tgure

Tgure

Bronco Guru
Joined
Jan 2, 2004
Messages
1,152
Loc.
Phoenix
Ok all new sheetmetal welded in. Whew :eek:
 

Attachments

  • DCP01147.JPG
    DCP01147.JPG
    166.7 KB · Views: 97
  • DCP01146.JPG
    DCP01146.JPG
    171.1 KB · Views: 82
  • DCP01145.JPG
    DCP01145.JPG
    169 KB · Views: 91
  • DCP01144.JPG
    DCP01144.JPG
    197.2 KB · Views: 100
  • DCP01148.JPG
    DCP01148.JPG
    164.3 KB · Views: 134

crawln68

Bronco Guru
Joined
Oct 8, 2004
Messages
3,045
Hey...that's looking good. I know what you mean about it being a lot spot welds! So what's next?
 
OP
OP
Tgure

Tgure

Bronco Guru
Joined
Jan 2, 2004
Messages
1,152
Loc.
Phoenix
crawln68 said:
Hey...that's looking good. I know what you mean about it being a lot spot welds! So what's next?

Next I need to cut off the driver side rocker and decide how high to bob the rear. Then I need to weld in motorcycle gas tank bungs for the recessed doors, Trim for flares, Weld up some holes, then time to paint ;D
 

ChappDogg

New Member
Joined
Apr 7, 2005
Messages
40
Loc.
Fargo for now
Looking Good

Tgure,
Great job, your project is taking on life. I'm doing a frame up project myself. Your work is very encouraging. I have a question, when you spot welded did you use a spot welder or your MIG. Some of the work I'll be doing is like yours. I have had to drill out spot welds etc. I was wondering the best way to weld my panels back in? I have a MIG to weld with. If you have input I would welcome it. Anyway nice work keep the pictures coming. Here is my Thread on my project.
http://www.classicbroncos.com/forums/showthread.php?t=67412

ChappDogg
 
OP
OP
Tgure

Tgure

Bronco Guru
Joined
Jan 2, 2004
Messages
1,152
Loc.
Phoenix
ChappDogg said:
Tgure,
Great job, your project is taking on life. I'm doing a frame up project myself. Your work is very encouraging. I have a question, when you spot welded did you use a spot welder or your MIG. Some of the work I'll be doing is like yours. I have had to drill out spot welds etc. I was wondering the best way to weld my panels back in? I have a MIG to weld with. If you have input I would welcome it. Anyway nice work keep the pictures coming. Here is my Thread on my project.
http://www.classicbroncos.com/forums/showthread.php?t=67412

ChappDogg


I used my mig for all the welding. I just went crazy with the sheet metal screws then pulled them out every other one and plug welded. I didn't really spot weld because that would have required me to pre drill the new panels and well I wasn't in the mood for that %)
 

sixtysick

Full Member
Joined
Jul 18, 2005
Messages
301
Loc.
Columbia, MO
Tgure said:
I used my mig for all the welding. I just went crazy with the sheet metal screws then pulled them out every other one and plug welded. I didn't really spot weld because that would have required me to pre drill the new panels and well I wasn't in the mood for that %)

I understand spot welding(having a hole in one sheet and nothing in the other), but how do you plug weld two sheets together with a hole going all the way through? I am new to welding as you might know. I have a 100 amp mig welder.

SS
 
OP
OP
Tgure

Tgure

Bronco Guru
Joined
Jan 2, 2004
Messages
1,152
Loc.
Phoenix
sixtysick said:
I understand spot welding(having a hole in one sheet and nothing in the other), but how do you plug weld two sheets together with a hole going all the way through? I am new to welding as you might know. I have a 100 amp mig welder.

SS


I am no welding expert either. This project is the first time for me. I started out using a piece of copper behind hole and pooled the weld until it filled each hole. The welds do not stick to the copper and it also acts as a heat sink. As I got a steadier hand I was able to do it without the copper and it went a little faster. Every once in a while I wouldn't get the weld to fill the hole so I just flipped it over and welded from the back side as well. Hope that helps. Let me know if you have more questions. ;D
 
OP
OP
Tgure

Tgure

Bronco Guru
Joined
Jan 2, 2004
Messages
1,152
Loc.
Phoenix
Well from the poll I did a couple days ago it was option 2 by a landslide. So I went ahead and cut for the flares real high and installed my locking fuel doors. I used two Honda CBR motorcycle fuel doors and the bungs from the motorcycle gas tanks. ;D

I also filled all holes in the bronco today so tomorrow I will clean those up, marine clean and metal ready the tub in prep for painting.
 

Attachments

  • DCP01230.JPG
    DCP01230.JPG
    130.7 KB · Views: 101
Top