• Welcome to ClassicBroncos! - You are currently viewing the forums as a GUEST. To take advantage of all the site features, please take a moment to register. It's fast, simple and absolutely free. So please join our community today!
    If you have problems registering or can't log into your account, please contact Admin.

'70 LUBR Build

OP
OP
5

5_oh_bronco

Jr. Member
Joined
Nov 10, 2014
Messages
64
Loc.
Grand Junction
One more note: I've started looking for parts to do my power steering conversion. Ideally, I would like to do a 4x4x2 conversion using a power steering box from 76-79 4x4 F150 or 78/79 Bronco. The 4x2 box with the reverse worm gear was easy enough to find. However, the 4x4 box is proving difficult to locate. Anybody out there interesting in selling one of these?
 

kip60

Full Member
Joined
Feb 7, 2015
Messages
238
I hope you have better luck with the exhaust kit than I did. I twisted and banged and took back apart and twisted some more and could never get the ends any higher than about half way. Will probably get to a muffler shop to get final adjustment some day. They did a great job over what I began with though. I am happy with the quality and having it all in one kit. Maybe it's just me. I live about 8 miles from LMC, it's very handy and the people there are very helpful.
 

Attachments

  • 20150330_191919.jpg
    20150330_191919.jpg
    65 KB · Views: 76
  • 20150330_191929.jpg
    20150330_191929.jpg
    63.2 KB · Views: 78
  • muffler pic.jpg
    muffler pic.jpg
    76.2 KB · Views: 88

englewoodcowboy

Lick Creek Restorations
Joined
Jul 25, 2010
Messages
4,200
Wow, just found this thread for the first time and I am very impressed! You sir take the OCD of keeping it Ford to a new level... I wish I had a mill and lathe.. I am really digging your rear disk brakes BIG TIME! If you ever decide to make another set of brackets, I would be interested. I am setting mine up with the rear drums for now as I too was not fond of the caddy setup... The only thing on my bronco that s donated from a chebby is the hydroboost and since it is made by Bendix and virtually the same unit found in Ford trucks I am OK with that..... Keep up the killer work!
 
OP
OP
5

5_oh_bronco

Jr. Member
Joined
Nov 10, 2014
Messages
64
Loc.
Grand Junction
Englewoodcowboy,
Let me know if you ever get serious about the rear disc brake conversion. Shoot me an IM and we could probably work something out. I really wanted to stick with the original 15" rims, so all the clearances are pretty tight. I actually had to remake the main part of the bracket to get a little more clearance.
"The only thing on my bronco that s donated from a chebby is the hydroboost" Yep, that is my situation too! Once you get into some of the accessories like the this, there are a lot of parts/components made by Tier 1 automotive suppliers that cross brand lines, such as axles, transfer cases, etc...
 

langester

Contributor
MASTER OF MADNESS
Joined
Mar 2, 2013
Messages
2,660
I just saw this build thread today. Awesome work! I look forward to seeing more.
 
OP
OP
5

5_oh_bronco

Jr. Member
Joined
Nov 10, 2014
Messages
64
Loc.
Grand Junction
Exhaust is in!

As I mentioned a couple days ago, I had purchased and received the dual exhaust kit from LMC. After inspecting the parts that came out of the box, I was reasonably impressed with what $250 can buy.

Over the weekend and the last couple of mornings, I got the exhaust completely installed. Initially, I had considered reusing the exhaust that was on the truck when I bought it. It was in decent shape, and had glass packs, producing a nice rumble. However, after getting the new exhaust in, I am very pleased that I went with the new kit. It looks sharp, was fairly easy to install, and only required minimal modification (and head scratching).

I wanted to use the original mustang headers and flared portion of the exhaust, as this made it super easy to keep the O2 sensors, and keep them in their original location. On the passenger side, this made for a very tight fit with for the O2 sensor between the frame and the bell housing!

All in all, the kit went in well. The driver's side took me about 3-1/2 hours, as I didn't really know what to expect or what I was doing. The passenger side went a little more smoothly (as I pretended to know what I was doing). The trickiest part of the whole business was getting the completely welded exhaust system snaked back under the frame! Oh for a bigger shop!
 

Attachments

  • Pass_exhaust.jpg
    Pass_exhaust.jpg
    202.5 KB · Views: 75
  • exhaust_2.jpg
    exhaust_2.jpg
    220.3 KB · Views: 78
  • exhaust_1.jpg
    exhaust_1.jpg
    237.2 KB · Views: 86
  • cozy_O2_sensor_location.jpg
    cozy_O2_sensor_location.jpg
    206.4 KB · Views: 78
OP
OP
5

5_oh_bronco

Jr. Member
Joined
Nov 10, 2014
Messages
64
Loc.
Grand Junction
Mike,
After wrestling with the exhaust on my truck, I would say your exhaust looks pretty good! I had the advantage of installing it without the body in place, and I cheated quite a bit by cutting and welding! Nice work!
 
OP
OP
5

5_oh_bronco

Jr. Member
Joined
Nov 10, 2014
Messages
64
Loc.
Grand Junction
Embedded Pictures

By the way, how do all of you expert forum users embed pictures in the text, instead of attaching them, as I do?

One would think that a fellow who can design and fabricate his own T-Case adapter could figure this out! But alas, no.
 

englewoodcowboy

Lick Creek Restorations
Joined
Jul 25, 2010
Messages
4,200
Englewoodcowboy,
Let me know if you ever get serious about the rear disc brake conversion. Shoot me an IM and we could probably work something out. I really wanted to stick with the original 15" rims, so all the clearances are pretty tight. I actually had to remake the main part of the bracket to get a little more clearance.
"The only thing on my bronco that s donated from a chebby is the hydroboost" Yep, that is my situation too! Once you get into some of the accessories like the this, there are a lot of parts/components made by Tier 1 automotive suppliers that cross brand lines, such as axles, transfer cases, etc...

I certainly will, I will tell you I am interested in something... but will determine it more after I get it on the road as far as rear brakes go. The problem I ran into with the wheels is the styles I like that to me are retro but current and not dated (to a time period like the saw blades of the late 80's and early 90's) are limited in size and back space at a 15" add to it the complicated and tight tolerances in the front with ford disks and it only made sense to go a little larger. I was looking at 16's then decided on 17's for a few reasons. I am going to run a larger tire and still want some control in handling and after recently changing my personal truck with 35's from 16" to 17" wheels it was a night a day difference by getting the sidewall down. 17" tires seem to be a little more affordable than 16's in comparable sizes but 15's are by far the cheapest for now... looking to the future knowing manufacturers are going for larger wheels I feel the 17 will be the new 15 in years to come. In the end it should be a as tight and firm as it can be
 

Knuck

Jr. Member
Joined
Aug 3, 2015
Messages
159
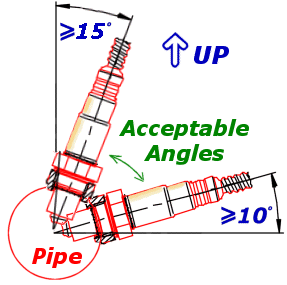
Aren't the O2 sensors supposed to be installed from the top pointing down?

pos10to15.gif
 
OP
OP
5

5_oh_bronco

Jr. Member
Joined
Nov 10, 2014
Messages
64
Loc.
Grand Junction
Aren't the O2 sensors supposed to be installed from the top pointing down?

pos10to15.gif

Knuck,
I think you are correct, but in the mustang from which I took the engine, (and the exhaust to just below the O2 sensors) the sensor were pointed down, just as they are as I've installed them. If they did it that way at the factory, I figured it would work for me. I guess we'll see!
 

Knuck

Jr. Member
Joined
Aug 3, 2015
Messages
159
From what I have read they need to point down so that moisture doesn't condense and accumulate in the sensor after things cool down.
 
OP
OP
5

5_oh_bronco

Jr. Member
Joined
Nov 10, 2014
Messages
64
Loc.
Grand Junction
[/QUOTE]17" tires seem to be a little more affordable than 16's in comparable sizes but 15's are by far the cheapest for now... looking to the future knowing manufacturers are going for larger wheels I feel the 17 will be the new 15 in years to come.[/QUOTE]

Cowboy,
I agree that 17's will be the new 15's in the near future. I have 16 inch rims on my blazer, and I've noticed that 35's and 37's for 16 inch rims are quite a bit more expensive than for either 15 or 17 inch rims.
For my build, I really want to stick with the original 15" steel rims that would have been stock on the bronco, and I intend to put original hubcaps on them. It was a bit of a trick to get the rear disc setup to fit inside a 15" rim, but it does fit. I did have to grind the calipers a little on their outside corner to get it to work tho.
 

Attachments

  • ford_rear_caliper_ground.jpg
    ford_rear_caliper_ground.jpg
    237.5 KB · Views: 61

englewoodcowboy

Lick Creek Restorations
Joined
Jul 25, 2010
Messages
4,200
With your mad skills at fab, I would think you could be real trick and get a set of 17's machined to either take a stock hubcap or better yet get them machined to look like the stock hubcap. Just throwing that idea out there. It would be very unique for sure...
 
OP
OP
5

5_oh_bronco

Jr. Member
Joined
Nov 10, 2014
Messages
64
Loc.
Grand Junction
Power Steering for the Bronco

Thanks to the help of some great folks here at ClassicBroncos.com I was finally able to secure the elusive 76-79 4x4 F150 power steering box that I needed to commence with the power steering conversion!

Finding the power steering box with the requisite reverse worm gear was easy, as there is a long list of vehicles from which it can be pulled. A local wrecking yard had a box from a 1996 F250 for a paltry $65. I was very surprised to discover that only one local wrecking yard had the 4x4 box, and that they wanted $175 + core! It wasn't even rebuilt, it was simply used. I told them I could buy a reman from Napa for $206 + core, and that they could keep their steering box. Nuts!

Yesterday morning I dove into the conversion, and was surprised at how simple the operation really is. I think that if I hadn't been messing around trying to save the pitman arm on the F250 box, I could have had the whole thing done in one morning session in my shop.

For anyone wanting to do this conversion in the future: fret not! It really is a pretty easy task. Six bolts per box, and only two shafts to pull.

You can see in the pictures below how the worm shafts from the two boxes are basically identical. In fact, looking at the picture you would never see the difference. The only difference between the two is the direction of the ball screw shaft, hence the opposite turning direction.

Also, notice the difference in size between the original manual box and the 4x4 F150 PS box! It'll be interesting to see how it will fit with the body in place and no body lift.

Here are a few pictures:
 

Attachments

  • ps_vs_non_ps.jpg
    ps_vs_non_ps.jpg
    214.3 KB · Views: 48
  • worm_and_sector_shaft.jpg
    worm_and_sector_shaft.jpg
    212 KB · Views: 45
  • Two_worms.jpg
    Two_worms.jpg
    200.4 KB · Views: 49

bsquared

Contributor
Sr. Member
Joined
Dec 4, 2010
Messages
961
Also, notice the difference in size between the original manual box and the 4x4 F150 PS box! It'll be interesting to see how it will fit with the body in place and no body lift.

5.0 Bronco, you are planning on welding in some kind of frame reinforcement when you put the power box on, aren't you? I used this one from BCB:
http://www.bcbroncos.com/store/product_info.php?products_id=331

Looks like you definitely have the resources to fab you own. You can see mine outside of the frame in this pic. Great looking build, for sure! B2
 

Attachments

  • Primer3.JPG
    Primer3.JPG
    120.2 KB · Views: 59
OP
OP
5

5_oh_bronco

Jr. Member
Joined
Nov 10, 2014
Messages
64
Loc.
Grand Junction
5.0 Bronco, you are planning on welding in some kind of frame reinforcement when you put the power box on, aren't you?

B2,
Honestly, I hadn't planned on it. I'm building this bronco for my wife, and while it will ride an inch or two above stock, I'm hoping to run a 31 x 9.5 tire (if I can find one I like). So I really haven't had the mindset of reinforcing things for large tires and off-road use.
Do you think the frame will need to be reinforced for running 31's and bumping down the occasional forest road?
 

DirtDonk

Contributor
Bronco Guru
Joined
Nov 3, 2003
Messages
47,645
No, not really. But then again, that 4x4x2 box is overkill for any of those scenarios as well. Even a stock box works well under those circumstances. And the larger bulk of the bigger box can sometimes get in the way of other items you want to mount.
That said, it's still my favorite steering box for an EB. Just not needed for light to medium duty use.

I'm a big fan of thin reinforcement of the area around the box for heavier use, but here again, not a need that I can see in your situation. In fact, in our kits we recommend mounting directly to the frame and moving the box a bit forward anyway, to be sure you can clear the tie-rod.
That's always a good thing to check when doing any kind of conversion anyway. With the limited space available on an EB, things can get close.
If yours is questionable, it's easy to notch the front body mount on the frame to allow you to move the box a little further forward.

Question about your front brakes 5_oh. How hard did you have to hammer the sliders/anchors in to get them to fit? If it was just a little tapping, that's normal and good. If you had to really smack them good to get them to go in at all, you're right to be concerned about the calipers sliding correctly.
Turns out there were at least two, if not three different versions of that particular design, so hardware can sometimes get mixed up at the auto parts store level.
Too tight is still too tight, which might indicate either the wrong hardware or another issue.

Keep it coming!

Paul
 

DirtDonk

Contributor
Bronco Guru
Joined
Nov 3, 2003
Messages
47,645
By the way, how do all of you expert forum users embed pictures in the text, instead of attaching them, as I do?...

How are you doing the attachments? Looks normal from here, but as a contributor you would generally use the "advanced" tab, then click on "upload photos" and use the window that pops up to search your computer for the images that you want to attach.
Is that how you're doing it now?

The other most common method is to use a dedicated online hosting site like SuperMotors or another of the popular ones out there, and adding the direct link to the photos.
I've never done it that way so don't know all the subtle details to make the image appear, rather than just a link to the image.
Lots of members here use that method though, so someone will know.

Paul
 
Top