• Welcome to ClassicBroncos! - You are currently viewing the forums as a GUEST. To take advantage of all the site features, please take a moment to register. It's fast, simple and absolutely free. So please join our community today!
    If you have problems registering or can't log into your account, please contact Admin.

First time Timing Chain cover seal replacement

CA650

Full Member
Joined
Apr 13, 2013
Messages
273
Thanks all for the help on my previous projects.

I’ve been dreading this one and I finally started it this weekend.
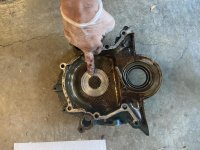
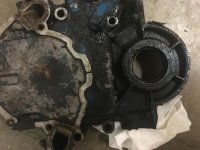
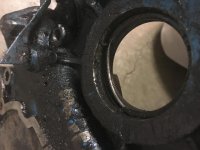
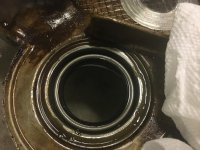
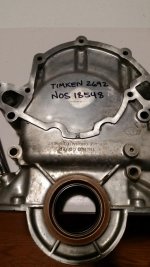
I’m going in to replace the timing chain seal because it leaks a little bit of oil and a little bit of radiator fluid.

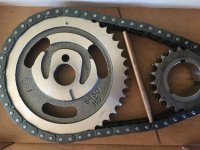
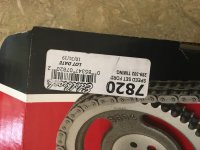
While in there it was recommended to me by others that I replace the timing chain set and so other seals and that I replace the harmonic balancer as well.

So we started:
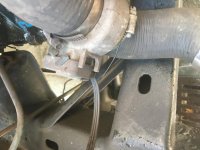
removed the front grill
drained the radiator and pulled it out
removed the belts and fan
unplugged various hoses
pulled the alternator
eased the power steering to the side
disconnected the fuel pump
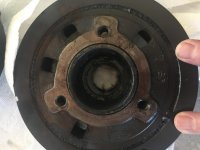
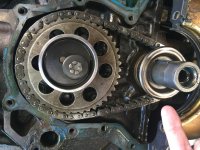
pulled the harmonic balancer
hit my first snag

would like some advice.
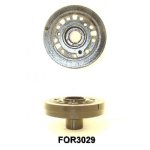
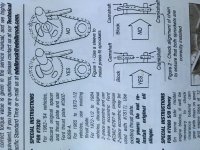
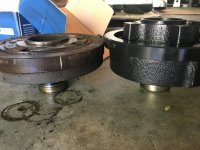
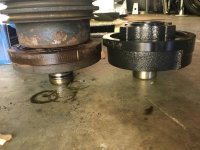
the dampner I took off had a three bolt pulley wheel attached to it, the replacement I bought has a 4 bolt face and is noticeable taller than the one I took off. so something is wrong.

pictures are attached. here are my questions

1) what should I do now?
2) which of these is correct for a 74 ford bronco? I thought I was careful when I ordered the replacement and I wasn’t aware there were 3 or 4 bolt versions and tall and short versions.
3) should I try to re-order a different balancer that is more similar to what i’m taking off or
4) should I try to order a new pulley for the new balancer that is lower profile and has four bolts?

here is a link to a video of what i’m looking at.
https://youtu.be/t9cF8mjlA4U

btw I weighed each of these and the newer 4 bolt one with the raised metal spacer weighs more.. it’s like 10lbs while the one I took off is like 9lbs
yes I think they are both 28oz balancers

ideally i’d like to just go back to mostly stock but i’m not sure what that looks like.

thx
 

Attachments

  • BC767179-D314-442E-B343-000B12233F17.jpg
    BC767179-D314-442E-B343-000B12233F17.jpg
    113.5 KB · Views: 55
  • A346B19F-E631-4401-AA7B-C3BEE10B7390.jpg
    A346B19F-E631-4401-AA7B-C3BEE10B7390.jpg
    110 KB · Views: 48
  • 30D7EF2D-BD0F-4315-9032-64EDE7BF8587.jpg
    30D7EF2D-BD0F-4315-9032-64EDE7BF8587.jpg
    74.8 KB · Views: 45
Last edited:

DirtDonk

Contributor
Bronco Guru
Joined
Nov 3, 2003
Messages
47,916
It's the wrong damper, so you have to return it for the right one they hopefully have.
All EB's were 3-bolt to my knowledge, so you have to go by that application. Sounds like they sent you the wrong one.
Or is your engine originally out of a different vehicle maybe, and that's what you ordered?

Paul
 

1970 Palmer

Full Member
Joined
Mar 2, 2020
Messages
455
I'm needing to do a cam chain/sprocket change myself.

Curious........if your only doing the cam chain replacement, and NOT a cam change.......why would you go to the effort to pull the grill? Even with the grill removed you still have to work around the core support.
 

MarsChariot

Contributor
Planetary Offroader
Joined
Oct 12, 2004
Messages
2,480
Loc.
Albuquerque, New Mexico
Yes, you need the three-bolt dampner. Check the part number stamped on it and it should look like one of these: FOR3029 69-77 3 BOLT #C9OE-D1 D2CE-C1A, D2TE-B-C1A-4A, D2TZ-B. Also, to answer 1970 Palmer's question: No need to remove the grill. Although if you happen to feel like it, I am sure it would open things up a bit. But way more trouble than necessary.
 

Attachments

  • FOR3029-500x500.JPG
    FOR3029-500x500.JPG
    33.1 KB · Views: 19
OP
OP
C

CA650

Full Member
Joined
Apr 13, 2013
Messages
273
Shit, ok thanks for the reply - i’ll order a different balancer

Re/ why did I take the grill off. Yes it was hard to get off.

Next set of questions/problems

here is a video of the timing chain with the cover off. I have a new chain but i’m curious to know if this one looks normal or if this is considered loose?
see video/

https://youtu.be/Ktl6XEJRVZw

is that considered normal?

also - The picture attached is a look at the back of the timing chain cover - i’ve never seen one off before so I don’t know what normal looks like. but it looks like the eccentric cam for the fuel pump has been dragging across the back of the cover? same question, does that look normal?
 

Attachments

  • 48F5F750-7CCB-4383-A5AB-76731AB5640D.jpg
    48F5F750-7CCB-4383-A5AB-76731AB5640D.jpg
    134.9 KB · Views: 77

1970 Palmer

Full Member
Joined
Mar 2, 2020
Messages
455
In order to answer your question, take a look at the front side and retaining parts for the timing gear. The cam likely needs something to control the end play would be my guess.

The cam chain is not the worse that I've seen, but you are inside now, and it only a $25 "piece of mind" thing. My 1966 GT convertible Mustang dumped all of the nylon coated cam teeth in the middle of stop and go freeway traffic.
 
OP
OP
C

CA650

Full Member
Joined
Apr 13, 2013
Messages
273
thx
the front side looks like this.
the ring like gasket at the bottom looks shot and it looks like there is some type of wire that was part of that gasket?

here is a video of both sides of the timing chain cover

https://youtu.be/ya9-K-VAPJ4

i also read in some other forum that this can happen
something about using the wrong cam eccentric or one piece vs two piece cam eccentrics?
maybe some previous owner used either the wrong cover, or the wrong excentric?

https://www.fordmuscleforums.com/threads/eccentric-hitting-cover-help.490747/#post-1530771

for all I know. maybe it’s not rubbing right now but was running in the past during some other botched repair? but the scoring on the inside of that cover looks a little bright to me like it’s recent
 

Attachments

  • EECC74C9-7637-497D-AD5F-FAE6E7065ABC.jpg
    EECC74C9-7637-497D-AD5F-FAE6E7065ABC.jpg
    99.7 KB · Views: 41
  • 137003AC-839E-470C-B540-7817761B3C45.jpg
    137003AC-839E-470C-B540-7817761B3C45.jpg
    77.1 KB · Views: 36
  • 02D5CB85-E2F2-46D8-BBB5-2F56A6D572B9.jpg
    02D5CB85-E2F2-46D8-BBB5-2F56A6D572B9.jpg
    104.1 KB · Views: 37
Last edited:

DirtDonk

Contributor
Bronco Guru
Joined
Nov 3, 2003
Messages
47,916
Yes, that is, or at least was very bad and very careless of the previous installer.
I'm pretty sure that all EB's got the two piece eccentric. I could be wrong, but my reasoning is that only the heavy-duty applications like police cars, ambulances and things like Boss engines got the one piece from memory.
And the one piece version on your cam looks like it was pretty well polished up by the action of touching.

So either the cam retainer is loose, the eccentric is the wrong one, or just as likely the cam gear is the "thick" version and should not have been there.
That's all I know though. Never run into it, but have been warned for 40 years to watch our for a mis-match between the gears and the front cover. Because the result would be precisely what you have.
They say right in the instructions that if you're not sure, then rotate the engine by hand and listen for scraping sounds. Said this in every timing set I've ever had.
Did you get instructions to that effect in yours, or have they tried saving even more money by not including that little one page wonder?

And like Palmer said, yours does not look bad bad. But it's more than justified to change it out "while you're in there" as the saying goes.
In fact, it's a good thing you didn't do the test or you might not have opened it up to find the mess. It might have passed the initial wear test (watching the distributor shaft rotate) but it will be even better now with the new one.

Compare your old gears to the new ones to see if you can detect a height difference when they're laid on a flat surface.
And of course check your camshaft end-play "while you're in there" and all that stuff. Just to be sure.

The good news about the grille is that it won't be near as much of a pain the next time!;D
When I first read that I actually thought you'd pulled the entire front clip off (even though you only said "grille") and I figured that was a lot of work, but it would sure make messing about with the front of the engine so much easier!
Actually, removing the grille alone still makes it easier, just not quite as much.

The spring that you see is there on good seals to keep a modest amount of tension on the shaft to keep it leak free for many years. Should not have broken or popped out, but it's not the first time I've seen that. Perhaps it was installed carelessly and knocked out at that time, or maybe it just broke from age.
Either way, glad you're changing it.

Was there a metal slinger inside that seal, on the end of the crankshaft?

Paul
 

1970 Palmer

Full Member
Joined
Mar 2, 2020
Messages
455
The seal comes with a wire spring around the inside to keep the seal tight against the dampener sleeve.

The front I was referring to was the front side of the sprocket that was rubbing against the inside of the timing cover. Basically, what controls the cam end play? I bet something is meant to rub against the inside of the cover slightly to control the end play. That would explain your rub marks.

How good is the cooling passages that go through the timing cover. Many times they are corroded beyond use and require the timing cover be replaced.

You want to clean everything up and inspect all your parts while your waiting for the correct dampener to arrive.

Curious, what was wrong with the original dampener?
 
OP
OP
C

CA650

Full Member
Joined
Apr 13, 2013
Messages
273
re: what was wrong with the balancer
- nothing - I was told to replace it “while I was in there” because opening this up was a hassle

- the video earlier in this thread shows the front side of the sprocket but it was the eccentric wheel for the fuel pump that has been rubbing I think

I opened it all up because I had a very slight leak of some oil and some coolant up near the spots where the timing cover met the block so I was going to replace the seals in there and paint the timing chain cover etc

re: paul’s questions/comments

- I didn’t know about different type of eccentrics or what kind I have on there. so i’ll need to read up on that. do I have a one piece one on there?
so should i look to change it for a two piece one?

- I did buy a new timing chain set (hopefully the right one) I just haven’t opened the box on it yet but I could do that tomorrow and compare its thickness to what is on there and read any instructions if there are some

- what is a metal “slinger”

- what is the cam retainer?

i’ll look at that timing chain and eccentric more closely tomorrow
and measure the thickness of the timing chain gear on the truck and the new one to see if one is thicker. and i’ll also google around to look at different types of eccentrics to see if I can discover what I have on there now and if I should order something else
 

DirtDonk

Contributor
Bronco Guru
Joined
Nov 3, 2003
Messages
47,916
The front I was referring to was the front side of the sprocket that was rubbing against the inside of the timing cover. Basically, what controls the cam end play? I bet something is meant to rub against the inside of the cover slightly to control the end play. That would explain your rub marks.

No, never on a Windsor. This is not the same as a Chevy, and the cam's natural tendency is to "torque" to the rear under high rpm and loads. Unlike the GM V8's with the rear mounted distributors that push the cam naturally to the front. Hence the development of cam buttons as "bearings" for the end of the cam when it wants to hit the timing cover.
With the Ford, the natural tendency is for the cam to float rearward, so any forward movement would be a bad thing on a large scale.

The cam is retained by a retainer plate with (I think?) two bolts. This is under the cam timing gear and acts as a thrust bearing. The other end would bump up against a gallery plug in the rear end of the block if I remember. Been awhile...
And with the more forward facing component of the cam being the fuel pump eccentric, it's the eccentric that is hitting and "self machining" the front cover.

You can see in the video that the eccentric, which looks like a single piece, also looks like it's leading edge is ground up as well. Could be the light of course, but it looks very much like it was in contact.
So the question for me then, is just why is the gouged out surface of the cover so wide. If it was just the eccentric hitting, it would be a simple thin ring.
So obviously I could be totally wrong on all that! (edit: Duh! Because it's an eccentric!)
 
Last edited:

DirtDonk

Contributor
Bronco Guru
Joined
Nov 3, 2003
Messages
47,916
re: what was wrong with the balancer
- nothing - I was told to replace it “while I was in there” because opening this up was a hassle

Not as bad as some other things, so just in case your old one turns out to be in really good shape, you might be able to justify keeping it and returning the bad one.
Look at the rubber elastomer layer between the hub and outer ring. Is it cracking? Worse still, is it sticking out anywhere?
And the final ultimate test of the elastomer is to find the two tick marks that are usually on the hub and the outer ring and make sure they're still lined up. If they have slipped, the damper is toast.

Look at the machined surface of the shank where the seal rides. If it's just slightly worn or rusty, take some 400 grit sandpaper or Emory/Emery cloth to it and smooth it down to a nice finish without taking any real meat off of it.
If there is a groove where the seal was riding, it needs to be removed. If it's deep you need a new damper or a Speedi-Sleeve/Redi-Sleeve/whatever-sleeve to cover it up.

Last, but definitely not least, you need to verify any new damper has the correct timing marks. You might find one that's exactly the right diameter, depth, has the right number of holes and all that, but it could have been originally slated for a completely different Ford and had the timing marks off by a LOT.
If you find they're off, simply make your own where your existing ones are. That's assuming they were correct in the first place!

I opened it all up because I had a very slight leak of some oil and some coolant up near the spots where the timing cover met the block so I was going to replace the seals in there and paint the timing chain cover etc

Good project. Good to get rid of leaks.
While it's off make sure that the back sealing surface is still flat. And like was mentioned look for excess corrosion in any areas.
If the back surface is not perfectly flat you can often save them by laying a sheet of 400 grit down on a perfectly flat surface (counter top? Piece of metal? Good flat work bench?) and rubbing the cover over the paper until you grind down any high spots.
Very well worth the trouble.

- I didn’t know about different type of eccentrics or what kind I have on there. so i’ll need to read up on that. do I have a one piece one on there?

The two piece is just that. One smaller inner puck with a slightly larger outer puck riding on the outside surface of the inner one.
Slightly less friction resistance and supposedly quieter operation than the one-piece style.
One piece is just that. Nothing slipping around the outer surface. The whole puck is solidly bolted to the end of the cam and gear.

so should i look to change it for a two piece one?

Nah, not as long as this one fits. See if you have a part number you can see on it to make sure it's the right one for a 302. Just in case there were different ones. I don't think there were, but it would not be out of character for them to have all been different!
Just make sure it's not still hitting the cover. Maybe take it down a few thousandths on that same flat piece of sandpaper? At least smooth down any rough edges left by the rubbing on aluminum. If there are any?

- I did buy a new timing chain set (hopefully the right one) I just haven’t opened the box on it yet but I could do that tomorrow and compare its thickness to what is on there and read any instructions if there are some

Doesn't hurt to know. Might as well.
And you could even do a quick test of your free-play in the old one and then compare it to the new one when it's installed. Just as a reference.
I had to go back into mine after having installed a new timing set just 25k miles before. Changed it out for a new one just because I was in there and I never wanted to do it again!
Same reason I changed out a perfectly good throwout bearing when I had to remove the transmission. Because I did not want to do it again sooner rather than later!

- what is a metal “slinger”

It's a thin metal slightly dished disc that slips over the crank snout before the cover goes on. The crank damper then sandwiches it between the end of the damper and the crank gear. This slinger then sits right behind the oil seal and keeps much of the direct splash oil off the back.
Slingers basically are there to help give the seals a fighting chance at not leaking by keeping the volume of oil that reaches them to a minimum.
It's not "critical" that it's there, but I think it plays a pretty important role in the life of an engine.

- what is the cam retainer?

Small plate about 3/16" thick that you'll see when you pull the timing gear off. It's bolted to the engine block and simply is there to keep the cam inside the engine. It's also a "thrust washer" surface so the cam end has something that's carefully machined to ride on.

i’ll look at that timing chain and eccentric more closely tomorrow
and measure the thickness of the timing chain gear on the truck and the new one to see if one is thicker. and i’ll also google around to look at different types of eccentrics to see if I can discover what I have on there now and if I should order something else

It's always good to know what you have and whether you need to get rid of it or not. Pretty sure at this point though your eccentric is not a big issue. But the cam gear can be, so well worth checking out and making sure that the surfaces behind it are in good shape and that the proper one goes back in it's place. Don't want the same result to be wear and tear on the cover.

Hopefully if anyone sees anything wrong with what I said they will correct me. I don't want to be steering you wrong with anything, but most of that stuff if fairly clear in memory. I just don't have a reference book for it in front of me to guarantee it's accuracy!
Pretty sure I'm steering you straight so far though.

Paul
 

B RON CO

Contributor
Bronco Guru
Joined
Jun 29, 2016
Messages
2,420
Loc.
Statesville, NC
Hi, I read the info and will add a few things. That cam gear is not original. I believe the stock eccentric is the two piece. Someone replaced the original parts with high performance parts.
The two piece eccentric might not fit the performance sprocket, and the one piece eccentric might not fit the stock type sprocket.
You need to rotate the crankshaft until the timing marks on the sprockets line up dot to dot.
We can't see the crank sprocket because the slinger is still there but if you have a high performance sprocket with adjustable degree slots you will have to replace it with the same type, on the same degree setting as it is now (and hope the cam was set up properly to begin with).
I personally would keep the original balancer.
Good luck
 
OP
OP
C

CA650

Full Member
Joined
Apr 13, 2013
Messages
273
thanks all
i’ll look at it all more closely now that the sun is up.

B Ron when you say “we can’t see the crank sprocket because the slinger is still there”
did you mean we can’t see it because the eccentric is still there? from the description paul gave above about what is a slinger it seems to be a part we would not see unless I removed the sprocket and some holding plate behind the sprocket

B Ron - why would you recommend keeping the balancer as is? cost or just eliminating problems with sourcing the wrong part? I don’t really care one way or the other as long as it all works and I don’t have to go back in here too soon.

——-

paul, I assume the reason that the back of the cover is so widely “machined down” is because the eccentric is “eccentric” it’s orbit is not a perfect circle so the design it cut on the back of the cover looks perfectly normal to me (normal for this problem i guess) and similar to what I saw in that old link I posted above where I found other people having the same problem.

i’m tempted to leave the timing chain alone and mill a few mm off the eccentric and replace the seals and close the patient back up. I have a fear of taking the timing chain off and somehow not lining up the new one. i’m googling videos of advice similar to what you guys are typing here about lining up different marks in the gears or the balancers and getting them wrong or something.

Thanks Mike
 

B RON CO

Contributor
Bronco Guru
Joined
Jun 29, 2016
Messages
2,420
Loc.
Statesville, NC
Hi, the slinger is on the crankshaft, covering the lower sprocket. It keeps oil away from the seal. The slinger will just slip off right now. Note the large end goes out, towards the cover.
Many performance timing chain sets have a special crank sprocket to adjust the cam timing.
I mostly reuse parts like the harmonic balancer unless there is a problem with it. I just change the worn out stuff.
Paul is talking about the cam retainer plate, under the eccentric, which you won't touch if you are just doing a chain set.
Good luck
 
OP
OP
C

CA650

Full Member
Joined
Apr 13, 2013
Messages
273
thanks a lot I wouldn’t want to try a project like this without this forum

for future readers of this thread: here is a video link to a guy going through the timing chain swap. his is not like mine because he does not use his mechanical fuel pump and he goes with a double chain setup but around 7 minutes in you can clearly see his (unused) fuel pump eccentric. and it has a double ring there so i assume that means it is a two piece eccentric as paul talks about in this thread

https://youtu.be/RtPKo_bakxs

his new set has two chains and somehow still fits under the chain cover. Note that he is wrong about the number of bolts that come up from the oil pan into the timing chain cover. there are only 4 bolts not 6 that need to be removed there


btw: I found something else unusual while I was taking the radiator out
there is some kind of heating coil installed that was spliced into the lower radiator hose.

picture attached
it has a 3 prong wall socket plug on it. the cord was wrapped up neatly behind the battery and I never noticed it before. looks like it was there to let the previous owner plug it in and heat the coolant for cold starts in the winter? anyway I assume this is not stock right?

I don’t plan to use that ever so I was thinking of just ordering a new lower radiator hose
and throwing this part out?
 

Attachments

  • 7E0888A7-0B7B-4DBD-9427-7CFEB08ED6D6.jpg
    7E0888A7-0B7B-4DBD-9427-7CFEB08ED6D6.jpg
    88 KB · Views: 27
Last edited:
OP
OP
C

CA650

Full Member
Joined
Apr 13, 2013
Messages
273
ok I woke up and went and looked at the new timing chain I bought and it looks
like I hosed you that order too.

RE the chain set
the new one is a double chain. I thought I was so
careful when I ordered to get something right for this year, make engine and still I think I hosed it up. Now that I read about the 7820 it says this in the Notes: Fits engines originally equipped with one-piece fuel pump eccentric.

here is a photo of the new chain the sprocket portion looks wider for sure than the one that is in there since it has two chains.

it does have instructions which I’ll read now but I assume this is the wrong one for my application?


RE the Balancer
also here is a closeup if the balancer I took off. it looks old to me. can you see where I am pointing my fingers, are those notches the things you said were supposed to line up?

so based on where I am at right now does does this sound like the right path forward??
1) i’ll order a new 3 hole balancer 28oz and i’ll get a new pills for that and new bolts since the old one had a wobble anyway

2) I will re-order the timing chain and get one that is designed for a two piece eccentric
I assume it will have a single chain? I may call edlebrock in the am on monday to double check and get some advice.
 

Attachments

  • D92A68BF-2863-4B4D-B5A6-02DA0E62F3D3.jpg
    D92A68BF-2863-4B4D-B5A6-02DA0E62F3D3.jpg
    78.2 KB · Views: 18
  • D756DD0C-5497-45F2-95A2-12EA417274BF.jpg
    D756DD0C-5497-45F2-95A2-12EA417274BF.jpg
    102.7 KB · Views: 15
  • A11CE106-6C89-4937-AB9E-8A73ED4AA2C2.jpg
    A11CE106-6C89-4937-AB9E-8A73ED4AA2C2.jpg
    83.2 KB · Views: 13
Last edited:
OP
OP
C

CA650

Full Member
Joined
Apr 13, 2013
Messages
273
the instructions for the 7820 the instructions seem to imply I
could get this timing chain to work.

I have a 1974 vehicle
it says use a one piece eccentric and do not install the original oil slinger??
 

Attachments

  • 472901DA-56D2-4678-9924-ECCECF713919.jpg
    472901DA-56D2-4678-9924-ECCECF713919.jpg
    143.6 KB · Views: 11

gr8scott

Contributor
Bronco Guru
Joined
Jul 1, 2011
Messages
1,847
Tried posting this last night, kept getting "Forbidden". Anyways,

Looks like that one piece eccentric was installed on a cam sprocket meant for a two piece eccentric. I run this double roller with a one piece eccentric
and never had an issue of it contacting the timing cover. You'll be fine with that timing set and the 1 piece eccentric.
https://www.summitracing.com/parts/edl-7820

Also, don't use the seal that comes with the timing cover gasket set. These are much easier to install:
https://www.summitracing.com/parts/tmk-2692
https://www.napaonline.com/en/p/NOS18548?keywordInput=18548

Here's the Timken installed in my cover.
 

Attachments

  • 20200625_195124.jpg
    20200625_195124.jpg
    71.7 KB · Views: 30
OP
OP
C

CA650

Full Member
Joined
Apr 13, 2013
Messages
273
oh excellent!
I am going to order that now

thanks

BTW I am looking more closely at the gear attached to the crank on the engine and I can’t see the dot on the lower sprocket because of this flange ? to be clear this flange I am pointing at is not the slinger thing right?

I am going to rotate this top sprocket until it’s dot is pointing straight down like i have seen in the videos and then remove the eccentric and try to remove both sprockets.
 

Attachments

  • 31C959AB-78C3-443B-89FB-BE709399CBA3.jpg
    31C959AB-78C3-443B-89FB-BE709399CBA3.jpg
    148.7 KB · Views: 28
Top